
American-style placemat with a fruit theme - Pattern

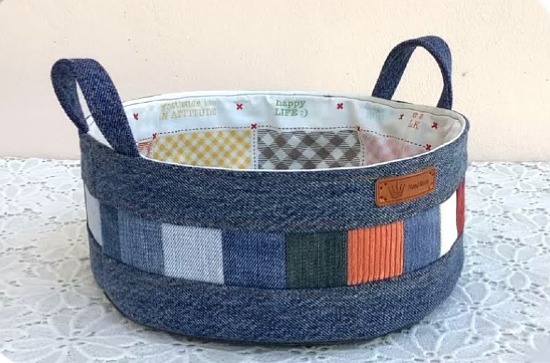
A Fabric tray made using old jeans – Pattern is an exceptional way to combine eco-friendly sustainability with practical home organization, transforming discarded denim into a stylish and sturdy accessory. We all have that one pair of jeans—too worn out to wear, but too sentimental to throw away—and this project gives those fibers a second life as a functional piece of art. Whether you need a place to store your keys, organize your sewing notions, or hold your jewelry on a nightstand, this denim-based tray offers a rugged yet sophisticated aesthetic that fits perfectly into any modern or rustic interior.
The beauty of a Fabric tray made using old jeans – Pattern lies in the inherent durability of the material, as denim is a heavyweight twill cotton designed to withstand significant wear and tear. Unlike lighter fabrics that require extensive stiffening, old jeans provide a natural structure that, when combined with the right interfacing, creates a rigid and reliable container. This project is a fantastic entry point into the world of upcycling, allowing you to practice your sewing skills while contributing to a circular economy by reducing textile waste in a creative and rewarding way.
In this detailed guide, we will explore the step-by-step process of executing a Fabric tray made using old jeans – Pattern, ensuring you achieve professional results even if you are relatively new to sewing with heavy fabrics. We will cover everything from deconstructing the original garment to mastering the box-corner technique that gives the tray its three-dimensional shape. By focusing on humanized instructions and high-quality construction methods, this article will empower you to create a variety of denim organizers that are as beautiful as they are useful, turning “trash” into a cherished household treasure.
The first stage of the Fabric tray made using old jeans – Pattern involves selecting the right part of the garment to maximize both strength and visual interest. Denim comes in various weights and washes; for a tray, a non-stretch, 100% cotton denim is the gold standard. Look for areas on the legs or back of the jeans that are relatively flat and free of heavy distressing, unless you specifically want a frayed, rustic look. Using the back pockets as a decorative feature on the bottom of the tray is a clever way to highlight the upcycled nature of the project.
Before you begin cutting your Fabric tray made using old jeans – Pattern, you must properly wash and press the denim. Old jeans can hold onto oils and dust, and a fresh launder will “bloom” the fibers, making them easier to sew. Since denim is notorious for fraying, a light application of fabric starch can help stabilize the edges during the cutting process. Once the fabric is dry, use a hot steam iron to flatten any permanent creases, ensuring your starting pieces are perfectly smooth for accurate measurements.
To provide the necessary rigidity for the Fabric tray made using old jeans – Pattern, you will need a heavy-duty fusible interfacing or a stiff stabilizer like Peltex. Denim is strong, but without internal support, the walls of your tray may collapse under the weight of its contents. Choosing a “firm” or “extra-firm” stabilizer ensures that the tray maintains its geometric shape over time. This internal skeleton is what separates a floppy fabric bag from a professional-looking denim valet tray.
Because you are sewing through multiple layers of thick fabric, your choice of sewing machine needles is critical. A standard universal needle will likely break or skip stitches when hitting the seams of the jeans. Instead, use a specialized “Denim” or “Jeans” needle (size 90/14 or 100/16), which has a reinforced shaft and a sharp point designed to pierce through dense weaves. This simple tool upgrade will make the construction of your Fabric tray made using old jeans – Pattern much smoother and prevent mechanical frustration.
In addition to the denim, you will need a coordinating lining fabric. While you could use more denim, using a vibrant cotton print or a soft flannel adds a delightful “pop” of color to the interior of the tray. This contrast highlights the craftsmanship of the fabric tray pattern and allows you to personalize the item to match your room’s decor. Using a lighter color for the lining also makes it easier to find small items, like earrings or pins, that you might store inside the finished tray.
Finally, gather your basic sewing notions, including a sharp rotary cutter, an acrylic ruler, and heavy-duty thread. For a professional look, you might want to use topstitching thread in a contrasting gold or orange, mimicking the original aesthetic of classic jeans. This attention to detail honors the history of the material while providing the structural strength needed to hold the corners of the Fabric tray made using old jeans – Pattern together through daily use and movement.
Precision is the most important factor when cutting the pieces for your Fabric tray made using old jeans – Pattern. Typically, you will need to cut two identical squares or rectangles: one from the outer denim and one from the lining fabric. A common size for a medium valet tray is a 10-inch square, which results in a finished tray roughly 7 inches wide with 1.5-inch tall walls. Using a cutting mat ensures that your corners are perfectly 90 degrees, which is vital for the symmetry of the final box shape.
Once your denim square is cut, you must prepare the stiffener. In this Fabric tray made using old jeans – Pattern, the stabilizer should be cut slightly smaller (usually 1/2 inch smaller) than the fabric squares. This reduces the bulk in your seam allowances, making it much easier for your sewing machine to handle the corners. Centering the interfacing on the wrong side of the denim and fusing it with a hot iron creates a crisp, laminated piece of fabric that feels more like leather than cloth.
The next step in the Fabric tray made using old jeans – Pattern is the preparation of the “box corners.” To create walls, you will need to cut a small square out of each of the four corners of your fabric. If you want 2-inch tall walls, you would cut a 2-inch square from each corner. This creates a “plus-sign” shape. This geometric trick is the standard way to transition from a flat piece of fabric into a 3D container, and it is a fundamental skill in bag-making and home organization projects.
If you are incorporating a pocket or a label from the original garment into your Fabric tray made using old jeans – Pattern, now is the time to position it. Centering a small watch pocket in the middle of the tray’s interior adds a functional “tray-within-a-tray” for tiny items like SIM cards or rings. Secure these elements with a basting stitch before you begin the main assembly. This ensures that the decorative elements don’t shift during the final phases of the sewing project.
Consistency in your seam allowance is vital during this stage. Most patterns for a Fabric tray made using old jeans – Pattern use a 1/4-inch or 3/8-inch seam. Because denim is thick, a slightly larger seam allowance can be more forgiving. Use a piece of masking tape on your sewing machine’s throat plate to act as a guide. This helps you maintain straight lines, ensuring that your denim tray doesn’t end up lopsided or wonky when it is finally turned right-side out.
Before moving to the assembly, take a moment to “clip your corners.” This involves cutting a small diagonal notch into the inner corners of the plus-sign shape. In the Fabric tray made using old jeans – Pattern, clipping the corners allows the fabric to “relax” and prevents bunching at the points where the walls meet the base. It is a small professional detail that significantly improves the structural integrity and aesthetic sharpness of your finished upcycled organizer.
The assembly of the Fabric tray made using old jeans – Pattern begins by sewing the four corner cut-outs together. You will fold the fabric so that the edges of the corner “notches” meet, right sides together, and sew from the bottom to the top. Repeating this for all four corners creates the “bucket” shape of the tray. It is helpful to use wonder clips instead of pins, as denim and interfacing can be too thick for traditional pins to penetrate without bending.
Repeat the same corner-sewing process for the lining fabric of your Fabric tray made using old jeans – Pattern. When you are finished, you should have two “buckets”: one made of denim and one made of your lining material. The lining bucket should be a tiny bit smaller than the denim one to ensure a snug fit. You can achieve this by sewing with a slightly larger seam allowance on the lining, which prevents the interior fabric from bunching up or wrinkling inside the tray.
Now comes the “bagging out” phase of the Fabric tray made using old jeans – Pattern. Place the denim tray inside the lining tray, ensuring that the right sides of the fabric are touching (the “pretty” sides should be facing each other). Align the top edges and the corner seams perfectly. Pin or clip around the entire top perimeter. This is the moment where the fabric tray starts to look like a finished product, and keeping the seams aligned here is crucial for a professional look.
Sew around the top edge of your Fabric tray made using old jeans – Pattern, but—and this is the most important part—leave a 3-inch gap on one of the sides. This gap is used for “turning” the tray. Because denim is stiff, you will need a decent-sized opening to pull the fabric through. Backstitch at the beginning and end of this gap to ensure the stitches don’t unravel when you start the somewhat forceful process of turning the heavyweight denim.
Carefully reach through the gap and pull the denim and lining through, turning the Fabric tray made using old jeans – Pattern right-side out. This part can be a bit like a wrestling match with the fabric! Once turned, use a point turner or a blunt chopstick to push out the corners and ensure the walls are straight. You will now see your beautiful lining on the inside and the rugged denim on the outside, with the raw seams hidden safely in between.
The final step of the main assembly is the “topstitch.” First, tuck the raw edges of your 3-inch gap inside and press the entire top edge of the Fabric tray made using old jeans – Pattern with a hot iron. Then, sew a continuous line of stitching about 1/8 inch from the top edge. This not only closes the turning gap but also gives the tray a crisp, finished edge and helps the walls stand up straight. This decorative topstitching is where your choice of contrasting thread really pays off.
One of the best parts of the Fabric tray made using old jeans – Pattern is the ability to customize the finish. If you want a more “industrial” look, you can add metal rivets to the corners. Using a rivet setter and a hammer, you can punch through the four corners where the walls meet. This not only reinforces the structure but also adds a professional, high-end touch that mimics the hardware found on original denim jeans.
If the walls of your Fabric tray made using old jeans – Pattern feel a little soft, you can add “pin-tucks” to the corners. This involves folding the outer corner edge and sewing a very narrow line (about 1/16 inch) from top to bottom on the outside of the tray. This creates a “rib” that acts like a pillar, giving the tray incredible vertical stability. This technique is especially useful if you are making a larger tray to hold heavier items like tools or books.
For a unique aesthetic, you can experiment with distressing the denim after the tray is finished. Using a piece of sandpaper or a wire brush, you can lightly scuff the edges of your Fabric tray made using old jeans – Pattern to reveal the white weft threads of the fabric. This gives the tray a “shabby chic” or vintage look that highlights its history as a pair of well-loved pants. Just be careful not to sand through the structural stitches!
Maintenance of your Fabric tray made using old jeans – Pattern is remarkably simple. Since it is made of denim and cotton, it is technically washable. However, because of the internal interfacing, we recommend spot-cleaning with a damp cloth and mild detergent. If it becomes very dusty, you can use a lint roller. If the tray loses its shape after a long period of use, a quick hit with a steam iron will usually reactivate the interfacing and make it stand tall once again.
You can also adapt the Fabric tray made using old jeans – Pattern into different shapes. Instead of a square, try an elongated rectangle for a “catch-all” tray that fits perfectly on a narrow hallway table. You can even sew two small denim handles onto the sides to turn the tray into a miniature basket. The versatility of denim upcycling means that no two trays will ever look exactly the same, making each one a unique gift or a personalized home accessory.
Ultimately, the Fabric tray made using old jeans – Pattern is a project that rewards creativity and attention to detail. It teaches you how to handle thick fabrics, how to work with stabilizers, and the importance of upcycling in modern craft. Every time you drop your keys into the tray, you’ll be reminded of the satisfaction that comes from making something beautiful and useful with your own two hands, all while keeping a pair of jeans out of the landfill.
1. Can I make this Fabric tray made using old jeans – Pattern without a sewing machine?
Yes, you can! While a machine is faster and provides more consistent stitches for heavy denim, you can hand-sew this project using a “backstitch” for strength. You will need a very sharp needle and perhaps a thimble to help push through the layers of denim and interfacing.
2. What if my denim has a lot of spandex (stretch)?
Stretch denim can be a bit trickier for a Fabric tray made using old jeans – Pattern because it wants to pull out of shape. To fix this, use a woven (non-stretch) interfacing on the back of the denim. This will “lock” the fibers in place and prevent the tray from becoming distorted during the sewing process.
3. How do I sew over the thick seams where the jeans’ flat-felled seams are?
When your machine reaches a very thick spot, “hand-wheel” the needle through the fabric. This means turning the wheel on the side of your machine by hand instead of using the foot pedal. It gives you more control and prevents the needle from snapping on the heavy denim layers.
4. Can I use this pattern for other fabrics?
Absolutely! The Fabric tray made using old jeans – Pattern works beautifully with canvas, upholstery fabric, or even heavy felt. The key is always the interfacing; as long as you have a stiff interior, you can use almost any fabric to create a functional and stylish storage tray.
5. My tray walls are flopping outward. What did I do wrong?
This usually happens if the interfacing isn’t stiff enough or if the topstitching isn’t tight enough. Try adding a second row of topstitching or sewing the “pin-tucks” mentioned in the customization section. This will reinforce the “hinges” of the walls and help them stand upright.
6. Is this project safe for beginners?
This is a great “intermediate-beginner” project. The straight lines are easy, but managing the thickness of the old jeans requires some care. It’s a fantastic way to learn about fabric manipulation and the importance of using the correct sewing machine needles for different materials.
Creating a Fabric tray made using old jeans – Pattern is a deeply satisfying project that blends the art of sewing with the ethics of sustainability. Throughout this article, we’ve learned how to select and stabilize heavyweight denim, the geometric secrets of box corners, and the professional finishing techniques like topstitching and riveting. This tray is more than just an organizer; it is a testament to the fact that with a little creativity, we can transform the most mundane items into something extraordinary.
By following this upcycling guide, you have mastered the skills necessary to work with thick materials and internal structures. The result is a durable, stylish, and highly functional denim accessory that serves as a constant reminder of your craftsmanship. Whether you are organizing your own home or gifting a set to a friend, these trays are sure to be a hit due to their unique history and rugged charm.


