
American-style placemat with a fruit theme - Pattern

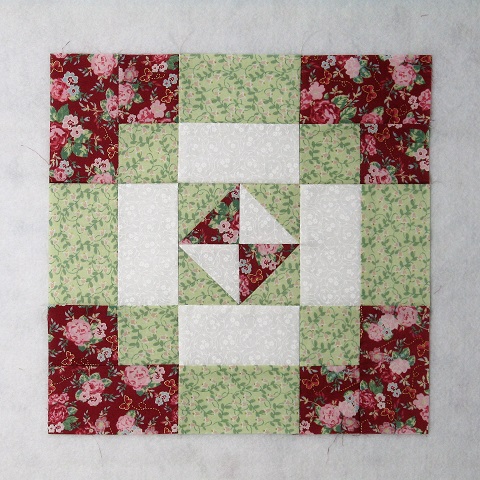
Learning how to master the Fair and Square Quilt Block Tutorial – Pattern is an exciting milestone for any quilter, as this specific design combines geometric precision with a timeless aesthetic that fits into almost any home decor style. The beauty of this pattern lies in its balanced proportions and the way it utilizes simple squares and rectangles to create a complex visual impact. Whether you are aiming to create a cozy heritage quilt or a modern wall hanging, understanding the foundational steps of the Fair and Square Quilt Block Tutorial – Pattern ensures that your final project will look professional and structurally sound.
In the world of textile arts, the Fair and Square Quilt Block Tutorial – Pattern stands out because it allows for immense creativity through fabric selection and color placement. By playing with high-contrast colors or subtle tonal shifts, you can completely transform the mood of the quilt block. This versatility makes it a favorite among both beginners who are just learning to sew straight seams and experienced quilters who want a reliable, “go-to” design that works well for scrap busting or planned color palettes.
This comprehensive guide is designed to take you through every nuance of the Fair and Square Quilt Block Tutorial – Pattern, ensuring you have the confidence to tackle your next sewing project with ease. We will discuss the best materials to use, the technical execution of the seams, and how to troubleshoot common issues like mismatched corners or “wavy” edges. By the end of this article, you will see why the Fair and Square Quilt Block Tutorial – Pattern remains a staple in the quilting community and how you can put your own unique spin on this classic layout.
The success of your Fair and Square Quilt Block Tutorial – Pattern begins long before you touch the sewing machine, starting instead with the careful selection of your materials. Choosing high-quality quilting cotton is essential because it has a tight weave and minimal stretch, which helps the block maintain its “square” shape during the sewing process. If you use fabrics with different weights, you might find that the Fair and Square Quilt Block Tutorial – Pattern becomes distorted or difficult to press flat.
Color theory plays a massive role in the visual success of the Fair and Square Quilt Block Tutorial – Pattern. You generally want to select a focus fabric that draws the eye, surrounded by “framing” fabrics that provide contrast. Using a mix of solids and small-scale prints can give the block depth without making it look too busy. Always remember to pre-wash your fabrics if you are worried about color bleeding, especially when mixing dark blues or reds with crisp whites.
Your cutting tools are the next critical component for a perfect Fair and Square Quilt Block Tutorial – Pattern. A sharp rotary cutter, a self-healing mat, and an acrylic quilting ruler are non-negotiable for achieving the precise measurements this pattern requires. If your initial squares are even slightly off, the error will compound as you sew the rows together, leading to a block that won’t lay flat. Precision in the cutting phase is the “secret sauce” of professional quilting.
Organization is also key when working on the Fair and Square Quilt Block Tutorial – Pattern, especially if you are making multiple blocks at once. I recommend using design boards or small trays to keep your cut pieces laid out in the correct orientation. Since the Fair and Square Quilt Block Tutorial – Pattern relies on a specific sequence of squares, it is very easy to accidentally flip a piece and sew it in the wrong direction, which can be frustrating to fix later.
Don’t forget the importance of your thread selection and needle type. A 50-weight cotton thread is usually the best choice for the Fair and Square Quilt Block Tutorial – Pattern because it is strong but thin enough to not add bulk to the seams. Pair this with a fresh universal or microtex needle in your sewing machine to ensure clean, skipped-stitch-free seams. A dull needle can “punch” the fabric rather than piercing it, causing the delicate cotton fibers to pucker.
Lastly, make sure your ironing station is ready beside your sewing area. The Fair and Square Quilt Block Tutorial – Pattern requires frequent pressing—not just ironing—to set the seams. Pressing involves lifting the iron and placing it down firmly, whereas ironing involves a sliding motion that can stretch the fabric out of shape. Having a good steam iron and a flat pressing surface will make the assembly process much more enjoyable and successful.
The first technical hurdle in the Fair and Square Quilt Block Tutorial – Pattern is achieving a perfect quarter-inch seam allowance. Most quilting designs, including this one, are calculated based on this exact measurement. If your seams are too wide, your block will end up smaller than intended; if they are too narrow, the block will be too large and the seams may be weak. Using a 1/4″ quilting foot on your machine can help maintain this consistency throughout the project.
When you begin sewing the individual units of the Fair and Square Quilt Block Tutorial – Pattern, start by joining the smaller squares into rows. It is often helpful to use the chain piecing method, where you sew pairs of fabric one after another without cutting the thread in between. This not only saves time and thread but also helps keep your pieces organized in the order they need to be assembled for the final Fair and Square Quilt Block Tutorial – Pattern layout.
Once your rows are sewn, the next step in the Fair and Square Quilt Block Tutorial – Pattern is “nesting” the seams. This is done by pressing the seam allowances of the first row to the right and the second row to the left. When you place the rows together to sew them, the seams will “lock” into each other, creating perfectly aligned corners. This technique is vital for the Fair and Square Quilt Block Tutorial – Pattern because it eliminates bulk and ensures the geometric lines are crisp.
Pins are your best friend during the assembly of the Fair and Square Quilt Block Tutorial – Pattern. Even if you are an experienced sewist, pinning at every intersection ensures that the fabric doesn’t shift under the presser foot. For the Fair and Square Quilt Block Tutorial – Pattern, focus your pins exactly where the seams meet. This precision is what separates a homemade-looking quilt from a handcrafted masterpiece that looks like it belongs in a gallery.
After sewing the rows together, you must give the entire Fair and Square Quilt Block Tutorial – Pattern a final press. At this stage, many quilters like to use a tailor’s clapper, which is a wooden tool that holds the heat and steam in the fabric, resulting in seams that are incredibly flat. A flat block is much easier to quilt later on, as it prevents the quilting foot from getting caught on lumpy seam intersections.
Finally, “squaring up” your block is the concluding step of the assembly. Use your large square ruler to trim away any tiny bits of excess fabric from the edges, ensuring the Fair and Square Quilt Block Tutorial – Pattern is exactly the size specified in the instructions (for example, 12.5 inches for a 12-inch finished block). This step ensures that when you go to join multiple Fair and Square Quilt Block Tutorial – Pattern units together, they will fit perfectly like pieces of a puzzle.
One of the most exciting aspects of the Fair and Square Quilt Block Tutorial – Pattern is how it behaves when repeated across a large surface. By rotating every other block by 90 degrees, you can create a secondary pattern that looks completely different from the single unit. This “secondary design” is a hallmark of sophisticated quilting and is easily achieved with the Fair and Square Quilt Block Tutorial – Pattern due to its symmetrical nature.
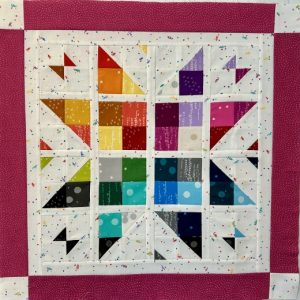
You can also experiment with “fussy cutting” when using the Fair and Square Quilt Block Tutorial – Pattern. Fussy cutting involves centering a specific motif from your fabric—like a flower, an animal, or a geometric shape—directly in the center square of the block. This turns the Fair and Square Quilt Block Tutorial – Pattern into a frame for your favorite fabrics, making it an excellent choice for a “memory quilt” using cherished clothing or themed prints.
For those who love a more modern look, try using a monochromatic color scheme for your Fair and Square Quilt Block Tutorial – Pattern. By using various shades of a single color (like navy, sky blue, and ice blue), you emphasize the shadows and light created by the seams rather than the prints themselves. This minimalist approach to the Fair and Square Quilt Block Tutorial – Pattern is very popular in contemporary interior design and looks stunning as a large-scale bedspread.
Another variation is to play with the scale of the Fair and Square Quilt Block Tutorial – Pattern. You can shrink the measurements to create 6-inch blocks for a delicate baby quilt, or enlarge them to 18-inch blocks for a fast and impactful “chunkier” quilt. Because the Fair and Square Quilt Block Tutorial – Pattern is based on a grid, the math for resizing is relatively straightforward, allowing you to customize the project to fit your specific needs and time constraints.
Adding sashing between your Fair and Square Quilt Block Tutorial – Pattern units is another way to change the final look. Sashing refers to strips of fabric sewn between the blocks, which acts like a mat in a picture frame. This provides “negative space” for the eye to rest and allows each individual Fair and Square Quilt Block Tutorial – Pattern to stand out as its own piece of art, rather than blending into a continuous field of pattern.
Don’t be afraid to mix the Fair and Square Quilt Block Tutorial – Pattern with other traditional blocks, such as Half-Square Triangles or Flying Geese. Creating a “sampler quilt” that features the Fair and Square Quilt Block Tutorial – Pattern as a central motif is a wonderful way to practice different techniques. The structured nature of this block provides a great anchor for more organic or complex shapes, providing a sense of balance to the overall quilt top.
Once you have completed several units of the Fair and Square Quilt Block Tutorial – Pattern and joined them into a quilt top, the next phase is the “quilting” itself—the stitching that holds the top, batting, and backing together. For the Fair and Square Quilt Block Tutorial – Pattern, a simple “stitch in the ditch” or a diagonal grid works beautifully to highlight the square geometry. If you want something more decorative, free-motion feathers or swirls can provide a lovely contrast to the straight lines of the block.
The binding is the final frame for your Fair and Square Quilt Block Tutorial – Pattern project. Choosing a contrasting color for the binding can really make the colors within the block “pop.” A double-fold bias binding is the most durable method, ensuring that your quilt can withstand years of use and washing without fraying at the edges. Since you’ve put so much work into the Fair and Square Quilt Block Tutorial – Pattern, taking the time to hand-stitch the binding to the back adds a beautiful, artisanal finish.
Proper care is essential to ensure your Fair and Square Quilt Block Tutorial – Pattern lasts for generations. When washing a quilt made from these blocks, always use a gentle, fragrance-free detergent and cold water. Using “color catcher” sheets in the wash is a brilliant tip to prevent any dark fabrics from bleeding into the lighter areas of your Fair and Square Quilt Block Tutorial – Pattern. Avoid high heat in the dryer; instead, tumble dry on low or lay flat to air dry.
Storage also matters for the longevity of your Fair and Square Quilt Block Tutorial – Pattern. If you need to store the quilt, avoid plastic bins which can trap moisture and cause mildew. Instead, wrap the quilt in a clean cotton sheet and store it in a cool, dry place. Try to refold the quilt periodically in different directions to prevent permanent creases from forming along the seams of your Fair and Square Quilt Block Tutorial – Pattern.
If you are giving your Fair and Square Quilt Block Tutorial – Pattern project as a gift, including a “quilt label” is a wonderful touch. You can use a permanent fabric marker or embroidery to note the date, the name of the pattern, and a message to the recipient. This transforms the Fair and Square Quilt Block Tutorial – Pattern from a simple blanket into a historical document and a family heirloom that tells a story of the time and effort you invested.
Finally, remember that quilting is a journey of continuous learning. Each Fair and Square Quilt Block Tutorial – Pattern you create will likely be better than the last as your muscle memory for the 1/4″ seam develops. Don’t be discouraged by small imperfections; they are the “fingerprints” of handmade art. The Fair and Square Quilt Block Tutorial – Pattern is a forgiving and rewarding design that will continue to bring joy to your sewing room for many years to come.
1. What is the “Fair and Square” block exactly?
It is a traditional geometric quilt block that typically features a central square surrounded by symmetrical rectangles or smaller squares. It is prized for its balance and ease of assembly.
2. Can a complete beginner try the Fair and Square Quilt Block Tutorial – Pattern?
Yes! It is one of the best patterns for beginners because it involves only straight seams. There are no difficult “Y-seams” or complex curves to worry about.
3. How much fabric do I need for one block?
This depends on the size, but generally, you can make a 12-inch block using a few “Fat Quarters” or even scraps from your stash. It is very fabric-efficient.
4. Why are my corners not lining up in the pattern?
The most common reason is an inconsistent seam allowance. Double-check that you are sewing a true 1/4″ seam and that you are “nesting” your seams when joining rows.
5. Do I have to use cotton fabric?
While you can use other fabrics, 100% quilting cotton is highly recommended for the Fair and Square Quilt Block Tutorial – Pattern because it behaves predictably and presses very flat.
6. How do I make the quilt block look “modern”?
Use solid fabrics in bold, saturated colors or “low-volume” prints (white or cream fabrics with very subtle patterns). Using a lot of negative space also gives it a modern edge.
In this article, we have explored the essential steps to successfully completing the Fair and Square Quilt Block Tutorial – Pattern. We covered everything from the initial fabric selection and the importance of precision cutting to technical sewing tips like nesting seams and squaring up your finished units. We also touched on creative ways to vary the design and how to care for your finished quilt to ensure it remains a beautiful part of your home for years to come. The Fair and Square Quilt Block Tutorial – Pattern is more than just a sewing project; it is an opportunity to express your personal style through the medium of fabric.
We hope this guide has been helpful and inspires you to start your next quilting adventure. Please leave your sincere opinion and any suggestions or questions you might have in the comments below! We love hearing about your progress and seeing how you interpret these classic designs in your own unique way. Happy quilting!


