
Bird-shaped Pincushion - Pattern

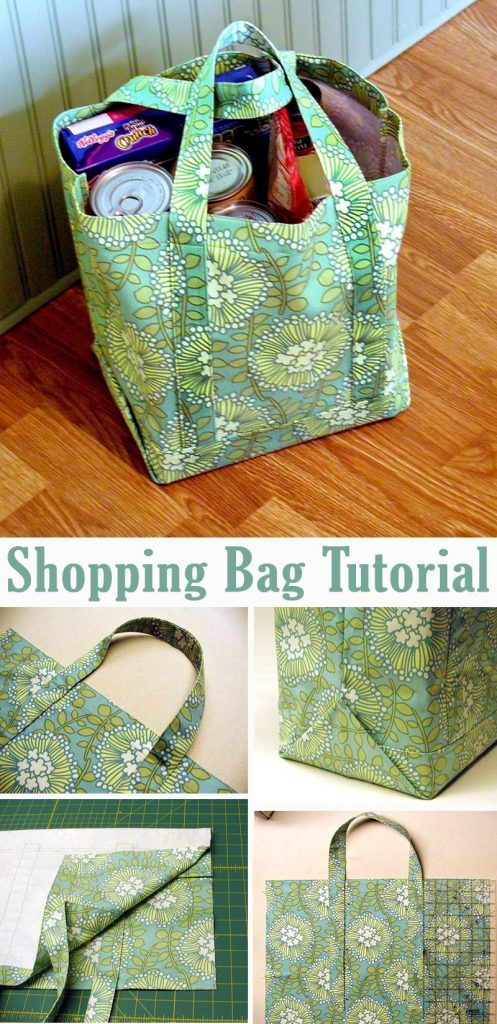
The Fat Sack Shopping Bag – Pattern is the ultimate solution for anyone looking to combine sustainability with high-capacity utility in their daily life. If you are tired of flimsy plastic bags that tear at the most inconvenient moments, learning how to master this specific Pattern will change the way you handle your weekly errands. This guide is designed to walk you through every detail of creating your own heavy-duty tote, ensuring that your Fat Sack Shopping Bag is both stylish and incredibly durable.
Creating a custom Fat Sack Shopping Bag – Pattern allows for a level of personalization that store-bought options simply cannot match. By choosing your own reinforced fabrics and adjusting the dimensions, you turn a simple utility item into a fashion statement that reflects your commitment to the environment. In the following sections, we will explore the essential materials, the structural logic of the Fat Sack, and the step-by-step techniques required to ensure your sewing project yields a professional-grade result.
In the world of DIY sewing, the Fat Sack Shopping Bag – Pattern has gained massive popularity because it prioritizes volume without sacrificing comfort. Unlike standard tote bags, this design features a wider base and reinforced gussets, making it the “heavy lifter” of the textile world. Whether you are a beginner or a seasoned pro, understanding the nuances of this Fat Sack design will empower you to create a versatile tool that handles groceries, gym gear, or beach essentials with ease.
The foundation of a successful Fat Sack Shopping Bag – Pattern lies in the selection of the right materials. To ensure your bag can handle significant weight, you should opt for heavy-weight fabrics like canvas, denim, or reinforced upholstery fabric. These materials provide the structural integrity needed to maintain the bag’s shape even when it is fully loaded with heavy items.
When we talk about the Fat Sack Shopping Bag, the “Fat” refers to the generous depth provided by the bottom gusset. Most standard patterns are flat, but this specific Pattern uses a boxed-corner technique to create a wide rectangular base. This allows the bag to stand upright on its own, making it much easier to load groceries at the checkout counter.
Precision cutting is another vital component of the Fat Sack Shopping Bag – Pattern. Because the bag is designed to carry weight, even a small misalignment in your fabric panels can lead to uneven stress on the seams. Using a rotary cutter and a clear quilting ruler is highly recommended to ensure every piece of your Fat Sack is perfectly squared before you begin sewing.
The handles of your Fat Sack Shopping Bag are the most common point of failure, so this Pattern emphasizes reinforced stitching. Instead of just attaching the straps to the top edge, the best designs involve sewing the webbing or fabric straps all the way down the sides of the bag. This distributes the load across the entire body of the fabric rather than just the top seam.
To make your Fat Sack Shopping Bag – Pattern truly unique, consider adding interior pockets or a key clip. These small additions transform a simple sack into an organized organizational tool. A well-placed pocket for a phone or wallet ensures that your essentials don’t get lost at the bottom of the large main compartment during a busy shopping trip.
Finally, pre-washing your fabric is a non-negotiable step when working with this Pattern. Natural fibers like cotton canvas can shrink significantly during their first wash. By pre-treating the material, you ensure that your Fat Sack Shopping Bag maintains its exact dimensions and professional look after it has been through the laundry for the first time.
Before you touch your sewing machine, you must master the layout of the Fat Sack Shopping Bag – Pattern on your fabric. Efficiency is key here, especially if you are working with patterned or directional fabric where the orientation of the print matters. Laying out your pieces correctly ensures that your Fat Sack looks cohesive and professional from every angle.
The primary panels of the Fat Sack Shopping Bag usually consist of two large rectangles for the body and two long strips for the handles. However, the secret to the “Fat” aspect of the Pattern is the square cutouts at the bottom corners. These cutouts are what will eventually be pinched together to create the depth and volume that defines this iconic bag style.
Marking your seam allowances clearly is a hallmark of a high-quality Fat Sack Shopping Bag – Pattern execution. Using a fabric pen or tailor’s chalk, mark exactly where your stitch lines will go. For a heavy-duty bag, a $5/8$ inch ($1.5$ cm) seam allowance is often preferred over the standard $1/4$ inch to allow for stronger, reinforced finishes like French seams.
Interfacing can be a secret weapon when working on your Fat Sack Shopping Bag. If your chosen fabric feels a bit too limp, applying a heavy-weight fusible interfacing to the bottom panel will provide extra “body.” This helps the Pattern maintain its boxy shape even when empty, preventing the bag from collapsing into a heap on the floor.
When cutting the handles for your Fat Sack Shopping Bag – Pattern, consider the “drop length.” This is the distance from the top of the handle to the top of the bag. A longer drop allows you to carry the sack over your shoulder, while a shorter drop is better for hand-carrying. Customizing this detail is one of the best perks of making your own bag.
Double-check your measurements one last time before making the first cut into your fabric. It is a common mistake to forget to add seam allowances to the handle length or the gusset depth. By being meticulous with your Fat Sack Shopping Bag preparation, you save yourself the frustration of wasted material and ensure a perfect fit during the assembly stage.
The assembly phase of the Fat Sack Shopping Bag – Pattern is where the magic happens. Start by preparing the handles, folding them lengthwise and top-stitching along both edges for maximum strength. This not only makes the handles of your Fat Sack more comfortable to hold but also prevents the fabric from stretching out under the pressure of heavy loads.
Joining the main body panels of the Fat Sack Shopping Bag requires a strong “straight stitch.” For extra security, many makers prefer using a “triple stitch” or a heavy-duty polyester thread. Since the Pattern is designed for bulk, your thread needs to be just as tough as your fabric to prevent the seams from popping during use.
The defining moment of the Fat Sack Shopping Bag – Pattern is “boxing the corners.” You do this by opening the bag and flattening the bottom corner so the side seam aligns perfectly with the bottom seam. Sewing across this triangle creates the flat base that gives the Fat Sack its name and its incredible carrying capacity.
Reinforcing the stress points is a critical step in the Fat Sack Shopping Bag construction. Use a “box-X” stitch where the handles meet the bag body. This involves sewing a square and then an “X” inside it, which is the industry standard for high-stress textile areas. This technique ensures your Pattern won’t fail even if you’re carrying several kilograms of goods.
Finishing the raw edges inside your Fat Sack Shopping Bag – Pattern will determine how long the bag lasts. While a zig-zag stitch works, a serger or “overlock” stitch is even better for preventing fraying. If you want a luxury finish, use bias tape to bind the interior seams, giving your Fat Sack a clean, boutique-quality interior.
The final top-stitch around the rim of the Fat Sack Shopping Bag serves two purposes: it keeps the seam allowance flat and adds a professional decorative touch. This is the last step in the Pattern assembly, and taking your time to ensure the line is perfectly straight will significantly elevate the overall aesthetic of your completed project.
Once you have completed the Fat Sack Shopping Bag – Pattern, it’s time to think about how to maintain and optimize it for daily errands. Because these bags are designed to replace single-use plastic, they will see a lot of action. Proper care ensures that your Fat Sack remains a reliable companion for years, eventually paying for itself in environmental savings.
Washing your Fat Sack Shopping Bag is inevitable, especially if it’s used for fresh produce. To preserve the integrity of the Pattern and the fabric, wash in cold water on a gentle cycle. Air drying is always preferable to machine drying, as it prevents the heavy-duty fibers from becoming brittle or shrinking unevenly over time.
Consider making a “set” of bags using the Fat Sack Shopping Bag – Pattern in different colors. This allows you to color-code your shopping—for example, green for produce, blue for frozen items, and red for meats. This level of organization makes unpacking at home much faster and keeps your Fat Sack collection hygienic and tidy.
One of the best features of the Fat Sack Shopping Bag is its foldability. Despite being large and sturdy, the clever Pattern allows the bag to be folded into a compact rectangle. You can even sew a small elastic loop into the top seam so that once the bag is rolled up, it stays secured, making it easy to keep several in your car’s glove box.
If you find that the bottom of your Fat Sack Shopping Bag – Pattern sags too much with heavy groceries, you can add a removable “base board.” Simply cut a piece of heavy plastic or thin plywood to the dimensions of the bag’s bottom and wrap it in matching fabric. This gives your Fat Sack a rigid floor, perfect for carrying delicate items like eggs or bread.
Finally, don’t be afraid to repair your Fat Sack Shopping Bag if it eventually shows signs of wear. The beauty of knowing the Pattern is that you can easily patch a hole or re-stitch a handle. This “make do and mend” philosophy is at the heart of the DIY movement and ensures your Fat Sack remains a sustainable choice for a lifetime.
What is the best fabric for a Fat Sack Shopping Bag – Pattern?
The most recommended fabrics are heavy-weight cotton canvas (10oz to 12oz), duck cloth, or reclaimed denim. These provide the necessary strength to support the “fat” or wide-bottom design of the bag.
How much fabric do I need for one Fat Sack Shopping Bag?
Generally, you will need about 1 yard (approx. 0.9 meters) of 45-inch wide fabric. This allows for the main body panels, the bottom gussets, and the handles. Always check your specific Pattern dimensions before purchasing.
Can a beginner sew this Fat Sack Shopping Bag – Pattern?
Yes! This is an excellent project for beginners. It focuses on straight seams and introduces the concept of “boxing corners,” which is a fundamental skill in bag making.
Is the Fat Sack Shopping Bag machine washable?
Absolutely. Since it is made of fabric, you can toss it in the wash. We recommend a cold wash and hang-drying to prevent the Pattern from shrinking or the colors from fading prematurely.
Why is it called a “Fat Sack”?
The name refers to the extra-wide gusset or base. Unlike standard flat totes, the Fat Sack Shopping Bag has a deep interior volume, allowing it to hold much more “bulk” than a traditional bag.
How do I make the handles stronger?
The best way to strengthen handles in this Pattern is to use “Box-X” stitching at the attachment points and to use a heavy-duty polyester thread that won’t rot or snap under tension.
In this article, we have explored the comprehensive journey of creating a Fat Sack Shopping Bag – Pattern, from selecting the most durable fabrics to mastering the specialized sewing techniques that ensure longevity.
We learned that the secret to the Fat Sack‘s utility lies in its boxed corners and reinforced handles, transforming a simple piece of fabric into a high-capacity tool for sustainable living. By following this Pattern, you are not just making a bag; you are creating a durable alternative to plastic that is customized to your specific needs and style.


