
Horizontal Row Quilt - Pattern

The Finished Scrap Bursts Quilt Block – Pattern is a vibrant and eco-friendly approach to quilting that allows you to breathe new life into your leftover fabric scraps. Whether you’re an experienced quilter or a beginner exploring the world of textile art, this pattern offers a fun, colorful, and rewarding way to reduce waste and create something beautiful from pieces you might otherwise discard.
Scrap quilting is nothing new, but the Scrap Bursts style is a modern twist on a beloved tradition. It focuses on using irregularly shaped and sized fabric remnants, arranging them in a way that radiates outward like a burst of energy. The result is a dynamic, eye-catching block that can stand alone or be combined with others for a full quilt.
In this article, we’ll explore how to make a Finished Scrap Bursts Quilt Block – Pattern, what materials and techniques to use, how to plan a cohesive look despite using mismatched scraps, and tips for customizing the pattern. Whether you’re creating a single block for a sampler quilt or planning an entire scrappy quilt, you’ll find the guidance you need right here.
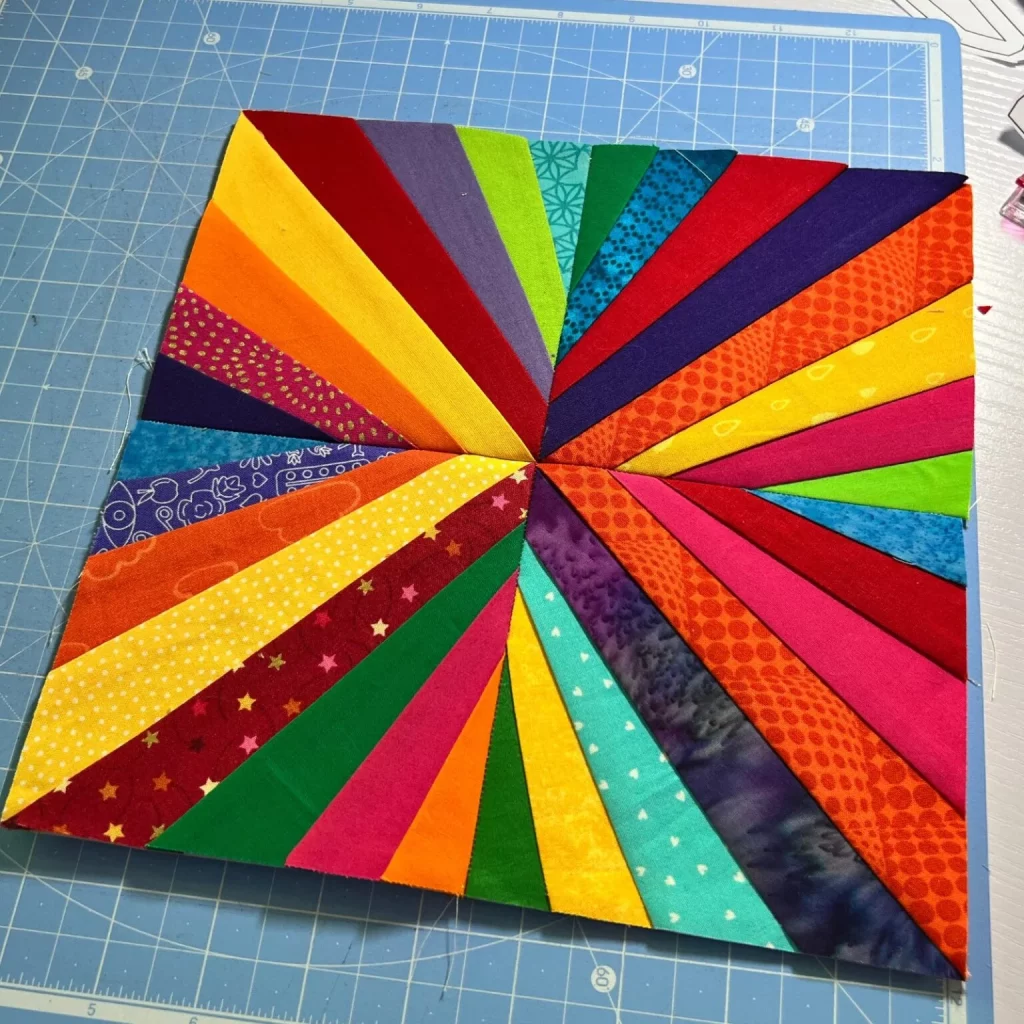
The Finished Scrap Bursts Quilt Block – Pattern is a patchwork design that features an explosion of fabric scraps radiating outward from a central point. Unlike more rigid block patterns, this design embraces freedom and randomness while maintaining visual balance and structure.
Each block begins with a small center piece—often a bright or bold scrap to serve as the “burst origin.” From there, additional fabric strips or shards are added in a starburst fashion, growing outward in a circular or angular pattern.
One of the hallmarks of this design is its improvisational nature. There’s no strict formula for how long or wide each strip must be. Instead, quilters are encouraged to play with shape and color to create energy and movement within the block.
This makes the Finished Scrap Bursts Quilt Block – Pattern particularly appealing for scrap lovers. It’s forgiving and flexible, allowing quilters to use up odd pieces that might not fit into more traditional patterns.
Despite the seemingly chaotic look, there’s an art to achieving a harmonious block. Balancing color values, spacing bursts evenly, and using repetition or contrast strategically all contribute to a successful design.
Many quilters choose to frame their scrap bursts with neutral sashing or background fabric, which helps highlight the burst effect while giving the eye a place to rest amid the visual energy.
To get started with the Finished Scrap Bursts Quilt Block – Pattern, you don’t need any fancy or expensive materials. One of the best things about this project is its accessibility—chances are, you already have what you need in your sewing room.
First and foremost, gather your fabric scraps. These can be anything: leftover jelly roll strips, trimmings from garment sewing, or even vintage fabric pieces. The more varied the colors and prints, the more exciting your burst block will be.
You’ll also need a cutting mat, rotary cutter, and quilting ruler. Because the pieces can be irregular, precise measurements aren’t always necessary—but you’ll still want tools to trim and square up your blocks as you go.
For background fabric, solid neutrals like white, gray, beige, or black work well. This fabric will help set off your colorful scraps and provide visual balance in your final quilt layout.
Thread and a sewing machine are next. Standard cotton quilting thread is fine. Since you’ll be sewing multiple small pieces, consider using a shorter stitch length (like 2.0 mm) for added strength.
You’ll also want pins or fabric clips, especially if you’re working with slippery or stretchy scraps. Optional tools include an iron and pressing mat, which help flatten seams and give your block a more polished finish.
Finally, a good attitude and a willingness to experiment are essential. The Finished Scrap Bursts Quilt Block – Pattern rewards creativity and spontaneity, making it perfect for both artistic expression and practical scrap-busting.
The process of making a Finished Scrap Bursts Quilt Block – Pattern is both intuitive and creative. While every quilter will approach it slightly differently, here’s a step-by-step outline that will help you get started.
Start by selecting a center scrap. This can be a small square or triangle—something to serve as the focal point. Bright or high-contrast colors work well here to draw attention to the center of your burst.
Next, begin adding strips or wedges of fabric around the center, angling them outward. You don’t need to follow a strict order, but it’s helpful to lay out a rough plan so the block grows evenly in all directions.
Use the “stitch and flip” method to attach each strip: place the new scrap right sides together with the previous one, sew along the edge, and then flip and press it into place. This technique is quick and gives clean results.
Continue building outwards until your block reaches the desired size—usually 12.5” x 12.5” (unfinished) or whatever your quilt layout requires. You can square it up at the end to ensure it fits cleanly with other blocks.
If you find gaps or uneven edges, don’t worry. These imperfections can add charm and personality to your quilt. Some quilters even leave asymmetrical edges as a design feature or trim the block into an artistic shape.
To finish, add a border or background fabric to frame your burst. This helps define the block and makes it easier to join with other blocks later. You can also back it with batting and quilt it individually before assembling into a larger quilt.
One of the best parts of the Finished Scrap Bursts Quilt Block – Pattern is its endless customizability. No two blocks need to look alike, which makes this pattern great for personal expression and storytelling through fabric.
Try color-themed bursts: sort your scraps by color and make each block a monochromatic explosion. This adds a rainbow effect when the blocks are joined together, giving cohesion to a scrappy quilt.
Another idea is to vary the background fabrics. While solids are most common, you can also use low-volume prints, linen textures, or even reclaimed fabric like old shirts for a sustainable touch.
Don’t be afraid to play with shapes. Your bursts don’t have to be perfectly radial—try offsetting the center or making a diagonal burst instead. This adds movement and variety to the overall layout.
Incorporate meaningful scraps, like pieces of baby clothes, old quilts, or garments from loved ones. This adds sentimental value and makes the quilt a personal keepsake.
You can also scale the blocks up or down. Make mini 6” blocks for a detailed look, or oversized 18” blocks for a bold, graphic statement. Mixing sizes in one quilt creates visual rhythm and modern flair.
Finally, consider adding embroidery, hand stitching, or even appliqué over your burst blocks. These layers of detail turn your quilt into a textured, mixed-media masterpiece.
Q1: What size should a Scrap Bursts Quilt Block be?
A: The most common size is 12.5″ x 12.5″ (unfinished), but you can make them any size depending on your project. Just be consistent if combining multiple blocks.
Q2: Do I need a sewing machine for this pattern?
A: While a sewing machine makes the process faster, you can absolutely make these blocks by hand if you prefer slow stitching or don’t have access to a machine.
Q3: Can beginners try the Finished Scrap Bursts Quilt Block – Pattern?
A: Yes! This pattern is great for beginners because it’s flexible, doesn’t require perfect measurements, and allows for plenty of creative freedom.
Q4: How do I keep the colors balanced in such a busy design?
A: Use a neutral background to break up color intensity, and try grouping similar shades or values in each burst to avoid overwhelming the eye.
Q5: Can I use stretchy or delicate fabrics in my scrap bursts?
A: You can, but it’s best to stabilize these fabrics with interfacing or mix them with more stable cottons to keep your block in shape.
Q6: How many blocks do I need for a full quilt?
A: That depends on your block size and desired quilt size. For a throw-size quilt (around 60″x72″), you’d need about 30 blocks at 12″.
The Finished Scrap Bursts Quilt Block – Pattern is a brilliant way to reduce fabric waste while creating something colorful, energetic, and uniquely yours. With no two blocks ever looking the same, this pattern encourages creativity, spontaneity, and resourcefulness—all qualities that lie at the heart of quilting.
We’ve covered what the pattern is, the tools and techniques you need, how to build your own blocks, and ways to make your quilt personal. Whether you’re quilting for fun, for sustainability, or to preserve memories, this project is both practical and meaningful.
Now it’s your turn! If you’ve tried the Finished Scrap Bursts Quilt Block – Pattern, or plan to, we’d love to hear your experience. Please share your sincere opinion in the comments and let us know what worked, what didn’t, and any
suggestions you have for fellow quilters!


