
American-style placemat with a fruit theme - Pattern

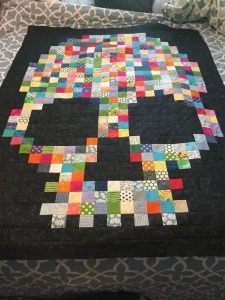
The Flea Market Flowers Quilt – Pattern is a delightful journey into the world of vintage aesthetics and botanical charm, offering quilters a unique way to preserve the beauty of a garden in fabric form. This specific design captures the whimsical essence of stumbling upon a rare find at a weekend market, combining mismatched yet harmonious floral prints into a cohesive masterpiece. When you embark on a Flea Market Flowers Quilt – Pattern, you aren’t just sewing layers of cloth together; you are narrating a story of nostalgia and timeless elegance that can brighten any room in your home.
Creating a Flea Market Flowers Quilt – Pattern requires a balance of artistic intuition and technical precision, making it a favorite for those who enjoy the “shabby chic” or “cottagecore” styles. The design often features a mix of appliqué and traditional piecing, allowing the maker to experiment with different textures and shapes. Many hobbyists find that working on this pattern provides a sense of calm, as the repetitive motion of the needle mimics the gentle rustle of leaves in a spring breeze, turning a complex project into a meditative retreat.
To achieve the best results with your Flea Market Flowers Quilt – Pattern, it is essential to understand how color value and fabric scale interact across the quilt top. Whether you are using authentic vintage scraps or modern reproductions of classic floral motifs, the way you arrange these elements determines the “rhythm” of the finished piece. In this comprehensive guide, we will explore the essential materials, assembly techniques, and finishing touches required to turn your vision of a Flea Market Flowers Quilt – Pattern into a stunning, heirloom-quality reality that will be cherished for generations.
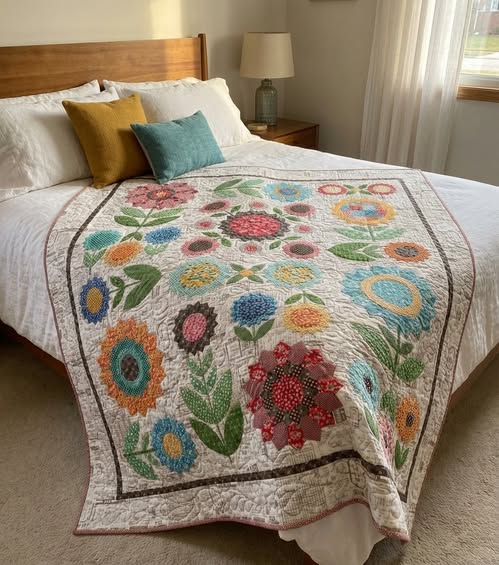
The foundation of a stunning Flea Market Flowers Quilt – Pattern begins with a thoughtful selection of quilting cotton. To achieve that authentic “flea market” look, try to find a mix of small-scale ditsy florals, medium-sized roses, and perhaps a bold botanical print to act as the focal point. Using high-quality natural fibers ensures that your quilt has the perfect weight and breathability, while also making the fabric easier to handle during the intricate cutting and sewing stages.
When selecting your color palette for the Flea Market Flowers Quilt – Pattern, don’t be afraid to mix “warm” and “cool” tones. Traditional designs often lean toward dusty pinks, sage greens, and buttery yellows, but a modern twist might include pops of navy or mustard. The goal is to make the quilt look as if the fabrics were collected over time from various stalls, giving the Flea Market Flowers Quilt – Pattern its signature eclectic and lived-in charm that collectors adore.
Precision is key, so investing in a sharp rotary cutter and a high-quality acrylic ruler is non-negotiable for this project. Because the Flea Market Flowers Quilt – Pattern often involves many small pieces and delicate curves, having tools that produce clean, fray-free edges will save you an immense amount of time. A fresh blade on your cutter will prevent the fabric from pulling, ensuring that your measurements remain exact from the first flower to the final border.
For the floral elements, you might want to explore fusible web if you are planning on doing “raw-edge” appliqué. This adhesive material allows you to iron your flower shapes directly onto the background fabric before stitching, which is a great time-saver for a Flea Market Flowers Quilt – Pattern. If you prefer a more traditional look, “turn-edge” appliqué using freezer paper or starch can provide a soft, dimensional effect that looks incredibly professional and high-end.
Your sewing machine should be fitted with a quarter-inch foot to maintain consistent seams throughout the Flea Market Flowers Quilt – Pattern. This specific foot acts as a guide, helping you avoid the common pitfall of “wonky” blocks that don’t line up during assembly. Additionally, using a 50-weight cotton thread in a neutral cream or light grey will allow the stitches to sink into the fabric, making the joinery nearly invisible and keeping the focus on the beautiful floral prints.
Finally, don’t forget a large design wall or a clear space on the floor to lay out your pieces. Seeing the Flea Market Flowers Quilt – Pattern in its entirety before you sew allows you to spot any “clashing” prints or areas where the colors might be too concentrated. This bird’s-eye view is crucial for achieving the balanced, “organized chaos” that makes the Flea Market Flowers Quilt – Pattern so visually captivating and artistically successful.
The heart of the Flea Market Flowers Quilt – Pattern lies in the construction of its individual blocks, which often alternate between floral motifs and geometric backgrounds. If your pattern includes pieced blocks, start by “chain piecing” your smaller units to maintain a steady workflow. This method involves sewing one pair after another without cutting the thread, which not only saves materials but also helps you stay organized as you build the framework for your Flea Market Flowers Quilt – Pattern.
When it comes to the floral centers, appliqué is often the star of the show. Whether you are sewing by hand using a blind hem stitch or using your machine’s blanket stitch, the key is to keep your movements fluid. In a Flea Market Flowers Quilt – Pattern, these flowers represent the wild, untamed beauty of nature, so they don’t have to be perfectly symmetrical; slight variations in the petals can actually add to the handmade, vintage appeal of the design.
Pressing as you go is a vital habit to cultivate when working on your Flea Market Flowers Quilt – Pattern. Instead of sliding the iron—which can stretch the fabric—simply press down firmly on the seams. This ensures that the blocks lay flat and that your points remain sharp. For the floral portions, pressing from the back onto a fluffy towel can prevent the appliqué from being crushed, maintaining the lovely 3D texture that is so characteristic of this style.
Joining the rows of your Flea Market Flowers Quilt – Pattern requires careful pinning at every intersection. To prevent the layers from shifting, use fine quilting pins and check that your seams “nest” together. This technical detail is what separates a beginner project from a masterpiece; when the lines of your Flea Market Flowers Quilt – Pattern meet perfectly, the eye can travel across the surface without being distracted by misaligned corners or bulky seams.
Borders serve as the frame for your fabric garden, and the Flea Market Flowers Quilt – Pattern often benefits from a “double border” approach. A thin inner border in a solid dark color can act as a “stop” for the eye, while a wider outer border in a contrasting print adds a final flourish. Always measure your quilt through the center rather than along the edges to determine border length, as this prevents the “wavy border” effect that can occur with a Flea Market Flowers Quilt – Pattern.
Once the top is fully assembled, take a moment to “triage” any loose threads or small gaps in the seams. This pre-quilting check ensures that the structural integrity of the Flea Market Flowers Quilt – Pattern is sound. A clean, well-pressed quilt top is much easier to manage during the final quilting stage, whether you are doing it yourself on a home machine or sending it out to a professional longarmer to add those intricate swirling vine designs.
The choice of batting will significantly impact the “drape” and “loft” of your Flea Market Flowers Quilt – Pattern. A 100% cotton batting provides a flat, traditional look that develops a beautiful “crinkle” after the first wash, enhancing the vintage vibe. If you prefer a fluffier quilt with more defined stitch lines, a wool or polyester blend might be the better choice for your Flea Market Flowers Quilt – Pattern, as it offers more bounce and warmth.
For the actual quilting design, consider free-motion quilting to mimic the organic shapes found in the fabric. Swirls, leaves, and “pebble” stitches work wonderfully with the Flea Market Flowers Quilt – Pattern, as they complement the botanical theme. If you are a beginner, simple “stitch-in-the-ditch” or a diagonal grid can also be very effective, providing a structured contrast to the soft, flowing floral motifs of the Flea Market Flowers Quilt – Pattern.
Binding is the final “hug” for your quilt, and for a Flea Market Flowers Quilt – Pattern, a scalloped edge or a simple bias binding in a striped or gingham print can add an extra layer of charm. Using a “double-fold” binding ensures durability, protecting the edges of your work from wear and tear. Hand-stitching the binding to the back of the quilt is a labor of love that results in an invisible, clean finish for your Flea Market Flowers Quilt – Pattern.
Adding a quilt label is a step you should never skip when finishing a Flea Market Flowers Quilt – Pattern. Include the name of the quilt, your name, the date, and perhaps a small message about the inspiration behind it. This turns the Flea Market Flowers Quilt – Pattern into a documented piece of art and a historical record for your family, ensuring that the “story” of the quilt is never lost over the years.
Once the binding is on and the label is attached, many quilters recommend a “first wash” using a gentle detergent and several color catchers. This process removes the starch and any markings used during construction, and it allows the fibers of the Flea Market Flowers Quilt – Pattern to settle into their final, cozy shape. The slight shrinkage that occurs during this wash is what gives the quilt that sought-after “antique” texture and softness.
Finally, take the time to photograph your Flea Market Flowers Quilt – Pattern in natural light. Capturing the way the light hits the appliqué and the quilting stitches is a great way to celebrate your hard work. Whether you display it on a quilt rack or use it as a daily bedspread, your Flea Market Flowers Quilt – Pattern is a testament to your creativity and a beautiful addition to the long tradition of handmade fiber arts.
The beauty of the Flea Market Flowers Quilt – Pattern is its adaptability to different sizes and seasons. You can easily scale the pattern down to create a charming wall hanging or a baby quilt by simply making fewer blocks. Alternatively, you can expand it into a king-sized bedspread by adding more rows and wider borders. This flexibility makes the Flea Market Flowers Quilt – Pattern a versatile choice for any home decor project or personalized gift.
If you are making a version for the winter, consider using flannel for the backing of your Flea Market Flowers Quilt – Pattern. Flannel provides extra warmth and a soft, “fuzzy” feel that is incredibly comforting on cold nights. For a summer-weight quilt, a light cotton lawn or even a linen blend can keep the Flea Market Flowers Quilt – Pattern feeling cool and airy, making it the perfect companion for a porch swing or a picnic.
Caring for your Flea Market Flowers Quilt – Pattern is essential to preserve the vibrancy of the floral prints. Always store your quilts in a breathable cotton bag or a pillowcase rather than a plastic bin, as plastic can trap moisture and lead to mildew. Every few months, it is a good idea to take the Flea Market Flowers Quilt – Pattern out and refold it in a different way to prevent permanent creases from forming along the seam lines.
If you ever need to clean your Flea Market Flowers Quilt – Pattern, hand-washing in a bathtub with a mild soap is the safest method. Rinse thoroughly and press out the excess water with towels—never wring a quilt, as this can snap the delicate quilting threads. Laying the Flea Market Flowers Quilt – Pattern flat on a clean sheet in the shade to dry will prevent the sun from fading those beautiful “flea market” colors that you worked so hard to curate.
For those who want to add a bit of “glamour” to their Flea Market Flowers Quilt – Pattern, consider incorporating small bits of embroidery or even tiny beads into the centers of the flowers. These “embellishments” can add a touch of sparkle and a high-end artisanal feel to the project. It’s these tiny, personalized details that make your version of the Flea Market Flowers Quilt – Pattern a truly unique expression of your individual style and skill.
Ultimately, the Flea Market Flowers Quilt – Pattern is about the joy of the process as much as the beauty of the final product. It encourages you to slow down, enjoy the tactile nature of the fabric, and create something that is both functional and artistic. As you finish your Flea Market Flowers Quilt – Pattern, remember that every stitch is a part of a larger legacy of quilters who have found inspiration in the simple, enduring beauty of a flower garden.
Is the Flea Market Flowers Quilt – Pattern difficult for a beginner?
While it features some more advanced techniques like appliqué, a beginner can certainly succeed by taking it slow. Many versions of the Flea Market Flowers Quilt – Pattern offer “simplified” options for the floral parts, such as using larger shapes or basic fusible webbing to make the process more approachable for those new to the craft.
How much fabric do I need for a twin-sized Flea Market Flowers Quilt – Pattern?
Generally, for a twin-sized quilt, you will need approximately 7 to 9 yards of fabric for the top (including all the various prints), plus 5 yards for the backing and 3/4 yard for the binding. Always check the specific yardage requirements on your Flea Market Flowers Quilt – Pattern before purchasing your supplies.
Can I use scraps for the Flea Market Flowers Quilt – Pattern?
Absolutely! In fact, using scraps is one of the best ways to achieve the authentic “flea market” look. Combining different fabric lines and vintage remnants can give your Flea Market Flowers Quilt – Pattern a much more eclectic and interesting appearance than using a single “pre-cut” bundle from a store.
What is the best way to attach the flowers in the pattern?
Most quilters prefer machine appliqué with a blanket stitch for its durability and speed. However, if you enjoy slow stitching, hand appliqué with a needle-turn technique provides a much softer finish that many collectors find more desirable for a Flea Market Flowers Quilt – Pattern.
How do I choose the right “background” fabric?
A neutral “low-volume” print—such as a cream fabric with a very subtle grey or tan pattern—is usually best for a Flea Market Flowers Quilt – Pattern. This allows the colorful floral motifs to “pop” without the background becoming too distracting or overwhelming the overall design.
Should I pre-wash my fabrics for this quilt?
Pre-washing is a personal preference, but for a Flea Market Flowers Quilt – Pattern involving many different red or dark-colored florals, it is highly recommended to prevent the dyes from “bleeding” into the lighter background fabrics during the final wash of the completed quilt.
In this article, we have explored the charming and intricate world of the Flea Market Flowers Quilt – Pattern, covering everything from the initial fabric selection and precision cutting to the specialized appliqué techniques that bring the design to life.
We discussed the importance of using high-quality quilting cotton, the role of color value in creating balance, and the professional finishing touches—like blocking and labeling—that ensure your work becomes a cherished heirloom. Whether you are aiming for a classic vintage look or a modern botanical aesthetic, the Flea Market Flowers Quilt – Pattern offers an endless array of creative possibilities for every level of quilter.


