
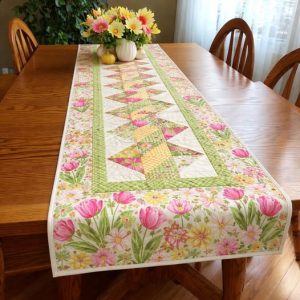
American-style placemat with a fruit theme - Pattern

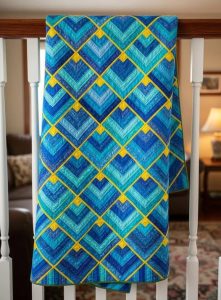
The Flying Geese Quilt – Pattern is an absolute staple in the world of traditional quilting, representing a design that is as versatile as it is historically significant. This iconic motif, which consists of a central triangle (the “goose”) flanked by two smaller triangles (the “sky”), creates a sense of movement and direction that has captivated makers for centuries. Whether you are aiming to create a classic heirloom that honors the pioneers of the craft or a sleek, minimalist wall hanging for a modern gallery, mastering this specific quilt block is an essential milestone for any textile enthusiast.
The beauty of a Flying Geese Quilt – Pattern lies in its mathematical elegance and the infinite ways it can be arranged to create different visual effects. By simply rotating the blocks or playing with color gradients, you can achieve patterns like “Star of Bethlehem,” “Dutchman’s Puzzle,” or even a simple, rhythmic “Chevron” design. This project is particularly rewarding because it allows you to practice the fundamentals of geometric piecing while exploring the boundaries of your own creativity through fabric selection and layout experimentation.
As you embark on your journey to create a Flying Geese Quilt – Pattern, you will find that the secret to success lies in the details—from the initial “fussy cutting” of your fabrics to the final, crisp pressing of your seams. This guide is designed to provide you with a comprehensive understanding of the materials, techniques, and assembly methods required to produce a professional-quality result. By focusing on precision and organization, you can transform simple scraps of cotton into a dynamic work of art that captures the grace and motion of a flock of birds in flight.
The first step in executing a flawless Flying Geese Quilt – Pattern is selecting the appropriate quilting cottons. Because this design relies heavily on sharp points and straight lines, using a high-quality, 100% cotton fabric is non-negotiable. These fabrics hold their shape during the cutting and sewing process, which is vital when you are dealing with bias edges that are prone to stretching. Look for a mix of “solids” and “low-volume prints” to ensure that the contrast between your “geese” and your “sky” is clear and visually striking.
Color theory is your best tool when planning a Flying Geese Quilt – Pattern. Traditionally, the “geese” are cut from a dark or vibrant fabric, while the “sky” triangles are made from a lighter, neutral fabric. This creates a high-contrast look that emphasizes the directional movement of the block. However, for a more contemporary “scrappy” vibe, you can mix and match various colors and patterns, as long as you maintain a consistent tonal value to keep the overall design from looking chaotic.
To achieve the precision required for a Flying Geese Quilt – Pattern, you must invest in the right cutting tools. A high-quality rotary cutter with a fresh blade and a clear acrylic quilting ruler are indispensable. For this specific pattern, many quilters prefer using a “flying geese ruler,” which features specialized markings for different sizes, ensuring that your triangles are perfectly proportioned every single time you cut into your fabric.
Marking tools also play a significant role in your quilt construction. You will need a fine-tipped fabric pen or a tailor’s chalk to mark diagonal lines on the back of your “sky” squares. These marks act as your sewing guide, helping you maintain a straight path across the fabric. In a Flying Geese Quilt – Pattern, being off by even an eighth of an inch can cause your points to be “chopped off” during assembly, so accuracy starts with the very first line you draw.
Don’t forget the importance of your sewing machine needles and thread. A fine, 50-weight cotton thread is ideal for piecing because it is strong but doesn’t add bulk to your seams. Use a sharp Microtex needle (size 80/12) to pierce through the layers of cotton cleanly. This ensures that your stitches are even and that your Flying Geese Quilt – Pattern has the durability needed to withstand years of use and laundering.
Lastly, consider the “batting” and “backing” you will use once the top is finished. A low-loft cotton batting will highlight the intricate piecing of your Flying Geese Quilt – Pattern without making it too puffy. Choosing a wide-back fabric for the reverse side can save you the hassle of seaming pieces together, giving your finished quilt a clean, professional appearance that matches the effort you put into the intricate top design.
There are several ways to construct a Flying Geese Quilt – Pattern, but the “No-Waste” method is highly recommended for modern quilters. This technique allows you to create four “geese” at once from one large square and four smaller squares. It is not only time-efficient but also reduces fabric waste significantly, making it a sustainable choice for your sewing project. By following a specific sewing and cutting sequence, you can produce identical blocks with minimal effort.
Precision stitching is the “heart” of a successful Flying Geese Quilt – Pattern. You must master the scant quarter-inch seam. This is a seam that is just a thread’s width narrower than a full quarter-inch, allowing for the space taken up by the fold of the fabric and the thickness of the thread. Using a specialized 1/4″ quilting foot on your sewing machine can help you achieve this consistency, ensuring that your blocks finish at the exact size required by the pattern instructions.
Pressing is just as important as sewing when working on a Flying Geese Quilt – Pattern. To avoid stretching the fabric, you should always “set” your seam by pressing it flat as-sewn before opening it up and pressing to one side. Traditionally, seams are pressed toward the “sky” triangles to reduce bulk at the tip of the goose. Using a wool pressing mat can help you achieve extremely flat seams, which is crucial for the final assembly of the quilt top.
Avoid “clipping your points” by paying close attention to the intersection of your seams. When you look at the back of a finished flying geese unit, the point of the goose should be exactly 1/4 inch away from the raw edge of the fabric. This “seam allowance” ensures that when you sew the units together, the point will land perfectly on the seam line. This level of detail is what gives a Flying Geese Quilt – Pattern its sharp, professional, and high-quality aesthetic.
For those who struggle with traditional piecing, Foundation Paper Piecing (FPP) is a fantastic alternative for a Flying Geese Quilt – Pattern. FPP involves sewing fabric directly onto a paper template, which acts as a permanent guide for your lines. This method is virtually foolproof for achieving perfect points and is particularly useful if you are making very small or oddly shaped geese for a specialized art quilt or a detailed border.
Consistency is key throughout the entire quilting process. If you are making a large quilt, try to work in “chain-piecing” batches. This means sewing one unit after another without cutting the thread in between. Chain-piecing not only saves time and thread but also helps you maintain a steady rhythm, which leads to more uniform stitches and a better overall result for your Flying Geese Quilt – Pattern.
The traditional layout for a Flying Geese Quilt – Pattern involves arranging the units in long vertical or horizontal rows, often referred to as “rivers.” This layout emphasizes the directional nature of the geese, making them look like they are migrating across the bed. To add variety, you can alternate the direction of the rows—some pointing up, some pointing down—to create a “herringbone” effect that adds visual energy and depth to the quilt design.
If you want a more modern look for your Flying Geese Quilt – Pattern, consider using “negative space.” Instead of filling the entire quilt top with geese, you can place a few “flocks” against a solid, neutral background. This minimalist approach is very popular in contemporary quilting and allows the viewer to appreciate the geometry of each individual flying goose block. It also provides a great canvas for intricate free-motion quilting in the empty areas.
Another creative option is the “Circular” or “Compass” layout. By angling the Flying Geese Quilt – Pattern units in a circle, you can create a sunburst or a kaleidoscope effect. This requires more advanced math and careful trimming, but the result is a stunning focal point that works beautifully as a center medallion for a larger quilt or as a standalone piece of textile wall art.
Sashing and borders can also transform your Flying Geese Quilt – Pattern. Adding a thin “inner border” in a dark color can act like a frame, making the colors of your geese stand out even more. Alternatively, you can use a “flying geese border” around a simpler central panel to add complexity and a sense of motion to a basic quilt pattern. The border acts as a transition between the busy interior and the finished edge.
Color “washing” or “ombré” effects are particularly effective with this pattern. You can start with deep navy blue geese at the bottom of the quilt and gradually move to lighter shades of sky blue as you reach the top. This color transition mimics the natural light of the horizon and gives your Flying Geese Quilt – Pattern a sophisticated, artistic quality that feels intentional and well-planned.
Finally, consider the scale of your geese. You can mix “large-scale” geese with “miniature” geese in the same quilt to create a sense of perspective. Smaller geese can look like they are further away in the distance, while larger ones appear closer. This play with scale turns a traditional geometric quilt into a narrative piece that tells a story of flight and journey through the medium of fabric.
Once your Flying Geese Quilt – Pattern top is complete, the quilting phase begins. The way you quilt—the stitches that hold the layers together—will greatly impact the final appearance. For a traditional look, “stitch-in-the-ditch” quilting follows the seams of the triangles, making them stand out. For a more modern feel, “straight-line quilting” in a diagonal direction can emphasize the movement of the geese and add a clean, architectural texture.
Thread color is a major design choice at this stage. You can choose a thread that matches your “sky” fabric to make the quilting invisible, or a contrasting thread to add another layer of pattern. In a Flying Geese Quilt – Pattern, many quilters like to use a “variegated thread” that changes color, mimicking the varied tones of the sky or the feathers of a bird, adding a subtle shimmer to the finished quilt.
Binding is the final “frame” for your masterpiece. For a Flying Geese Quilt – Pattern, a “bias binding” is often preferred because it is durable and handles the corners of the quilt beautifully. You can use a solid color that matches your geese for a cohesive look, or a striped fabric cut on the bias to create a “barber pole” effect that adds a whimsical touch to the edges of your handmade accessory.
Before you finish, don’t forget to “square up” your quilt. Use your large ruler and rotary cutter to ensure all the edges are perfectly straight and the corners are true 90-degree angles. This step is essential for a Flying Geese Quilt – Pattern to hang straight on a wall or lay flat on a bed. A squared-up quilt always looks more professional and is easier to bind.
Labeling your work is the final act of a true artist. Create a fabric label for the back of your Flying Geese Quilt – Pattern that includes the name of the quilt, your name, the location, and the date it was completed. This turns your project into a documented piece of history. Many quilters also like to include a small “hidden goose” on the back as a fun signature of the theme.
Taking care of your Flying Geese Quilt – Pattern will ensure it lasts for generations. Wash it only when necessary using a gentle, “quilt-safe” detergent and a color catcher sheet to prevent the dark reds or blues of the geese from bleeding into the light sky fabrics. Store it away from direct sunlight to prevent fading, and your beautiful handcrafted quilt will remain a vibrant symbol of your creativity and skill for years to come.
1. Is the Flying Geese Quilt – Pattern difficult for beginners?
It is considered an intermediate-level pattern because of the need for precise points. However, a beginner who is comfortable with a sewing machine and takes the time to practice their 1/4″ seam can certainly find success with this pattern.
2. What is the most common size for a flying geese unit?
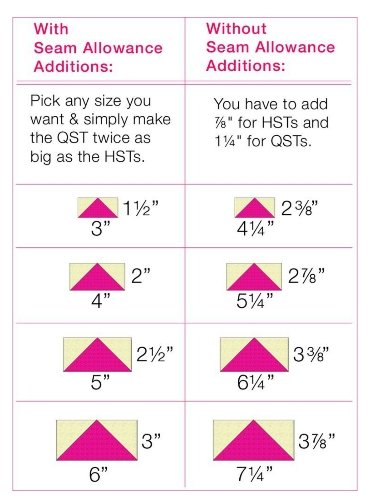
The most common “finished” size is 2″ x 4″. This means the width of the “goose” is always twice its height, which is the standard ratio that gives the block its iconic look.
3. How do I avoid “chopping off” the points of my geese?
Always ensure there is exactly 1/4 inch of fabric between the point of the triangle and the raw edge of the block. When you sew blocks together, your needle should pass exactly through the “V” created by the previous seams.
4. Can I use the “No-Waste” method for any size?
Yes! You just need to follow a specific math formula: the large square should be the finished width of the goose plus 1.25 inches, and the four small squares should be the finished height of the goose plus 7/8 of an inch.
5. Why are my flying geese blocks coming out lopsided?
This usually happens because the fabric was stretched during pressing or because the diagonal lines were not marked or sewn accurately. Using starch can help stabilize the fabric and prevent this “distortion.”
6. Where can I find a printable chart for this pattern?
Many quilting websites and blogs offer free “Flying Geese Math Charts” that list the cutting sizes for dozens of different block dimensions, making it easy to plan your quilt without doing the math yourself.
In this article, we have explored the rich history and technical precision required to create a stunning Flying Geese Quilt – Pattern. We discussed the importance of high-quality quilting cottons and the necessity of precision tools like rotary cutters and specialized rulers. We delved into construction techniques such as the “No-Waste” method and the importance of the scant quarter-inch seam to keep your points sharp. We also looked at how dynamic layouts, negative space, and color gradients can transform a traditional design into a modern work of art. Finally, we covered the essential finishing steps, from quilting motifs to binding and labeling, to ensure your quilt becomes a lasting heirloom.
Quilting is a journey of both the mind and the hands, and the Flying Geese Quilt – Pattern is one of the most rewarding paths you can take. It teaches patience, accuracy, and the joy of seeing a complex vision come to life one triangle at a time. We hope this guide has inspired you to start your own migration into the world of geometric quilting. Please leave your sincere opinion and suggestions in the comments below! We would love to hear about your favorite color palettes or any tips you have for keeping those points perfectly sharp.


