
American-style placemat with a fruit theme - Pattern

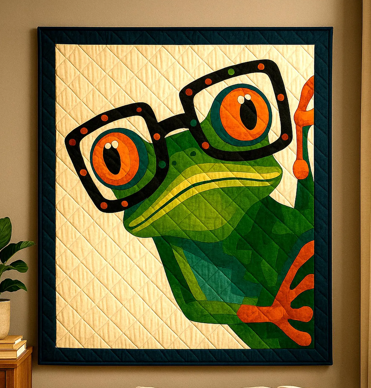
The Frog Quilt – Pattern is a delightful and whimsical project that captures the playful essence of nature’s most famous pond dwellers through the art of textile design. For quilters looking to add a splash of color and a touch of personality to their collection, the Frog Quilt – Pattern provides a perfect balance of geometric structure and organic charm. Whether you are creating a nursery gift or a fun wall hanging for a nature lover, the Frog Quilt – Pattern serves as an engaging way to explore various shades of green and experiment with creative appliqué or piecing techniques.
In the world of contemporary quilting, the Frog Quilt – Pattern has gained popularity for its ability to transform simple shapes into recognizable, adorable characters. This specific Frog Quilt – Pattern allows makers to choose between traditional patchwork methods or more detailed foundation paper piecing, depending on the desired level of realism. Because frogs are found in such diverse environments, the Frog Quilt – Pattern is incredibly adaptable, inviting you to set your fabric amphibians against lily pads, ripples of blue water, or lush tropical leaves to create a complete story within your stitches.
This comprehensive guide will walk you through the technical and creative aspects of the Frog Quilt – Pattern, ensuring that your finished project is as vibrant as a living pond. We will discuss the importance of selecting the right fabric textures, the precision required for those iconic bulging eyes, and how to scale the Frog Quilt – Pattern for different bed sizes or decorative uses. By the end of this article, the Frog Quilt – Pattern will become one of your favorite designs, offering a sense of joy and accomplishment that only a handmade, animal-themed quilt can provide.
The success of your Frog Quilt – Pattern starts with selecting a range of greens that provide depth and movement to the design. To make the most of the Frog Quilt – Pattern, look for a mix of lime, emerald, and forest green fabrics, perhaps even incorporating some mottled “batiks” to mimic the wet, textured skin of a real frog. Using a variety of tones within the Frog Quilt – Pattern ensures that the individual pieces of the frog’s body don’t blend together, maintaining the clarity of the character.
Contrast is vital when working on a Frog Quilt – Pattern, especially between the frog and the background. Many quilters following the Frog Quilt – Pattern opt for a soft blue or cream background to represent water or air, which makes the green of the frog pop. If your Frog Quilt – Pattern includes lily pads, choose a green that is slightly different in hue or value from the frog itself to ensure every element of the scene is distinct and visible from a distance.
Don’t forget the small but essential details in the Frog Quilt – Pattern, such as the eyes and the belly. For the eyes, a high-quality black or dark charcoal fabric is usually recommended by the Frog Quilt – Pattern to give the frog an intelligent and friendly expression. A lighter “tummy” fabric, such as a pale yellow or light mint, adds a realistic touch to the Frog Quilt – Pattern and provides a nice break from the dominant green tones of the upper body.
Texture can be a secret weapon in a Frog Quilt – Pattern, adding a tactile element that children especially love. Consider using a bit of green minky or flannel for the frog’s body within your Frog Quilt – Pattern to make it extra soft and cuddly. If you prefer traditional quilting cottons, look for prints with small polka dots or “pebbles” to add a layer of visual interest to the Frog Quilt – Pattern without overwhelming the overall design.
For a more modern take on the Frog Quilt – Pattern, you can experiment with non-traditional colors like teal, purple, or even a bright “poison dart frog” orange. While the classic green Frog Quilt – Pattern is always a winner, these bold color choices can turn a standard project into a vibrant piece of contemporary art. Just ensure that the fabrics you choose for your Frog Quilt – Pattern are high-quality and colorfast to prevent any bleeding during the first wash.
Finally, always calculate your yardage based on the specific Frog Quilt – Pattern instructions to avoid running out of your primary green mid-project. It is often helpful to buy a little extra of the “frog skin” fabric, as those are the pieces that will be most numerous in the Frog Quilt – Pattern. Having all your fabrics prepared and pressed before you cut the first square will make the entire process of building your Frog Quilt – Pattern much more efficient and enjoyable.
Accuracy in the cutting phase is what separates a good Frog Quilt – Pattern from a great one, particularly when dealing with the small angles of the legs and feet. Using a sharp rotary cutter and a specialized quilting ruler is highly recommended for the Frog Quilt – Pattern to ensure that every piece meets the exact dimensions specified. Even a small error in the initial cuts of the Frog Quilt – Pattern can lead to “wonky” seams that make the frog look distorted once the blocks are joined.
Many versions of the Frog Quilt – Pattern use templates for the more organic shapes, such as the rounded head or the toes. When tracing these onto your fabric, use a fine-line fabric marker to keep your lines crisp, ensuring the Frog Quilt – Pattern maintains its intended silhouette. If you are using an appliqué method for your Frog Quilt – Pattern, remember to leave a small seam allowance if you are doing “turn-under” appliqué, or cut exactly on the line for “raw-edge” styles.
Organization is key when you have dozens of small green pieces for your Frog Quilt – Pattern. Using small labeled bags or clips to group the pieces for the “front legs,” “back legs,” and “body” of the Frog Quilt – Pattern will save you hours of confusion. This systematic approach to the Frog Quilt – Pattern ensures that you don’t accidentally sew a foot onto a head piece, keeping the assembly process smooth and stress-free.
If your Frog Quilt – Pattern involves foundation paper piecing (FPP), ensure your printer settings are set to “actual size” to avoid shrinking the blocks. FPP is a fantastic technique for the Frog Quilt – Pattern because it allows for incredibly sharp points and perfect proportions that are difficult to achieve with traditional piecing. Taking the time to double-check the scale of your Frog Quilt – Pattern printouts will prevent sizing issues when you go to assemble the full quilt top.
Interfacing can be a helpful addition to the Frog Quilt – Pattern, especially if you are using thin fabrics or complex appliqué. Applying a lightweight fusible web to the back of the frog’s components makes them easier to handle and prevents fraying as you sew the Frog Quilt – Pattern together. This is particularly useful for the delicate “toes” of the frog, which are often the most intricate part of the entire Frog Quilt – Pattern design.
Once all your pieces are cut and sorted, perform a “dry layout” of your Frog Quilt – Pattern on a design wall or a flat table. This allows you to see the color flow and check for any misplaced pieces before you commit to sewing. Visualizing the Frog Quilt – Pattern in its entirety at this stage helps you catch any mistakes early, ensuring that your final Frog Quilt – Pattern is a perfectly balanced and symmetrical masterpiece.
The assembly of a Frog Quilt – Pattern usually follows a specific order, starting with the smaller units like the eyes and the legs before moving to the main body. Following the step-by-step instructions in the Frog Quilt – Pattern ensures that your seams nest correctly and that the bulk of the fabric is managed efficiently. Using a consistent quarter-inch seam allowance throughout the Frog Quilt – Pattern is the most important factor in keeping the blocks square and the lines straight.
When sewing the “curved” sections of the Frog Quilt – Pattern, such as the top of the head or the belly, use plenty of pins to keep the fabric from shifting. Sewing slowly and adjusting your fabric every few stitches will help you maintain a smooth curve, which is essential for the friendly look of the Frog Quilt – Pattern. If you are new to curves, practicing on a few scrap pieces of the Frog Quilt – Pattern fabric can build your confidence before you tackle the actual blocks.
Pressing is a critical step in the Frog Quilt – Pattern that should never be rushed or skipped. To keep the quilt top flat, press your seams toward the darker green fabric or press them open to reduce bulk at the intersections of the Frog Quilt – Pattern. A well-pressed Frog Quilt – Pattern is much easier to quilt later on and gives the finished product a professional, high-end appearance that looks great in photos and in person.
If your Frog Quilt – Pattern includes decorative topstitching or embroidery for the mouth and nostrils, these should be added after the main piecing is complete. Using a contrasting thread for these details in the Frog Quilt – Pattern can add a lot of personality; a simple “smile” line can make your frog look happy and welcoming. These small hand-stitched or machine-stitched additions are what truly bring the Frog Quilt – Pattern characters to life.
Joining the individual frog blocks to the background or sashing requires careful alignment to ensure the “pond” looks cohesive. If your Frog Quilt – Pattern features frogs in different poses, check that they are spaced evenly and that the colors are distributed across the quilt top. This stage of the Frog Quilt – Pattern is where you see the transition from a collection of fabric scraps to a beautiful, storytelling textile that reflects your hard work.
Finally, “squaring up” each block to the size specified in the Frog Quilt – Pattern is the final step of the assembly phase. Trimming away any excess fabric ensures that your rows will line up perfectly when you sew the full quilt top together. A perfectly squared Frog Quilt – Pattern is a joy to work with during the quilting and binding phases, ensuring a flat and functional final product that will last for generations.
The Frog Quilt – Pattern offers endless possibilities for creative layouts, allowing you to build anything from a simple repeat pattern to a complex narrative scene. You can arrange your Frog Quilt – Pattern blocks in a grid for a classic look, or scatter them randomly across a blue background to simulate frogs jumping in a pond. This flexibility makes the Frog Quilt – Pattern a favorite for custom commissions or personalized gifts for children.
Adding a “border” of lily pads or dragonflies can further enhance the theme of your Frog Quilt – Pattern, providing a frame that pulls the whole design together. You can find complementary patterns that work well alongside the Frog Quilt – Pattern to create a diverse ecosystem on your quilt. Using a darker green or a deep blue for the border of the Frog Quilt – Pattern can help ground the lighter colors of the interior and provide a professional finish.
The quilting itself is an opportunity to add more detail to the Frog Quilt – Pattern by mimicking the movement of water or the texture of leaves. Free-motion quilting “ripples” around each frog in the Frog Quilt – Pattern adds a sense of motion, as if the frogs have just landed in the water. For the frogs themselves, a simple “pebble” stitch or a “meandering” line can add the perfect amount of texture to the Frog Quilt – Pattern without distracting from the pieced design.
For a unique twist, you can use the Frog Quilt – Pattern to create individual decorative pillows or a “quiet book” for a toddler. Because the Frog Quilt – Pattern is so recognizable, it works beautifully in smaller formats where the detail can be appreciated up close. Making a matching set of a Frog Quilt – Pattern bedspread and a frog-shaped pillow is a fantastic way to decorate a child’s bedroom with a cohesive and playful theme.
Labeling your finished Frog Quilt – Pattern is the final, essential step of the creative process. Include the date, the name of the Frog Quilt – Pattern, and a small note about who it was made for on a fabric label sewn to the back. This turns your Frog Quilt – Pattern into a family heirloom that tells a story of love and creativity, ensuring the recipient knows exactly how much care went into every stitch.
Ultimately, the Frog Quilt – Pattern is a celebration of both the craft of quilting and the beauty of the natural world. Every time you look at the finished quilt, you will be reminded of the fun you had choosing colors and the satisfaction of mastering the curves and points of the Frog Quilt – Pattern. Whether it sits on a bed or hangs on a wall, your Frog Quilt – Pattern is a vibrant and joyful addition to any space, proving that quilting is truly a medium for limitless imagination.
Is the Frog Quilt – Pattern suitable for a beginner quilter?
Yes, the Frog Quilt – Pattern can be very beginner-friendly if you choose an appliqué version. Appliqué allows you to sew the frog shapes onto a solid background without having to match complicated seams. If you are a beginner looking for a challenge, the traditional pieced Frog Quilt – Pattern is a great way to practice your precision.
What is the best way to wash a finished Frog Quilt – Pattern?
To preserve the colors of your Frog Quilt – Pattern, we recommend washing it in cold water on a gentle cycle. Use a “color catcher” sheet to ensure the greens don’t bleed into the lighter background fabrics. Air drying or drying on low heat will help keep the Frog Quilt – Pattern soft and prevent shrinkage.
Can I enlarge the Frog Quilt – Pattern for a king-sized bed?
Absolutely! You can enlarge a Frog Quilt – Pattern by adding more blocks or by increasing the size of the sashing and borders. Many quilters also choose to “scale up” the individual frog blocks in the Frog Quilt – Pattern by 25% or 50% to create fewer, larger frogs that fill the space of a big quilt.
How much fabric do I need for the green parts of the Frog Quilt – Pattern?
For a standard lap-sized Frog Quilt – Pattern, you will typically need about 2 to 3 yards of various green fabrics. It is best to use a “scrappy” mix of 5 or 6 different greens to give your Frog Quilt – Pattern more depth and a more organic, natural look.
What kind of batting is best for this animal-themed quilt?
A cotton-polyester blend batting is excellent for the Frog Quilt – Pattern because it provides a bit of “loft” that makes the frogs look slightly 3D. If you want a very flat, vintage look for your Frog Quilt – Pattern, a 100% cotton batting is the preferred choice.
In conclusion, the Frog Quilt – Pattern is a versatile and joyful project that allows you to bring a bit of nature’s whimsy into your home through the art of quilting. Throughout this article, we have explored the importance of selecting a diverse green fabric palette, the need for precision in cutting and preparation, and the technical assembly steps that ensure a professional finish.
We also discussed creative ways to layout and quilt your Frog Quilt – Pattern, from pond-themed ripples to custom borders. By mastering the Frog Quilt – Pattern, you create more than just a blanket; you create a vibrant piece of art that can serve as a nursery heirloom, a decorative wall hanging, or a cozy gift for a nature enthusiast. The combination of structural geometric units and the organic charm of the frog makes this pattern a timeless favorite that quilters of all levels can enjoy.


