
Horizontal Row Quilt - Pattern

The God’s Eye quilt block tutorial – pattern is a stunning project that blends tradition with creativity. With its mesmerizing geometric design and symbolic meaning, this quilt block is a beautiful way to add depth and artistic expression to your quilting projects. Whether you’re an experienced quilter or a confident beginner, mastering this block will elevate your skills and add a bold visual element to any quilt top.
The term “God’s Eye” originates from spiritual symbolism, representing protection and insight in many cultures. Translated into quilting, the God’s Eye quilt block pattern uses symmetry and contrast to create a radiant focal point that stands out in any patchwork layout. This timeless design lends itself well to both modern and traditional color palettes.
In this comprehensive tutorial, you’ll learn how to create a God’s Eye quilt block using straightforward techniques, precise cutting, and smart piecing strategies. With a clear structure and practical tips, you’ll feel confident crafting a quilt block that not only looks impressive but also carries a beautiful meaning.
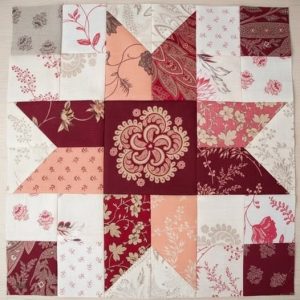
The unique appeal of the God’s Eye quilt block tutorial – pattern lies in its symmetrical, radiating layout. It typically features a central square (the “eye”) surrounded by layers of triangles or diamond shapes that draw attention inward. Understanding the construction is key before you begin cutting or sewing.
This block is often constructed with half-square triangles (HSTs) or diamond shapes. The design requires careful planning of light and dark fabrics to emphasize the radiating pattern. A well-thought-out color contrast will make your God’s Eye quilt block visually striking.
Start by choosing three to five different fabrics that vary in tone and intensity. For a traditional look, go with deep indigo, burgundy, and earthy tones. For a modern take, try bold solids or graphic prints. Keep the center fabric distinct so it becomes the true “eye” of the block.
Cotton quilting fabric is the best material for this project due to its durability, ease of use, and availability in a wide range of prints and colors. Make sure all your fabrics are pre-washed and pressed to avoid shrinking or bleeding.
Accurate cutting is essential. Using a rotary cutter, quilting ruler, and self-healing mat will help ensure that all your fabric pieces are even. This is especially important for maintaining the symmetry of the God’s Eye quilt block pattern.
Before starting to sew, lay out your pieces to get a feel for how they interact. Visualizing the block ahead of time can prevent mistakes and help you make changes before stitching begins.
Creating a beautiful God’s Eye quilt block starts with precision cutting. Depending on the specific variation you’re following, the block typically consists of triangles and squares arranged in a diamond layout. Getting these pieces right is critical for a seamless finished block.
To start, determine your block size. A common finished size is 12” x 12”, but you can scale up or down as needed. For a 12” block, you’ll generally need: one 4.5” center square, four 4.5” squares for the first round of triangles, and eight 5” squares for HSTs.
Use the two-at-a-time HST method by placing two 5” squares right sides together, drawing a diagonal line across one, and sewing ¼” on either side. Cut on the line, press open, and trim to 4.5”. Repeat until you have the quantity needed for your design.
To add a more intricate frame to the “eye,” you can use the stitch-and-flip method with additional triangle corners sewn onto square units. This is a great technique for highlighting your color transitions and adding interest to the block.
Take care to match grainlines when cutting. This will help reduce stretching and keep your quilt block from warping during construction and pressing. Accurate measuring and cutting can make or break the symmetry of the God’s Eye quilt block pattern.
Organize your cut pieces by color and layer to make piecing more efficient. Group similar units and stack them in sewing order. This approach reduces confusion and speeds up the block assembly process.
With your pieces prepped and ready, it’s time to dive into the sewing process. Creating the God’s Eye quilt block involves building outward from the center and maintaining symmetry throughout the assembly.
Begin by sewing the center square and surrounding it with the first set of triangles or HSTs. If you’re using HSTs, make sure the directional prints (if any) are facing the same way. Seam accuracy is critical here, so use a consistent ¼” seam allowance.
After completing the first round, press all seams open or to one side based on your preference. Open seams help reduce bulk, especially at the center where multiple seams meet. A well-pressed block lies flat and makes joining multiple blocks easier later.
Add the next round of triangles or HSTs, building out from the center. Take time to align points and seams so that your quilt block remains square and symmetrical. Pinning at intersections will help ensure clean points and reduce shifting.
Repeat the process for each additional layer until the block reaches your desired size. As you add more layers, continue pressing carefully after each step. Pressing is just as important as stitching for clean lines and sharp points.
Trim the block to size once all components are attached. Use a large quilting ruler to square it up by aligning the center square and ensuring that all sides are equal. Trimming also helps make sure your block fits perfectly with others in your quilt top.
If desired, sew sashing or borders around the block to emphasize the design even more. This step is optional but can add extra polish to your finished God’s Eye quilt block and make it easier to incorporate into a larger quilt.
Once you’ve mastered the construction, you can have fun incorporating the God’s Eye quilt block pattern into various projects. This versatile design works well in many settings and can be adapted to suit different styles.
Use the block in a full-sized quilt by repeating it in a grid layout. With alternating fabric choices, each block can look distinct while maintaining cohesion. This repetition creates a striking quilt top that draws the eye across the entire piece.
Try using the God’s Eye block as a centerpiece in a sampler quilt. Pair it with other classic or modern blocks to showcase your range of quilting skills. The block’s bold design makes it a natural focal point in any quilt.
You can also scale the block down to create mini quilts, wall hangings, or even quilted cushions. These smaller projects are ideal for gifting or home decor and allow you to experiment with color without committing to a large quilt.
Make a table runner using three to four blocks in a row. Use coordinated fabrics for a cohesive look and back the runner with a complementary fabric. Add binding and minimal quilting to complete a lovely handmade decoration.
For a modern twist, experiment with negative space around the block. Use solid background fabrics to let the intricate piecing of the God’s Eye quilt block stand out. This minimalist approach can make the design feel fresh and contemporary.
Incorporate fussy cutting into your center square to highlight a motif or special fabric. This personal touch can add extra charm to your quilt block and make each one feel unique.
Q1: Is the God’s Eye quilt block suitable for beginners?
Yes, with some experience in HSTs and basic piecing. It’s a great skill-builder for quilters looking to expand their techniques.
Q2: What size should I make the block?
A standard size is 12″ x 12″, but you can adjust depending on your project. Just remember to scale your pieces accordingly.
Q3: What fabrics work best for this pattern?
Quilting cottons in varying tones work well. Choose high-contrast fabrics to emphasize the geometric design.
Q4: Can I use pre-cuts like charm packs or layer cakes?
Yes! Charm packs (5″ squares) are great for HSTs, and layer cakes (10″) give you even more options for larger blocks.
Q5: How do I ensure perfect points?
Accurate cutting, a consistent ¼” seam allowance, and careful pinning at intersections are key. Press as you go for best results.
Q6: What quilting style works best with this block?
Echo quilting or straight-line quilting can highlight the block’s geometry. Custom quilting can enhance the “radiating” look.
The God’s Eye quilt block tutorial – pattern brings together tradition, symmetry, and creativity in one inspiring project. Whether you’re drawn to its symbolic meaning or captivated by its bold design, this block offers endless opportunities for experimentation and expression.
We’ve covered fabric selection, cutting tips, piecing strategies, and creative ideas to help you succeed with your God’s Eye quilt block. With care and patience, this block can become a centerpiece in quilts, home decor, or gifts.


