
American-style placemat with a fruit theme - Pattern

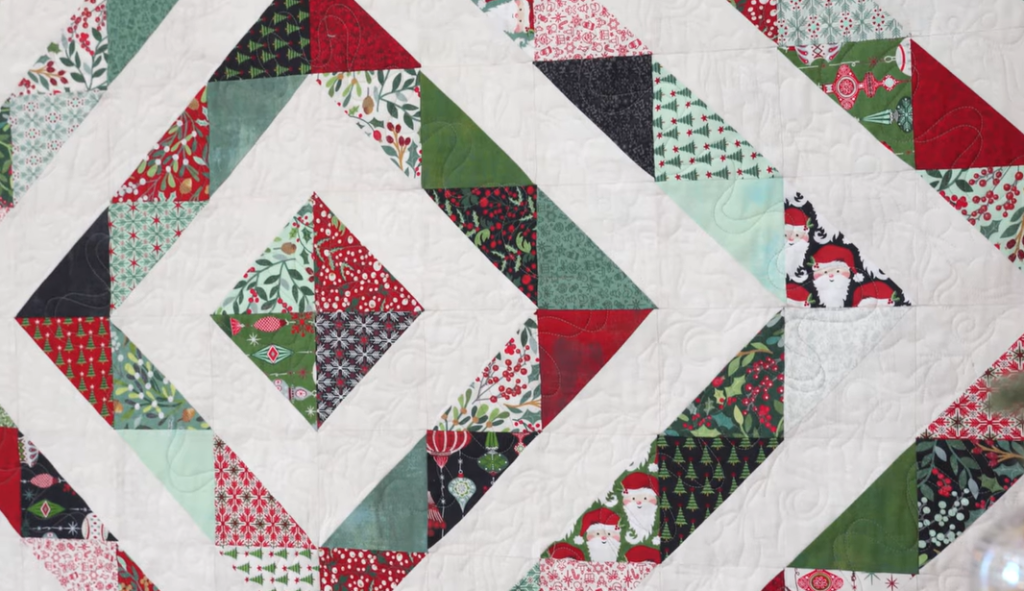
Half Square Triangles Quilt techniques – Pattern are among the most essential skills a quilter can master, offering a gateway to an infinite world of geometric design and creative expression. Known affectionately in the sewing community as HSTs, these versatile units consist of two right-angled triangles joined along their longest edge to form a perfect square. Whether you are a beginner picking up a rotary cutter for the first time or a seasoned artisan looking to refine your precision, understanding how to manipulate these shapes is the secret to unlocking thousands of classic and modern quilt patterns.
When you dive into Half Square Triangles Quilt techniques – Pattern, you quickly realize that the beauty of this method lies in its simplicity and the sheer variety of ways it can be constructed. From the traditional “draw-a-line” method to high-speed “eight-at-a-time” shortcuts, the approach you choose can significantly impact both your accuracy and your production speed. For many quilters, the HST is the “bread and butter” of their craft, serving as the foundational building block for iconic designs like the Pinwheel, Star of Ohio, and the timeless LeMoine Star.
In this comprehensive guide, we will explore the nuances of Half Square Triangles Quilt techniques – Pattern, focusing on the methods that ensure your points are sharp and your seams are flat. Achieving professional results requires a blend of the right tools, consistent seam allowances, and a bit of patience during the trimming process. By mastering these techniques, you will gain the confidence to tackle complex quilt layouts and create stunning heirlooms that showcase your dedication to the art of quilting.
The most fundamental approach to Half Square Triangles Quilt techniques – Pattern is the two-at-a-time method, which is perfect for scrappy quilts or when you only need a few units of a specific color. To begin, you place two contrasting fabric squares right sides together, ensuring the edges are perfectly aligned to maintain fabric grain integrity. This method is highly favored because it minimizes fabric waste and allows for great control over pattern placement.
Using a fabric marker or a fine-point pencil, you draw a diagonal line from one corner to the opposite corner on the lighter fabric. This line serves as your guide, but you won’t actually sew on it; instead, it acts as the center point for your quarter-inch seam. This precision is what makes the Half Square Triangles Quilt techniques – Pattern so successful for high-contrast designs.
Next, you sew a seam exactly 1/4 inch away from both sides of the drawn line. This is where a 1/4 inch quilting foot becomes your best friend, as it helps maintain a consistent distance throughout the entire length of the square. Keeping your stitch length slightly shorter can also help prevent the seams from pulling apart during the later stages of the quilting process.
Once the sewing is complete, you use a rotary cutter to slice directly along the drawn center line. This action magically transforms your single unit into two identical HST units. It is a satisfying moment for any maker, seeing the Half Square Triangles Quilt techniques – Pattern come to life with just a few simple cuts.
After cutting, it is time to press the units open. Most quilters prefer to press toward the darker fabric to prevent the seam allowance from shadowing through the lighter side. This step is crucial for maintaining a professional look in your finished quilt top, as it ensures the colors remain vibrant and the surface stays smooth.
The final step in this technique is trimming and squaring up. Even with perfect sewing, fabric can shift slightly, so using a quilting ruler to trim the units to the exact size required by your quilt pattern is essential. This attention to detail ensures that all your Half Square Triangles fit together perfectly when you begin assembling your final masterpiece.
If you are working on a large project like a King-size quilt, you will want to utilize the eight-at-a-time Half Square Triangles Quilt techniques – Pattern. This “magic” method allows you to produce a bulk amount of units simultaneously, significantly cutting down on cutting and sewing time. It starts with two larger squares of fabric, usually calculated by doubling the desired finished size plus a small seam allowance margin.
To execute this, you draw two diagonal lines on the back of the lighter fabric, forming a large “X” from corner to corner. This grid provides the framework for multiple Half Square Triangles Quilt techniques – Pattern units. It is a brilliant way to handle fat quarters or yardage when you need a consistent color palette across your entire quilt design.
Similar to the previous method, you sew a 1/4 inch seam on both sides of both diagonal lines. This means you will be making four passes with your sewing machine. The stability of the larger fabric piece often leads to less stretching along the bias edges, which is a common challenge when working with triangular fabric shapes.
The cutting process for the eight-at-a-time method is where the efficiency really shines. You first cut the square vertically through the center, then horizontally through the center, and finally along both diagonal lines. In just four quick motions with your rotary cutter, you have produced eight individual Half Square Triangles Quilt techniques – Pattern units ready for the iron.
Pressing these units requires a gentle touch. Because many of the edges are cut on the bias, the fabric is prone to stretching if you push the iron back and forth. Instead, use a “pressing” motion—lifting the iron and placing it down firmly—to set the seams without distorting the geometric shape of your HSTs.
This bulk method is a game-changer for modern minimalist quilts or traditional Star patterns that require a high volume of identical units. By mastering this specific Half Square Triangles Quilt techniques – Pattern, you can move from the cutting table to the sewing machine with much more speed, allowing you to focus on the creative layout and design aspects of your work.
One of the most exciting aspects of Half Square Triangles Quilt techniques – Pattern is the sheer versatility of the units once they are constructed. By simply rotating the squares, you can create entirely different visual effects. For instance, the Chevron pattern is achieved by alternating the direction of the triangles to create “V” shapes, a popular choice for modern nursery quilts.
Another classic layout is the Broken Dishes design, which clusters four HSTs together so that the triangles meet in the center. This creates a sense of movement and energy across the quilt top. Utilizing Half Square Triangles Quilt techniques – Pattern in this way allows you to experiment with color theory, using gradients or high-contrast pairings to make the shapes pop.
For those who love a more traditional aesthetic, the Flying Geese look can also be mimicked using two HST units. While there are specific methods for geese, using Half Square Triangles gives you more flexibility if you decide to change your mind mid-project. The ability to pivot your design is one of the greatest benefits of mastering these quilting techniques.
The Barn Glass or Diamond layout is another stunning option. By pointing the triangles toward a central axis, you create large diamond shapes that can serve as a focal point for your textile art. The Half Square Triangles Quilt techniques – Pattern acts as a modular system, where each block is a piece of a larger puzzle waiting to be solved.
Don’t forget the power of “negative space” in your quilt pattern. By pairing a patterned HST with a solid background unit, you can create the illusion of floating shapes. This technique is frequently seen in contemporary quilting, where the focus is on clean lines and bold, architectural structures made possible by precise Half Square Triangles.
Experimenting with your design wall is highly recommended when working with these units. Before you sew the blocks together, lay out your Half Square Triangles Quilt techniques – Pattern pieces and walk away for a few minutes. Seeing the arrangement from a distance often reveals new secondary patterns or color balance issues that you wouldn’t notice up close.
Even experienced quilters encounter challenges when working with Half Square Triangles Quilt techniques – Pattern, particularly regarding “dog ears” and blunt points. Dog ears are the tiny triangles of fabric that stick out past the square after you press your seam open. Removing these is a vital step in the trimming process to ensure your final seams aren’t too bulky.
If your points are getting “chopped off” when you sew your blocks together, it usually indicates an issue with your seam allowance. In the world of Half Square Triangles Quilt techniques – Pattern, a “scant” 1/4 inch seam is often the secret to success. This means sewing just a thread or two narrower than a full 1/4 inch to account for the space the fabric takes up when folded over the seam.
Fabric stretching is another common hurdle, especially since the long side of the triangle is cut on the bias. To combat this, some quilters use fabric starch or a sizing spray before cutting their squares. This stiffens the fibers and makes the Half Square Triangles Quilt techniques – Pattern much easier to handle without the fabric warping out of shape.
Maintaining a sharp rotary blade is non-negotiable for precision. If your blade is dull, it can snag the fabric or fail to cut through all layers, leading to jagged edges that ruin your alignment. When working with Half Square Triangles, every millimeter counts, so start your project with a fresh blade to ensure clean, crisp cuts.
Another tip for perfect HSTs is to check your iron settings. Too much steam can actually distort the fabric, causing it to “wave.” Use a dry iron or very minimal steam, and always ensure you are pressing the seam flat before pressing it to one side. This “sets” the stitches into the fabric, a professional quilting technique that leads to much flatter blocks.
Finally, keep a consistent trimming tool handy. Using the same ruler throughout the entire project ensures that every Half Square Triangles Quilt techniques – Pattern unit is identical. Consistency is the hallmark of a high-quality quilt, and by following these troubleshooting steps, your finished project will have the flat, square, and professional finish that every quilter dreams of.
What is the best way to calculate the size of squares for HSTs?
To use the two-at-a-time Half Square Triangles Quilt techniques – Pattern, add 7/8 of an inch to your desired finished size. For example, if you want a 4-inch finished HST, you should start with 4 7/8-inch squares. Many quilters round this up to 1 inch (starting with a 5-inch square) to allow extra room for trimming.
How do I prevent my sewing machine from “eating” the corners of the triangles?
This is a common issue when sewing on the bias. To prevent this, you can use a “leader” or “ender”—a small scrap of fabric that you start sewing on before moving onto your HST unit. This keeps the thread tension consistent and prevents the needle from pushing the corner of your quilt fabric down into the needle plate.
Can I make Half Square Triangles using paper piecing?
Absolutely! Foundation Paper Piecing (FPP) is an excellent way to achieve perfect Half Square Triangles Quilt techniques – Pattern, especially for very small units. There are also “HST paper” products available where you sew directly on printed lines on a paper sheet, then tear the paper away after the units are formed.
Is it better to press seams open or to the side for HSTs?
This depends on the quilt pattern. Pressing to the side (usually the darker side) is traditional and makes the seams stronger. However, pressing seams open can reduce bulk, which is helpful if you have many points meeting in one spot. For Half Square Triangles, pressing to the side is generally recommended for beginners.
What are “dog ears” in quilting?
“Dog ears” are the small triangular flaps of fabric that extend beyond the edges of the square after a diagonal seam has been sewn and pressed. In the context of Half Square Triangles Quilt techniques – Pattern, these should be trimmed off to ensure your blocks lay flat and align perfectly with neighboring units.
Mastering the Half Square Triangles Quilt techniques – Pattern is a transformative milestone for any sewing enthusiast. Throughout this article, we have explored the foundational two-at-a-time method, the high-efficiency eight-at-a-time approach, and the creative possibilities of various quilt layouts.
We also covered essential troubleshooting tips to help you maintain precision, from managing bias stretch to perfecting your seam allowance. By integrating these quilting skills into your repertoire, you are well-equipped to create intricate, beautiful, and professional-grade quilts that will stand the test of time.


