
American-style placemat with a fruit theme - Pattern

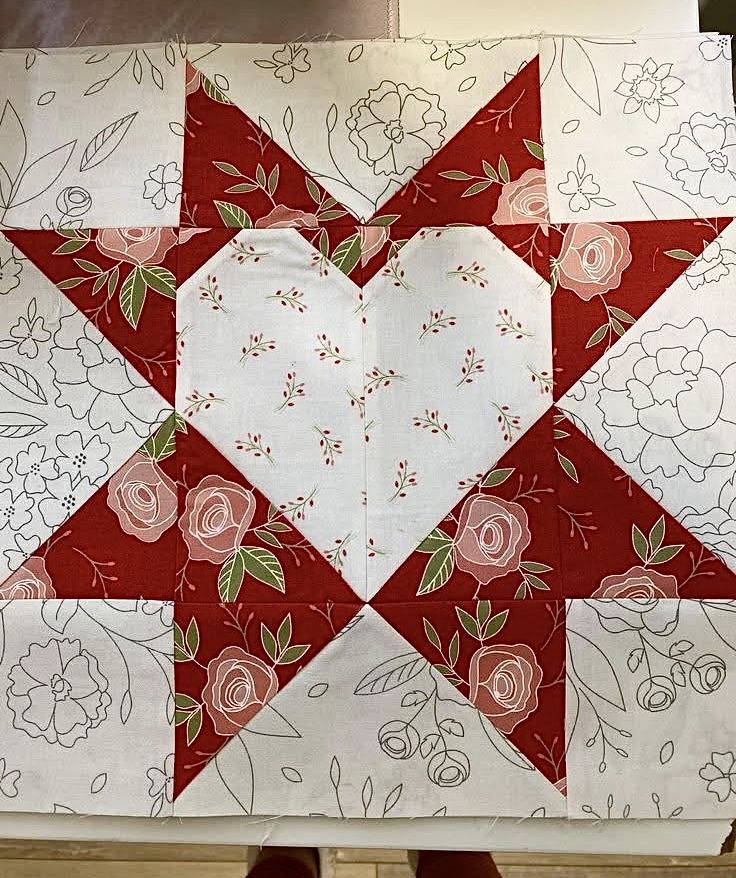
Creating a Heart Quilt Block – Pattern is one of the most heartwarming ways to dive into the world of quilting, offering a timeless design that symbolizes love, friendship, and handmade care. Whether you are a seasoned quilter looking for a quick weekend project or a beginner eager to learn the basics of patchwork, mastering the Heart Quilt Block – Pattern provides a versatile foundation for countless creative endeavors. This specific design has remained a staple in the quilting community for generations because it allows for endless customization through color choice, fabric texture, and arrangement.
The beauty of a modern Heart Quilt Block – Pattern lies in its geometric simplicity, often utilizing basic shapes like squares and triangles to form a soft, recognizable silhouette. By following a structured Heart Quilt Block – Pattern, you can create stunning baby quilts, romantic wedding throws, or even small decorative pillows that add a touch of charm to any room. The process of selecting fabrics for your Heart Quilt Block – Pattern—ranging from traditional reds and pinks to contemporary teals or even scrap-friendly “scrappy” looks—is a meditative journey that transforms simple remnants of cloth into a meaningful piece of art.
In this comprehensive guide, we will explore everything you need to know about the Heart Quilt Block – Pattern, from the initial cutting phase to the final assembly of the block. We will discuss the technical nuances of “stitch and flip” methods, the importance of accurate seam allowances, and how to scale your Heart Quilt Block – Pattern to fit different project sizes. By the end of this article, you will have a deep understanding of why the Heart Quilt Block – Pattern is a must-have in your sewing repertoire and how to execute it with professional precision and a human touch.
The first step in bringing your Heart Quilt Block – Pattern to life is choosing high-quality 100% quilting cotton. This material is preferred because it has a stable weave and minimal stretch, which is crucial when you are trying to align the points of your Heart Quilt Block – Pattern. If you use a fabric that is too thin or slippery, the heart might end up looking lopsided or distorted after you press your seams.
When considering the “vibrancy” of your Heart Quilt Block – Pattern, think about the contrast between the heart fabric and the background fabric. Most quilters choose a neutral background, such as cream, white, or light grey, to make the colors of the Heart Quilt Block – Pattern pop. However, a “dark mode” heart—using a dark background with a bright, neon heart—can create a strikingly modern aesthetic that reinvents the classic Heart Quilt Block – Pattern.
The term Pattern implies a repeatable structure, but your choice of print can drastically change the “mood” of the block. A floral print gives the Heart Quilt Block – Pattern a vintage, cottagecore feel, while solid colors emphasize the clean, crisp lines of the geometry. If you are using scraps, try to keep the “value” (the lightness or darkness) consistent across the heart pieces so the shape remains clearly visible within the Heart Quilt Block – Pattern.
Don’t forget to pre-wash your fabrics if you are worried about “bleeding,” especially if you are using deep reds for your Heart Quilt Block – Pattern. Red dyes are notorious for migrating into lighter background fabrics during the first wash. A quick pre-wash with a color catcher ensures that the crisp white background of your Heart Quilt Block – Pattern stays pristine for years to come, protecting your hard work.
The weight of the fabric also plays a role in how the Heart Quilt Block – Pattern feels when finished. Mixing different weights, like flannel and standard cotton, can be done, but it requires more attention to tension and needle size. For a beginner, sticking to a uniform fabric weight throughout the Heart Quilt Block – Pattern is the easiest way to achieve a flat, square block that is easy to quilt over later.
Finally, consider the scale of the prints you choose for your Heart Quilt Block – Pattern. If you are making a small 6-inch block, a large-scale floral print might get “lost” or cut off in a way that makes the heart look cluttered. Small-scale prints or “blenders” (fabrics that look solid from a distance but have a subtle texture) are generally the most successful choices for a clear and beautiful Heart Quilt Block – Pattern.
To ensure your Heart Quilt Block – Pattern comes together perfectly, you need a few essential tools: a rotary cutter, a self-healing mat, and a clear acrylic ruler. Precise cutting is the secret to a professional-looking Heart Quilt Block – Pattern. Even a 1/8-inch error in your initial cuts can lead to a block that won’t lay flat or align with other blocks in your quilt top.
Most Heart Quilt Block – Pattern designs rely on the “Stitch and Flip” method to create the rounded corners at the top of the heart. This involves placing small squares of background fabric on the corners of a larger rectangle and sewing diagonally. When you flip the corner and press it, you create the diagonal line needed for the Heart Quilt Block – Pattern without having to deal with tricky “Y-seams” or curves.
A quarter-inch seam allowance is the golden rule of quilting, and it is especially important for the Heart Quilt Block – Pattern. Most modern sewing machines come with a specialized “1/4-inch foot” that helps you maintain this distance. If your seams are too wide, your Heart Quilt Block – Pattern will be too small; if they are too narrow, the heart shape might look bloated or lose its points.
Marking your diagonal lines is a helpful trick for a perfect Heart Quilt Block – Pattern. Use a water-soluble fabric pen or a Hera marker to draw a line on the back of your corner squares. Sewing directly on this line ensures that the “flip” part of your Heart Quilt Block – Pattern is exactly where it needs to be, resulting in perfectly symmetrical “lobes” at the top of the heart.
Pressing is just as important as sewing when working on a Heart Quilt Block – Pattern. You should always “set the seam” by pressing it flat first, then pressing the seam allowance to one side (usually toward the darker fabric). Proper pressing prevents the Heart Quilt Block – Pattern from becoming bulky, which makes the eventual machine or hand quilting much smoother and more enjoyable.
Before you finish the block, it is a good habit to “square up” your Heart Quilt Block – Pattern. This means using your ruler to trim away any tiny bits of excess fabric so the block is exactly the size specified in the Pattern. Squaring up ensures that when you sew multiple hearts together, the rows stay straight and the corners of the Heart Quilt Block – Pattern meet up perfectly every time.
Once you have mastered the basic Heart Quilt Block – Pattern, you can begin to experiment with variations like the Log Cabin Heart or the Wonky Heart. A Log Cabin variation involves building the heart out of strips of fabric, adding a sense of movement and complexity to the Heart Quilt Block – Pattern. These variations allow you to put a personal stamp on a classic design while still following the core logic of the original.
You can also adjust the “slouch” or “height” of the Heart Quilt Block – Pattern by changing the proportions of the rectangles used. A taller, thinner Heart Quilt Block – Pattern has a more elegant, primitive look, while a wide, squat heart feels whimsical and modern. Experimenting with these dimensions allows you to create a Pattern that is uniquely yours, tailored to the specific “vibe” of your project.
Adding a border or “sashing” around each Heart Quilt Block – Pattern can completely change the look of a quilt. Sashing helps each heart stand out as an individual unit, whereas sewing the blocks directly to one another creates a “lattice” effect where the hearts seem to dance across the fabric. This choice is a key part of designing the overall layout of your Heart Quilt Block – Pattern project.
For a tactile experience, try incorporating applique into your Heart Quilt Block – Pattern. Instead of piecing the heart using squares and triangles, you can cut a heart shape out of fabric and sew it onto a background block using a blanket stitch or a satin stitch. This version of the Heart Quilt Block – Pattern is perfect for using up very small scraps or adding decorative embroidery around the edges.
Another popular variation is the “Heart-in-a-Heart” block. This involves creating a small Heart Quilt Block – Pattern and then using it as the center square for a larger heart. This nested design is visually stunning and showcases a high level of quilting skill. It’s a great way to challenge yourself once you feel comfortable with the standard Heart Quilt Block – Pattern.
Finally, think about the color gradients. You can make a “rainbow heart” by using different colors for each section of the Heart Quilt Block – Pattern. By using the Pattern as a map, you can create ombre effects that transition from dark at the bottom point to light at the top lobes, adding a professional, artistic depth to your finished quilt.
After you have sewn a collection of blocks from your Heart Quilt Block – Pattern, the next stage is the quilt top assembly. This is where you join all your hearts into rows. It is helpful to lay all your blocks out on a “design wall” or a clean floor first. This allows you to check the color balance of your Heart Quilt Block – Pattern blocks and make sure no two identical fabrics are touching.
Once the top is finished, you will create a “quilt sandwich” consisting of your Heart Quilt Block – Pattern top, a layer of batting, and a backing fabric. Basting these layers together—either with safety pins or a temporary spray adhesive—is essential. If the layers shift while you are quilting, it can create “puckers” on the back of your beautiful Heart Quilt Block – Pattern.
When it comes to the actual quilting, you can choose a design that complements the Heart Quilt Block – Pattern. A simple “echo quilting” design, where you sew lines that follow the shape of the heart, emphasizes the Pattern. Alternatively, a “stipple” or “meandering” stitch adds a lovely crinkled texture that makes the Heart Quilt Block – Pattern feel cozy and lived-in.
If you are a beginner, “stitching in the ditch”—sewing directly in the seams of the Heart Quilt Block – Pattern—is a safe and effective way to finish the project. This keeps the focus on the patchwork itself and ensures the quilt is durable enough to survive many years of use and washing. The Heart Quilt Block – Pattern looks great with both minimal and dense quilting styles.
The binding is the final frame for your Heart Quilt Block – Pattern. You can use a matching fabric for a seamless look or a contrasting “striped” binding for a bit of extra flair. Hand-sewing the binding to the back of the quilt provides a high-end finish that honors the time and love you put into every Heart Quilt Block – Pattern you created.
Lastly, don’t forget to add a quilt label to the back. Your Heart Quilt Block – Pattern project is a piece of history. Recording your name, the date, and the occasion for making the quilt ensures that the story of your Heart Quilt Block – Pattern is preserved for whoever is lucky enough to wrap themselves in your handmade creation in the future.
1. What is the easiest size for a beginner Heart Quilt Block – Pattern?
A 10-inch or 12-inch block is generally the easiest for beginners. Larger pieces of fabric are easier to handle and more forgiving if your seam allowance isn’t perfectly consistent throughout the Heart Quilt Block – Pattern.
2. How many Heart Quilt Block – Pattern units do I need for a throw quilt?
For a standard throw quilt (approx. 50″ x 60″), you would need about 30 blocks if you are making 10-inch hearts without sashing. Adding sashing (strips of fabric between blocks) can reduce the number of hearts needed.
3. Can I use a Heart Quilt Block – Pattern for a pillow cover?
Absolutely! A single large Heart Quilt Block – Pattern (such as 16 or 18 inches) makes a perfect center for a decorative throw pillow. It’s a great way to practice the Pattern before committing to a full-sized quilt.
4. Why are the points of my heart getting cut off?
This usually happens because of an inaccurate quarter-inch seam. If you sew too close to the point of the Heart Quilt Block – Pattern, the point will disappear into the seam allowance when you join it to the next piece.
5. Is the Heart Quilt Block – Pattern suitable for “Fussy Cutting”?
Yes! Fussy cutting involves cutting a specific motif (like a little bird or a flower) from your fabric to feature it right in the center of the Heart Quilt Block – Pattern. It adds a wonderful “surprise” element to the design.
6. How do I make my Heart Quilt Block – Pattern look vintage?
To achieve a vintage look, use “reproduction fabrics” (prints that look like they are from the 1930s or 1800s) and choose a cream or tea-dyed background rather than a bright white for your Heart Quilt Block – Pattern.
In this article, we have explored the timeless and versatile world of the Heart Quilt Block – Pattern, covering everything from the importance of choosing 100% quilting cotton to the technical execution of the “stitch and flip” method.
We discussed how to scale the Pattern for different ages and projects, the tools needed for precision, and the creative variations that allow you to make each block your own. Whether you are using the Heart Quilt Block – Pattern for a large-scale quilt or a small handmade gift, the core principles of accuracy, pressing, and color contrast remain the keys to success. We hope this guide has inspired you to start your next sewing journey with confidence and love.


