
American-style placemat with a fruit theme - Pattern

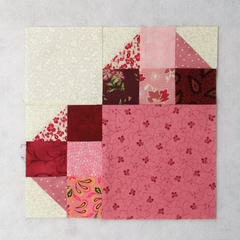
Creating a Heart-Shaped Quilt – Pattern is one of the most heartwarming ways to express your creativity and love through the art of quilting. Whether you are preparing a special gift for a wedding, a newborn baby, or simply want to add a touch of romance to your home decor, this specific design offers a timeless appeal that resonates with people of all ages. Many quilters find that working on a Heart-Shaped Quilt – Pattern allows them to experiment with vibrant colors and intricate fabric combinations, turning simple scraps of cloth into a meaningful masterpiece that can be cherished for generations.
The journey of developing a Heart-Shaped Quilt – Pattern involves more than just sewing pieces of fabric together; it is about understanding the geometry of love and the precision of patchwork. For beginners, the idea of creating curved edges or sharp points might seem daunting, but modern techniques have made the process much more accessible. By following a well-structured quilting guide, you can learn how to manage the unique angles required for the heart shape, ensuring that every block aligns perfectly to form a cohesive and beautiful visual narrative across the surface of your quilt.
In this detailed exploration of the Heart-Shaped Quilt – Pattern, we will dive deep into the essential materials, the technical construction methods, and the creative variations that make this project so popular. From selecting the perfect cotton fabrics to mastering the final quilting stitches, every step is an opportunity to refine your skills and produce something truly unique. As you move forward, you will discover that the versatility of this pattern is limited only by your imagination, making it a favorite choice for both traditionalists and modern quilters alike who want to create a symbol of warmth and affection.
The success of your Heart-Shaped Quilt – Pattern begins with the quality of the fabrics you choose to incorporate into your design. Most professional quilters recommend using 100% high-quality cotton because it holds its shape well during the cutting and sewing process, which is vital for maintaining the symmetry of the heart. When picking your colors, consider using a mix of solids and prints to give the heart a sense of depth and movement, making the central motif pop against the background fabric.
In addition to the main fabric, the batting selection plays a significant role in the final feel of your Heart-Shaped Quilt – Pattern. If you want a quilt that is light and breathable, a cotton batting is ideal, whereas a polyester or wool blend can provide more loft and warmth. The “loft” refers to the thickness of the batting, and for a heart-themed project, a medium loft often helps highlight the decorative quilting lines that follow the curves of the heart shape, giving it a subtle 3D effect.
Precision cutting tools are non-negotiable when you are working with a Heart-Shaped Quilt – Pattern. You will need a sharp rotary cutter, a self-healing cutting mat, and a variety of acrylic quilting rulers. Since the heart shape often involves 45-degree angles or specialized “half-square triangles,” having a ruler with clear increment markings will ensure that your pieces are uniform. This accuracy is what prevents the fabric from puckering and keeps the “V” of the heart looking sharp and professional.
The thread you use for a Heart-Shaped Quilt – Pattern should be strong yet fine enough to blend into the seams. A 50-weight cotton thread is the gold standard for piecing, as it is durable but does not add unnecessary bulk to the seam allowances. Choosing a neutral color like dove grey or tan often works best for piecing different colors together, but you might want a contrasting thread for the actual top-stitching to showcase the beautiful heart outlines you have created.
Marking tools are also essential when following a Heart-Shaped Quilt – Pattern, especially if you are using the “draw and sew” method for the rounded corners. A water-soluble fabric pen or a chalk pencil allows you to mark the sewing lines directly onto the fabric without leaving a permanent trace. These marks act as a guide for your needle, ensuring that the curves of the heart are smooth and consistent throughout the entire quilt top, which is crucial for a polished final look.
Finally, don’t overlook the importance of a high-quality sewing machine needle. For a Heart-Shaped Quilt – Pattern, a size 80/12 or 75/11 universal or microtex needle is usually preferred. A fresh needle prevents skipped stitches and ensures that the fabric is not damaged as you navigate the multiple layers of the quilt sandwich. Preparing your workspace with these specific materials will make the construction phase much more enjoyable and significantly increase the chances of a flawless result.
The most common way to construct a Heart-Shaped Quilt – Pattern is through a method known as “stitch and flip.” This technique involves placing small squares on the corners of larger rectangles and sewing diagonally across them to create the angled top of the heart. By mastering this simple piecing method, you can create hearts of any size without having to deal with difficult templates or “Y-seams,” making the project much faster and more beginner-friendly.
Another popular approach for the Heart-Shaped Quilt – Pattern is using Half-Square Triangles (HSTs). HSTs are the building blocks of many traditional quilt patterns and are perfect for creating the bottom point of the heart. By pairing two contrasting triangles together, you create a sharp, clean diagonal line that defines the lower half of the heart. The secret to perfect HSTs is consistent seam allowance, usually exactly one-quarter of an inch, which ensures all blocks fit together like a puzzle.
When working on a Heart-Shaped Quilt – Pattern, “fussy cutting” can be a game-changer for your visual design. Fussy cutting is the practice of targeting a specific image on your fabric—like a flower or a small animal—and centering it within the heart block. This technique adds a layer of personalization and detail to the quilt, making each individual heart look like a tiny piece of framed art. It takes a bit more fabric and time, but the results are incredibly rewarding.
Pressing is a critical step that many quilters rush through, but in a Heart-Shaped Quilt – Pattern, it is essential. You should always “press for success” by using a hot iron to set your seams before pushing them to one side. Most quilters recommend pressing seams to the dark side to prevent the seam allowance from showing through the lighter fabrics. Flat, crisp seams are the hallmark of a high-quality quilt and make the final quilting process much easier for your machine.
For those who want a more organic look, the Heart-Shaped Quilt – Pattern can also be achieved through appliqué. This involves cutting out a heart shape and sewing it onto a background square using a blanket stitch or a zig-zag stitch. Appliqué allows for much more rounded and realistic heart shapes compared to the pixelated look of traditional piecing. This method is particularly popular for baby quilts or wall hangings where a single, large focal heart is desired.
Symmetry is the biggest challenge when following a Heart-Shaped Quilt – Pattern. To ensure your hearts aren’t lopsided, always check your measurements after every few blocks. Using a scant quarter-inch seam is a secret used by many experts to account for the fold of the fabric. By staying diligent with your measurements and your sewing machine’s alignment, the hearts in your Heart-Shaped Quilt – Pattern will look uniform and professionally made, giving the entire project a sense of balance.
The layout of your Heart-Shaped Quilt – Pattern determines the overall “vibe” of the finished piece. You can choose a “grid layout,” where hearts are arranged in neat rows and columns, or a “scattered layout” for a more modern and whimsical feel. Some quilters even use the hearts to create a larger shape, such as a “wreath of hearts,” which adds a complex and sophisticated layer to the quilt design that catches the eye from across the room.
Color theory plays a massive role in how the Heart-Shaped Quilt – Pattern is perceived. A monochromatic palette—using various shades of red and pink—creates a classic, romantic look. Alternatively, a “scrappy” approach using every color in the rainbow can make the quilt feel energetic and fun. Using a color wheel can help you find complementary colors, such as teal and orange, that make the heart shapes vibrate with visual interest against a neutral background like white or grey.
Background fabric, or “negative space,” is just as important as the hearts themselves in a Heart-Shaped Quilt – Pattern. If you choose a busy print for the hearts, a solid white or cream background will provide a place for the eye to rest and make the shapes more defined. On the other hand, using a dark background like navy or charcoal can create a “glowing” effect for the hearts, making them look like neon lights or stained glass, which is a very popular trend in contemporary quilting.
Borders and sashing are the frames of your Heart-Shaped Quilt – Pattern. Sashing refers to the strips of fabric sewn between the blocks, which can help separate the hearts and keep the design from feeling too crowded. Adding a wide outer border gives you space to perform intricate “free-motion quilting,” where you can sew smaller heart motifs or swirls to complement the main theme. These finishing touches wrap the whole design together into a cohesive artistic statement.
When planning your Heart-Shaped Quilt – Pattern, consider the “scale” of your prints. Using a mix of large-scale florals, medium geometric patterns, and tiny “low-volume” prints adds texture and variety. If all the fabrics have the same scale of pattern, the quilt can look flat. By mixing the scales, you create a “focal hierarchy” that guides the viewer’s eye through the different sections of the quilt, making the discovery of each heart a unique experience.
Finally, think about the binding of the quilt, which is the fabric that wraps around the raw edges. For a Heart-Shaped Quilt – Pattern, a striped binding cut on the bias can create a “barber pole” effect that adds a whimsical finishing touch. Alternatively, using the same fabric as the hearts for the binding can create a sense of continuity. The binding is the last thing you sew, but it’s the frame that protects your work and adds that final pop of color.
One of the most frequent issues when making a Heart-Shaped Quilt – Pattern is “stretched” fabric, especially when sewing on the bias (the diagonal grain of the fabric). Bias edges are very stretchy and can cause your heart blocks to become distorted or “wonky.” To prevent this, try using fabric starch to stiffen the material before cutting. Starch keeps the fibers locked in place, allowing you to sew those diagonal seams of the heart without the fabric pulling out of shape.
Another common hurdle in the Heart-Shaped Quilt – Pattern is losing the “points” of the heart. This happens when the seam allowance of a joining block cuts off the tip of the triangle. To avoid “chopped-off points,” always aim to sew just a hair’s breadth outside the intersection of the previous seam. This leaves enough room for the point to sit perfectly on the seam line once the quilt is assembled, maintaining the geometric integrity of your heart shapes.
If you find that your Heart-Shaped Quilt – Pattern blocks are not coming out the same size, it’s usually an issue with “fabric creeping.” This is when the top layer of fabric moves faster than the bottom layer as it passes through the sewing machine. Using a walking foot (or even-feed foot) is the best solution for this. It moves both layers of fabric at the same speed, which is especially helpful when you start joining the heart blocks into long rows.
For quilters who struggle with the “bulky intersections” where multiple seams meet in a Heart-Shaped Quilt – Pattern, “spinning the seams” can help. This technique involves slightly opening a few stitches in the seam allowance at the intersection and pressing the seams in a circular motion. This flattens the center point, making it much easier to quilt over later and preventing your sewing machine needle from breaking on a thick “hump” of fabric.
Sometimes, the colors in your Heart-Shaped Quilt – Pattern might “bleed” when you wash the finished quilt for the first time, especially with deep reds. To prevent this, always pre-wash your fabrics or use “color catchers” in the laundry. These small sheets trap any loose dye in the water, ensuring that your beautiful red hearts don’t turn your white background pink. Protecting your hard work with these simple laundry precautions is a vital step for any long-term textile project.
Lastly, if your quilt top doesn’t lie flat (a problem known as “wavy borders”), it’s usually because the borders were “stretched” onto the quilt rather than measured. To fix this in your Heart-Shaped Quilt – Pattern, always measure the center of your quilt and cut your border strips to that exact length before pinning them at the ends and the middle. This ensures that the quilt stays square and flat, making it much easier to hang on a wall or spread across a bed without unsightly ripples.
What is the best size for a Heart-Shaped Quilt – Pattern block?
The most versatile size is a 10-inch or 12-inch square. This allows for enough detail to see the heart clearly while still being manageable for a variety of quilt sizes, from lap quilts to full-sized bed covers.
Can I make a Heart-Shaped Quilt – Pattern without a sewing machine?
Yes! You can use a technique called English Paper Piecing (EPP). This involves wrapping fabric around paper templates and hand-sewing the pieces together. It takes much longer but produces incredibly precise results and is a very relaxing, portable hobby.
How much fabric do I need for a standard heart quilt?
For a throw-sized quilt (approx. 50″ x 60″), you generally need about 3 to 4 yards of background fabric and a variety of “fat quarters” or scrap fabrics for the hearts themselves. Always buy a little extra for mistakes or “fussy cutting.”
Is this pattern suitable for beginners?
Absolutely. The “stitch and flip” version of the Heart-Shaped Quilt – Pattern is one of the first patterns recommended for new quilters because it teaches the basics of diagonal seams and block assembly without overly complex math.
How do I quilt the finished top?
You can “quilt in the ditch” (sewing along the seams) for a subtle look, or try echo quilting, where you sew lines that follow the shape of the heart about half an inch apart. This makes the heart motif stand out beautifully.
Can I use flannel instead of cotton?
Yes, flannel is a great choice for a Heart-Shaped Quilt – Pattern, especially for baby quilts. Just keep in mind that flannel shrinks more than cotton, so pre-washing is mandatory to avoid distorting the heart shapes later.
Creating a Heart-Shaped Quilt – Pattern is a journey of patience, precision, and passion. Throughout this article, we have covered the importance of selecting high-quality cotton fabrics, the technical nuances of “stitch and flip” piecing, and the creative ways you can use color theory to make your design stand out.
We also addressed common troubleshooting tips to ensure your points stay sharp and your quilt lies flat. Quilting is more than just a craft; it is a way to sew memories into a functional piece of art that provides warmth and comfort to those you love.


