
American-style placemat with a fruit theme - Pattern

This Hexagon Placemat Tutorial – Pattern is designed to guide you through the rewarding process of creating a geometric masterpiece for your dining table. Many home decorators are moving away from traditional rectangular shapes in favor of more dynamic, modern designs, and the Hexagon Placemat is the perfect way to embrace this trend. By following a structured pattern, you can ensure that every angle is precise, creating a professional finish that looks like it came straight from a high-end boutique.
The beauty of a Hexagon Placemat Tutorial – Pattern lies in its ability to showcase your favorite fabrics, whether you prefer minimalist linens or vibrant, patterned cottons. Because the hexagon shape consists of six equal sides, it provides a balanced and harmonious look that fits well on round, square, or rectangular tables. Using a dedicated pattern simplifies the cutting process, which is often the most intimidating part of geometric sewing projects for beginners and experts alike.
Mastering this Hexagon Placemat Tutorial – Pattern allows you to customize your home environment while practicing essential quilting and binding techniques. Throughout this guide, we will break down the terminology and the technical steps required to transform simple fabric into a durable, heat-resistant placemat. By the end of this tutorial, you will have the confidence to create a full set of placemats that are as functional as they are beautiful, adding a handmade touch to every meal.
A high-quality Hexagon Placemat Tutorial – Pattern starts with understanding the geometry involved in the six-sided shape. Unlike a square, a hexagon requires consistent 120-degree internal angles to ensure the piece lies flat and symmetrical. Using a pattern template is highly recommended because even a slight deviation in measurement can cause the fabric to ripple or the edges to become uneven during the final assembly.
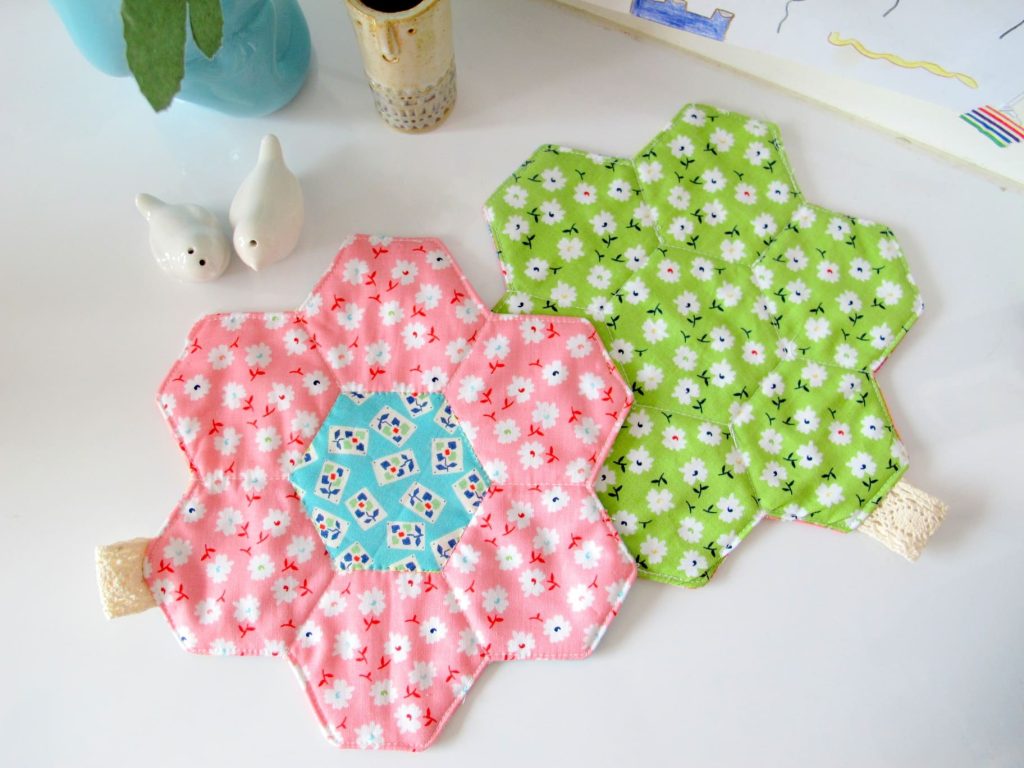
The term Hexagon Placemat refers to a functional tabletop accessory designed to protect surfaces from heat, scratches, and spills while adding aesthetic value. In the context of this tutorial, we focus on creating a “quilted” version, which includes a top layer, a middle layer of batting, and a backing. This three-layer construction provides the necessary thickness to protect delicate wood or glass tables from hot plates and heavy dinnerware.
When we discuss a Pattern, we are referring to the specific dimensions and shapes you will cut from your fabric to build the final product. A standard Hexagon Placemat Tutorial – Pattern usually suggests a side length of about 6 to 8 inches, resulting in a placemat that is roughly 12 to 16 inches wide from point to point. Having a physical or digital pattern to trace ensures that all your placemats in a set are identical in size.
Choosing the right fabric is the next crucial step in your Hexagon Placemat Tutorial – Pattern journey. Quilting cotton is the gold standard here because it is easy to press, doesn’t slip during sewing, and comes in thousands of prints. However, you can also experiment with home decor weight fabrics or even canvas if you want a more rugged, industrial look for your dining room or patio table.
The “tutorial” aspect of this guide focuses on the step-by-step instructions that bridge the gap between raw materials and a finished product. We will look at how to properly align the fabric grain, how to use a rotary cutter safely, and how to manage the “y-seams” if you choose a patchwork design. Following a structured Hexagon Placemat Tutorial – Pattern prevents common mistakes, such as stretching the bias edges of the fabric.
Finally, consider the batting or interfacing you will use inside your Hexagon Placemat. For heat resistance, a cotton batting is superior to synthetic polyester, which can melt if a very hot pot is placed on it. Some crafters even use a layer of Insul-Bright, a specialized heat-reflective material, to make their Hexagon Placemat Tutorial – Pattern results even more functional for serving hot dishes straight from the oven.
To begin your Hexagon Placemat Tutorial – Pattern, you will need to gather your tools: a self-healing cutting mat, a rotary cutter, and a clear acrylic ruler. These tools are essential for geometric shapes because they allow for the extreme precision required for hexagons. If you are using a printed pattern, make sure to check the “scale square” on your printout to ensure the dimensions haven’t been distorted by your printer settings.
The Hexagon Placemat design works best when you iron your fabric with starch before cutting. Starch adds a bit of stiffness to the cotton fabric, which is incredibly helpful when dealing with the diagonal cuts of a hexagon. Since several edges of the Hexagon Placemat Tutorial – Pattern will be on the “bias” (the diagonal grain of the fabric), they are prone to stretching; starch acts as a stabilizer to keep everything in line.
When cutting your pattern pieces, you will generally need one hexagon for the top, one for the backing, and one from the batting. If you are following a patchwork Hexagon Placemat Tutorial – Pattern, you might instead cut six triangles that meet in the center. This “kaleidoscope” effect is a popular variation of the Hexagon Placemat that allows you to play with color gradients and fussy-cutting specific fabric motifs for the center.
Safety and precision go hand-in-hand during the cutting phase. Always cut away from your body and keep your fingers well away from the edge of the ruler. When following the Hexagon Placemat Tutorial – Pattern, it is often easier to cut a square first and then trim the corners at the 60-degree marks indicated on your quilting ruler. This ensures that the center of your placemat remains perfectly balanced.
Organization is key when making a set of four or six placemats. As you cut the pieces for your Hexagon Placemat, stack the top, batting, and backing for each unit together. This keeps your workspace tidy and ensures you don’t accidentally mix up the “right side” and “wrong side” of your fabrics. A well-organized Hexagon Placemat Tutorial – Pattern workflow makes the actual sewing process much faster and more enjoyable.
Before moving to the sewing machine, do a “dry fit” of your pieces. Lay the backing fabric face down, place the batting on top, and then place your Hexagon Placemat top fabric face up. This is known as a quilt sandwich. If your pattern includes a seam allowance, ensure you have accounted for it in your cutting so that the finished placemat isn’t smaller than you intended for your dinner plates.
The first step in sewing your Hexagon Placemat Tutorial – Pattern is to secure the layers together. You can use curved safety pins or a temporary fabric adhesive spray to “baste” the layers. Basting is critical in a Hexagon Placemat project because it prevents the fabric from shifting and creating “bunches” or “ghosting” on the back as you quilt through the multiple thicknesses.
Quilting the layers is where you can truly get creative with your Hexagon Placemat Tutorial – Pattern. You might choose to do “stitch-in-the-ditch” quilting, which follows the existing seams, or you can create a grid pattern across the entire hexagon. For a modern look, try echoing the hexagon shape by sewing concentric lines starting from the center and moving outward toward the edges of the placemat.
The term Hexagon Placemat – Pattern implies a specific finished edge, and how you handle the corners is vital. When quilting, stop your stitches about 1/4 inch from the edge to leave room for the binding. If you are a beginner, using a walking foot on your sewing machine is highly recommended for this tutorial. A walking foot feeds the top and bottom layers of the Hexagon Placemat through the machine at the same rate, preventing puckering.
If your Hexagon Placemat Tutorial – Pattern calls for a “turn and topstitch” method instead of binding, you will sew the top and backing right sides together, leave a small gap, turn it right side out, and then topstitch. This method is faster but results in a softer edge. For a more traditional, “pro” look, the binding method is preferred as it frames the hexagon and provides extra durability to the edges that see the most wear.
Pay close attention to the tension settings on your machine. Since you are sewing through fabric and batting, you may need to slightly loosen the tension to ensure the stitches look beautiful on both the front and the back of your Hexagon Placemat. Testing on a small scrap of the same “sandwich” you cut from your pattern is a professional habit that prevents the need for unpicking stitches later on.
Once the quilting is complete, trim the excess batting and backing so they are perfectly flush with the top fabric of your Hexagon Placemat. Use your hexagon pattern or ruler one last time to “square up” (or in this case, “hexagon up”) the piece. Sharp, clean edges make the final step—applying the binding—much easier and ensure that the 120-degree angles of your Hexagon Placemat Tutorial – Pattern are crisp.
Binding a Hexagon Placemat is slightly different than binding a square one because of the obtuse angles. For this Hexagon Placemat Tutorial – Pattern, you will want to use bias binding (fabric cut at a 45-degree angle to the grain). Bias binding has a natural stretch that allows it to navigate the corners of the hexagon smoothly without creating bulk or awkward folds.
To start the binding, fold your binding strip in half lengthwise and press it. Align the raw edges of the binding with the raw edges of your Hexagon Placemat. Start sewing on one of the straight sides, leaving a 3-inch “tail” of binding unsewn at the beginning. As you reach a corner, you will need to use a mitered corner technique adapted for the 120-degree angle of your pattern.
The secret to a perfect Hexagon Placemat Tutorial – Pattern finish is how you fold the corner. When you reach the corner, stop 1/4 inch from the end, backstitch, and remove the piece from the machine. Fold the binding up and then back down, aligning it with the next side of the hexagon. This creates a small pleat that, when flipped to the back, forms a perfect mitered corner that looks incredibly professional.
After sewing the binding all the way around the Hexagon Placemat, join the ends using your preferred method—either a diagonal seam or by tucking one end into the other. Then, flip the binding over to the back of the placemat. You can finish the Hexagon Placemat Tutorial – Pattern by hand-sewing the binding to the back with a blind stitch for a clean look, or by machine-sewing from the front (“stitch-in-the-ditch”) for speed.
Give your finished Hexagon Placemat a final press with a hot iron. This sets the stitches and flattens the binding, giving the placemat its final, polished appearance. If you followed the Hexagon Placemat Tutorial – Pattern correctly, the piece should lay perfectly flat on the table without any curling at the edges. Repeating this process for each placemat in your set will result in a stunning, cohesive dining display.
Customization doesn’t have to stop at the binding. You can add a small fabric label to the back of your Hexagon Placemat with your name and the year it was made. This transforms your Hexagon Placemat Tutorial – Pattern project into a family heirloom or a personalized gift. Now that you’ve mastered the technique, you can experiment with different sizes or even join several hexagons together to create a matching table runner.
1. Is a Hexagon Placemat Tutorial – Pattern harder than a square one?
It is slightly more challenging due to the angles, but not significantly so. The main difference is in the binding process. Once you understand how to miter a 120-degree corner instead of a 90-degree one, the process is very similar to making any other quilted item.
2. How much fabric do I need for a set of four placemats?
Typically, one yard of fabric for the top and one yard for the backing is enough to make four standard-sized Hexagon Placemats. You will also need a similar amount of batting and about 1/2 yard of fabric if you are making your own bias binding.
3. Can I use this Hexagon Placemat Tutorial – Pattern to make a mug rug?
Yes! You can simply scale down the pattern to about 5 or 6 inches wide. The construction steps remain exactly the same. Smaller hexagons make excellent coasters or mug rugs that complement your full-sized placemats.
4. Why is my Hexagon Placemat not laying flat?
This usually happens if the fabric was stretched during the sewing or quilting phase. Using starch before cutting and a walking foot while sewing are the two best ways to prevent your Hexagon Placemat – Pattern from waving or rippling.
5. Do I have to use bias binding?
For a Hexagon Placemat, bias binding is highly recommended. Because the edges are not all on the straight grain, “straight-grain binding” can cause the edges to pucker. Bias binding’s natural elasticity handles the geometric shape much better.
6. Can I make these reversible?
Absolutely! Just choose a different but coordinating fabric for the backing. When you follow the Hexagon Placemat Tutorial – Pattern, ensure your quilting design looks good on both sides, and you’ll essentially have two sets of placemats in one.
This Hexagon Placemat Tutorial – Pattern has provided you with a comprehensive look at creating a unique, geometric dining accessory.
We have explored the importance of using a precise pattern to maintain the integrity of the hexagon shape, the materials needed for heat resistance and durability, and the specific sewing techniques required for a professional finish. By focusing on precision cutting, careful quilting, and the art of mitered corners, you can create a Hexagon Placemat that rivals any store-bought version.


