
American-style placemat with a fruit theme - Pattern

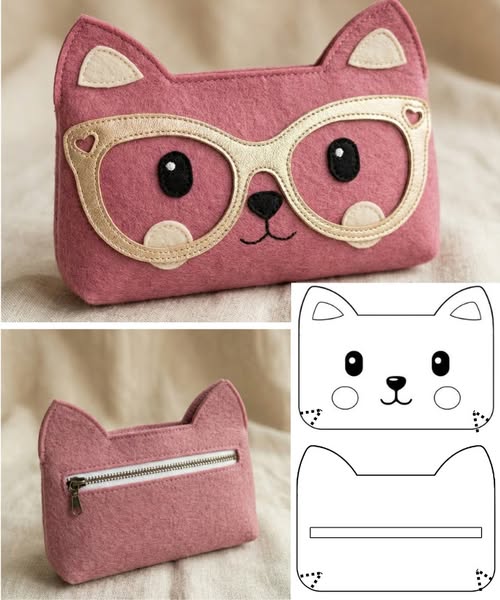
Creating a Kitten-shaped fabric pencil case – Pattern is one of the most delightful ways to combine your love for sewing with a practical, adorable accessory that everyone will envy. Whether you are making this for a student heading back to school or as a charming gift for a feline lover, this Kitten-shaped fabric pencil case tutorial provides all the guidance you need to succeed. There is something uniquely satisfying about taking a flat piece of fabric and turning it into a functional three-dimensional character that holds your favorite stationery.
The beauty of following a Kitten-shaped fabric pencil case – Pattern lies in the small details that bring the character to life, such as the pointy ears and the delicate whiskers. By using a specialized Kitten-shaped fabric pencil case tutorial, you can ensure that the proportions are just right, making the final product look professional rather than just a simple DIY project. This specific design focuses on durability and charm, ensuring that your pencils and pens are stored safely within a whimsical, soft-to-the-touch fabric shell.
In the following sections, we will dive deep into the world of creative sewing to master the Kitten-shaped fabric pencil case – Pattern from start to finish. We will discuss the best types of fabrics to use, how to manage zippers without fear, and the best ways to embroider the facial features for maximum cuteness. This Kitten-shaped fabric pencil case tutorial is structured to be easy to follow, even if you are relatively new to the sewing machine, so grab your supplies and let’s get started on this purr-fectly wonderful project.
When starting your Kitten-shaped fabric pencil case – Pattern, the fabric choice is the most critical decision you will make for the project’s longevity. A sturdy cotton canvas or a high-quality quilting cotton is often the best choice for the exterior because these fabrics hold their shape well. In our Kitten-shaped fabric pencil case tutorial, we emphasize using breathable yet firm materials that can handle the weight of several pens without stretching out or losing the kitten’s iconic silhouette.
The lining of your Kitten-shaped fabric pencil case – Pattern should be just as carefully considered as the outside to ensure a high-quality finish. A lighter weight cotton or even a water-resistant nylon can work wonders if you are worried about ink leaks from pens. Following a Kitten-shaped fabric pencil case tutorial that includes a lining will not only make the case look better but will also hide all the raw edges of your seams for a clean, professional interior.
Interfacing is the “secret ingredient” in any successful Kitten-shaped fabric pencil case – Pattern that requires structural integrity. Use a medium-weight fusible interfacing to give the fabric enough body so the kitten stands up straight rather than flopping over when empty. This step in the Kitten-shaped fabric pencil case tutorial is what separates a floppy pouch from a high-end designer pencil case that maintains its adorable feline shape regardless of how many items are inside.
Texture plays a huge role in the appeal of a Kitten-shaped fabric pencil case – Pattern, so don’t be afraid to experiment with different materials. Soft fleece or minky fabric can create a “furry” feel that makes the kitten even more realistic and huggable. However, if you are a beginner following this Kitten-shaped fabric pencil case tutorial, remember that slippery or stretchy fabrics can be harder to sew, so you might want to stick to stable wovens for your first attempt.
Color coordination is where your creativity truly shines when working with a Kitten-shaped fabric pencil case – Pattern. You can choose classic tabby colors like grey and orange, or go for a magical look with pastel pinks or even a black cat theme. A good Kitten-shaped fabric pencil case tutorial encourages you to mix and match patterns, perhaps using a floral print for the inner ears or the lining to add a surprise element of style when the case is opened.
Finally, consider the washability of your chosen materials for the Kitten-shaped fabric pencil case – Pattern. Pencil cases tend to get dirty over time with graphite dust and ink marks, so using pre-shrunk, machine-washable fabrics is highly recommended. By following the advice in this Kitten-shaped fabric pencil case tutorial, you ensure that your creation can be tossed in the laundry and come out looking as good as new, preserving your hard work for years to come.
To successfully execute the Kitten-shaped fabric pencil case – Pattern, you will need a standard sewing machine equipped with a universal needle. A zipper foot is also an absolute necessity, as it allows you to sew closely to the zipper teeth, which is a key part of this Kitten-shaped fabric pencil case tutorial. Having the right machine attachments ensures that the closure of your pencil case is smooth and functional, preventing any annoying snags when you are trying to reach for a pen.
Sharp fabric shears are a must-have for cutting out the intricate pieces of the Kitten-shaped fabric pencil case – Pattern. The kitten ears and the curved body require precise cuts to ensure the symmetry of the final character. In this Kitten-shaped fabric pencil case tutorial, we suggest using a rotary cutter and a cutting mat for the longer straight edges, but sticking to small, sharp scissors for the delicate curves around the head and tail areas.
Pins and wonder clips are your best friends when assembling the layers of the Kitten-shaped fabric pencil case – Pattern. Because you will be working with several layers including the exterior fabric, interfacing, lining, and the zipper, keeping everything in place is vital. This Kitten-shaped fabric pencil case tutorial recommends using clips for the thicker areas where pins might bend, ensuring that nothing shifts while you are feeding the fabric through the machine.
Marking tools like tailor’s chalk or heat-erasable pens are essential for transferring the facial details of the Kitten-shaped fabric pencil case – Pattern. You will need to mark where the eyes, nose, and whiskers will go before you start sewing the main body together. Following the placements suggested in the Kitten-shaped fabric pencil case tutorial ensures that your kitten looks balanced and has a sweet, friendly expression rather than looking a bit lopsided.
A zipper is, of course, a primary component of the Kitten-shaped fabric pencil case – Pattern. We recommend a nylon coil zipper because it is easy to sew over if you accidentally hit it with your needle, and it can be trimmed to size. This Kitten-shaped fabric pencil case tutorial usually calls for a 7-inch to 9-inch zipper, depending on how long you want your kitten body to be, giving you plenty of room for standard-sized pencils.
Don’t overlook the importance of an iron and ironing board when working on your Kitten-shaped fabric pencil case – Pattern. Pressing your seams open and fusing your interfacing properly are the steps that give your project a “store-bought” quality. As you move through the Kitten-shaped fabric pencil case tutorial, taking the time to press after every major seam will make the final assembly much easier and the finished product look incredibly crisp and well-made.
The first step in our Kitten-shaped fabric pencil case – Pattern is to cut your fabric pieces according to the template provided. You will typically need two main body pieces for the exterior, two for the lining, and two sets of ear pieces. In this Kitten-shaped fabric pencil case tutorial, we start by prepping the ears—sewing them right sides together, turning them out, and top-stitching to give them that alert, “kitten” look that defines the whole project.
Next, you will move on to the most intimidating part of the Kitten-shaped fabric pencil case – Pattern: the zipper. Don’t worry, our Kitten-shaped fabric pencil case tutorial breaks it down simply—sandwich the zipper between the exterior fabric and the lining fabric. By sewing one side at a time, you create a clean edge where the zipper is neatly tucked between the layers, providing a professional look that is both functional and aesthetically pleasing.
Once the zipper is installed, it is time to add the personality to your Kitten-shaped fabric pencil case – Pattern. Before sewing the front and back together, embroider the face onto the front exterior piece. This Kitten-shaped fabric pencil case tutorial suggests using a simple satin stitch for the nose and a backstitch for the whiskers, ensuring the thread is secured tightly so the “face” doesn’t come undone with daily use.
Now, you will basted the ears onto the top of the kitten’s head on the front piece of your Kitten-shaped fabric pencil case – Pattern. Make sure the ears are pointing “down” toward the face so that when you turn the case right-side out later, they will pop up in the correct direction. This is a common point of confusion in any Kitten-shaped fabric pencil case tutorial, so take your time to visualize the final result before you hit the sewing machine.
The penultimate step of the Kitten-shaped fabric pencil case – Pattern involves sewing the entire perimeter of the case. With the zipper halfway open (this is crucial!), place the exterior pieces right sides together and the lining pieces right sides together. Our Kitten-shaped fabric pencil case tutorial guides you to sew all the way around, leaving a small opening in the bottom of the lining so you can turn the whole thing right-side out.
Finally, pull the fabric through the opening in the lining to reveal your finished Kitten-shaped fabric pencil case – Pattern. Use a chopstick or a turning tool to gently push out the curves of the ears and the corners of the body. In this Kitten-shaped fabric pencil case tutorial, the last step is to stitch the opening in the lining closed, either by hand or machine, and push the lining down into the case. Your adorable kitten is now ready to hold all your favorite pens!
Once you have mastered the basic Kitten-shaped fabric pencil case – Pattern, the world of customization opens up to you. You can add a small fabric tail to the back of the case or use buttons for eyes to give it a more vintage, “toyland” feel. This Kitten-shaped fabric pencil case tutorial encourages you to think outside the box—perhaps adding a small bow tie or a “collar” made of ribbon to give your kitten an even more distinct and lovable personality.
If you are making the Kitten-shaped fabric pencil case – Pattern for younger children, consider using safety eyes instead of buttons or embroidery. Safety eyes lock into place and are much harder to pull off, making the product safer for little hands. However, as noted in this Kitten-shaped fabric pencil case tutorial, safety eyes should be installed before you sew the lining and exterior together, as you need access to the back of the fabric to secure the washer.
For those who want a more “glamorous” version of the Kitten-shaped fabric pencil case – Pattern, consider using metallic threads for the whiskers or sequins for a bit of sparkle. You could even use a glittery fabric for the inner ears. Our Kitten-shaped fabric pencil case tutorial is designed to be a canvas for your imagination, so don’t feel limited by the basic colors; make a “space cat” or a “rainbow kitten” if that fits your personal style better!
Maintaining your Kitten-shaped fabric pencil case – Pattern is relatively simple if you followed our fabric advice. If the case gets dirty, a gentle hand wash in cool water with mild detergent is usually best to preserve the embroidery and the shape of the ears. This Kitten-shaped fabric pencil case tutorial recommends air drying rather than using a tumble dryer, as the high heat can sometimes cause the interfacing to warp or the zipper to become slightly distorted.
You can also adapt the Kitten-shaped fabric pencil case – Pattern to different sizes depending on its intended use. If you want a small coin purse, simply scale down the pattern pieces by 50%. This Kitten-shaped fabric pencil case tutorial logic applies upwards as well; scale it up to create a large makeup bag or even a small clutch. The construction techniques remain identical, proving just how versatile and useful this specific pattern can be for any sewing enthusiast.
Lastly, consider making a set of these using the Kitten-shaped fabric pencil case – Pattern in various colors to stay organized. You could have one for pencils, one for markers, and one for crochet hooks. Following this Kitten-shaped fabric pencil case tutorial repeatedly will help you refine your sewing skills, specifically your ability to sew curves and zippers, making you a more confident and capable crafter in the long run.
Is this Kitten-shaped fabric pencil case – Pattern suitable for beginners?
Yes! While it involves a zipper and some curves, our Kitten-shaped fabric pencil case tutorial is designed to be slow-paced and easy to follow. If you can sew a straight line and are willing to take your time with the zipper, you can definitely make this.
What size zipper do I need for the Kitten-shaped fabric pencil case – Pattern?
A 7-inch to 9-inch nylon zipper is usually perfect. It is better to have a zipper that is slightly too long, as it can be trimmed down, whereas a zipper that is too short will limit the opening size of your Kitten-shaped fabric pencil case tutorial project.
Can I sew this Kitten-shaped fabric pencil case – Pattern by hand?
While a sewing machine is much faster and provides more durable seams, you can certainly sew this by hand using a strong backstitch. It will take significantly longer, but the result of the Kitten-shaped fabric pencil case tutorial will be just as cute and personal.
What if I don’t have a sewing machine with a zipper foot?
It is possible to sew a zipper with a regular foot, but it is much more difficult to get a close, clean seam. If you are serious about following the Kitten-shaped fabric pencil case – Pattern, investing in a universal zipper foot is a very affordable way to improve your results.
How do I make the whiskers look even on the Kitten-shaped fabric pencil case – Pattern?
The best way is to use a template. Draw the face onto a piece of paper first, then use a window or a light box to trace the design onto your fabric using a disappearing ink pen. This ensures the Kitten-shaped fabric pencil case tutorial results in a perfectly symmetrical face.
Can I sell items made from this Kitten-shaped fabric pencil case – Pattern?
Generally, most free patterns are for personal use, but if you create your own variations and put in the work, many people sell their handmade versions at craft fairs. Always check the specific terms of any Kitten-shaped fabric pencil case tutorial you follow online!
In this comprehensive guide, we have walked through every step of creating your very own Kitten-shaped fabric pencil case – Pattern. We started by discussing the importance of fabric choice and interfacing to give your kitten its shape, moved into the essential tools like zipper feet and marking pens, and provided a detailed Kitten-shaped fabric pencil case tutorial on how to assemble the pieces correctly.
By focusing on quality materials and careful construction, you now have the knowledge to create a beautiful, functional piece of art.


