
American-style placemat with a fruit theme - Pattern

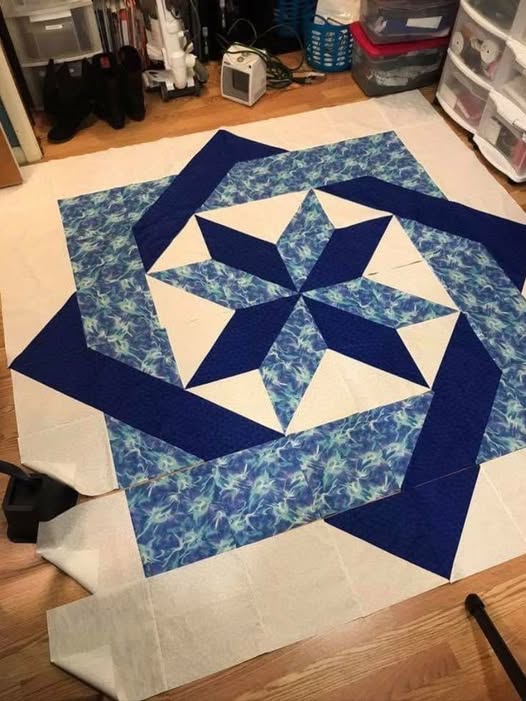
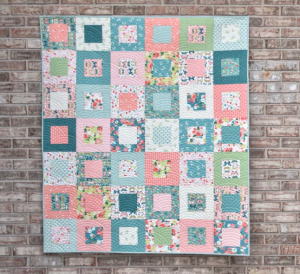
The Labyrinth Quilt Block – Pattern is a mesmerizing and visually complex design that captures the ancient essence of mazes and pathways within the comfort of a textile medium. Mastering the Labyrinth Quilt Block – Pattern is often seen as a significant milestone for quilters because it creates a stunning optical illusion of interlocking lines and depths using only straight seams. While it may look intimidating at first glance, the secret to a successful Labyrinth Quilt Block – Pattern lies in the rhythmic repetition of geometric units, making it a meditative and deeply rewarding project for those who appreciate precision and structure.
Working on a Labyrinth Quilt Block – Pattern allows you to explore the fascinating relationship between light and shadow through careful fabric placement. The design typically features a central star or square that is gradually surrounded by “paths” that seem to weave over and under one another, creating a three-dimensional effect that is truly breathtaking. Because the Labyrinth Quilt Block – Pattern relies so heavily on contrast and symmetry, it provides an excellent opportunity for quilters to hone their color theory skills and learn how to guide the viewer’s eye through a complex landscape of cotton and thread.
In this comprehensive guide, we will break down the components of the Labyrinth Quilt Block – Pattern, from the initial selection of high-contrast fabrics to the final assembly of the intricate rows. We will cover the essential techniques needed to maintain sharp points and flat seams, ensuring that your Labyrinth Quilt Block – Pattern looks as professional as a museum piece. Whether you are aiming to create a bold wall hanging or a sophisticated bed quilt, understanding the logic behind this Pattern will expand your quilting horizons and provide you with a timeless design that never fails to spark conversation and admiration.
The most critical factor in achieving the “maze” effect of the Labyrinth Quilt Block – Pattern is the selection of your color palette. To make the paths appear as though they are weaving in and out, you need at least three distinct fabric values: a light, a medium, and a dark. Using a 100% quilting cotton with a high thread count ensures that the many seams in a Labyrinth Quilt Block – Pattern remain crisp and don’t fray during the assembly of the small, geometric units.
A popular choice for the Labyrinth Quilt Block – Pattern is a monochromatic scheme, such as various shades of blue or gray, which emphasizes the architectural nature of the design. However, using a bold complementary color for the “inner path” can create a vibrant energy that makes the block feel more modern. Regardless of the colors you choose, always check for “fabric bleed” before you start, as the dark fabrics in a Labyrinth Quilt Block – Pattern can easily ruin a light background if the dyes are not set properly.
The background fabric of your Labyrinth Quilt Block – Pattern should ideally be a solid or a very subtle “low-volume” print. Busy patterns can distract the eye from the maze-like structure, causing the intricate pathways to get lost in the noise. By choosing a neutral background, you provide a stable stage for the primary colors of your Labyrinth Quilt Block – Pattern to perform their optical magic. This clarity is what makes the labyrinth motif so powerful and recognizable from a distance.
Texture can also play a role in your Labyrinth Quilt Block – Pattern if you want to add an extra layer of depth. For example, using a tone-on-tone print for the medium value can provide a sense of movement that mimics the winding nature of a real labyrinth. Just ensure that the texture doesn’t interfere with the stitch definition, as the beauty of the Labyrinth Quilt Block – Pattern depends on the sharp, clean lines formed by the meeting of different fabric pieces.
For beginners, using a coordinated fabric bundle or a “fat quarter pack” can simplify the selection process for a Labyrinth Quilt Block – Pattern. These curated collections are designed to work harmoniously, taking the guesswork out of value and contrast. Once you become more comfortable with the Pattern, you can start “scrapping” it by pulling from your stash, which can result in a uniquely eclectic and personal version of the Labyrinth Quilt Block – Pattern that tells its own story.
Finally, consider the scale of any prints used in your Labyrinth Quilt Block – Pattern. Since this block often consists of many small squares and triangles, large-scale floral or geometric prints will likely be cut into unrecognizable pieces. To maintain the integrity of the Pattern, stick with small-scale ditsy prints or solids. This ensures that the focus remains on the complex construction of the labyrinth itself rather than the individual patterns on the fabric pieces.
The Labyrinth Quilt Block – Pattern is essentially a large puzzle made up of smaller, manageable units, most commonly Half-Square Triangles (HSTs) and squares. To ensure the paths of your labyrinth align perfectly, you must master the art of the HST. Using the “two-at-a-time” method is a great way to maintain consistency in your Labyrinth Quilt Block – Pattern while saving time. Accuracy in cutting these initial units is the foundation upon which the entire block is built.
Another essential unit in the Labyrinth Quilt Block – Pattern is the “Flying Geese” block, which often helps form the star-like center or the corners of the maze. These units require a precise 1/4 inch seam allowance to ensure that the points don’t get “cut off” when the blocks are joined together. If your seam allowance is even slightly off, the cumulative error across a complex Labyrinth Quilt Block – Pattern can result in a block that is the wrong size or refuses to lie flat.
“Squaring up” your units is a non-negotiable step when working on a Labyrinth Quilt Block – Pattern. After sewing your HSTs and Flying Geese, use a quilting ruler to trim each piece to the exact measurement required by the pattern. This removes any small distortions that may have occurred during sewing or pressing. In a Labyrinth Quilt Block – Pattern, where so many points must meet, this level of precision is what differentiates a standard quilt from a professional-quality masterpiece.
Pressing is just as important as sewing in a Labyrinth Quilt Block – Pattern. To keep the block flat and avoid bulk at the intersections, many quilters recommend pressing seams open. However, if you prefer to “nest” your seams for extra strength and easier alignment, you must press your seams toward the darker fabric. A tailor’s clapper can be used after pressing with a hot iron to ensure the seams in your Labyrinth Quilt Block – Pattern are as flat as possible, which makes the final quilting much easier.
Layout is the stage where the Labyrinth Quilt Block – Pattern truly begins to appear. It is highly recommended to use a design wall or a flat floor space to lay out all your units before you start joining them into rows. Because the units are so similar, it is incredibly easy to rotate an HST the wrong way, which would “break” the path of the labyrinth. Checking your layout against the Pattern diagram frequently is a habit that will save you hours of unpicking stitches later.
When it comes to joining the rows of your Labyrinth Quilt Block – Pattern, use “pinning for precision.” Pin at every intersection where seams meet to ensure that the paths flow seamlessly from one unit to the next. This meticulous pinning technique prevents the fabric from shifting under the presser foot. The goal is to have every “pathway” in the Labyrinth Quilt Block – Pattern look like a continuous line, enhancing the illusion of an interlocking maze that characterizes this sophisticated design.
One of the most common frustrations when making a Labyrinth Quilt Block – Pattern is “point loss,” where the sharp corners of the triangles are swallowed by the seam. This usually happens because the needle is passing exactly through the point instead of a hair’s breadth above it. To prevent this, always look for the “V” created by the previous seams and aim to sew just beside it. This point-preservation technique keeps your Labyrinth Quilt Block – Pattern looking crisp and professionally executed.
If your Labyrinth Quilt Block – Pattern is turning out “wavy” or doesn’t lie flat on the cutting mat, it is likely a result of fabric stretching. This often happens when sewing on the bias—the diagonal edge of the triangles. To combat this, use a spray starch or a fabric stabilizer before cutting your pieces. This gives the fabric a “paper-like” quality that resists stretching, ensuring that the geometric units of your Labyrinth Quilt Block – Pattern retain their intended shape throughout the process.
Another challenge is the “cumulative error,” where the block ends up smaller or larger than the Pattern specifies. This is almost always due to an inconsistent seam allowance. To check your accuracy, sew three 2.5-inch strips together and measure the center strip; it should be exactly 2 inches wide. If not, adjust your needle position or use a magnetic seam guide. Consistency is the key to making all the components of a Labyrinth Quilt Block – Pattern fit together like a perfect jigsaw puzzle.
Confusing the different shades of fabric is also a risk in a Labyrinth Quilt Block – Pattern, especially if you are working under poor lighting. Labeling your fabric pieces with “A, B, C” or “Light, Medium, Dark” using washi tape or small stickers can prevent mistakes. In a complex Pattern, a single misplaced medium-value square can disrupt the entire optical illusion, so staying organized is just as important as your sewing skill when building a Labyrinth Quilt Block – Pattern.
Sometimes, despite your best efforts, the center of the Labyrinth Quilt Block – Pattern might become bulky due to the number of seams meeting in one spot. To fix this, you can “fan” or “spin” the seams at the intersection. This seam-spinning technique reduces the lump of fabric in the center, allowing your sewing machine to pass over it smoothly and ensuring that your quilt top remains flat. A flat center is essential if you plan to do intricate “stitch-in-the-ditch” quilting later on.
If you find the Labyrinth Quilt Block – Pattern too overwhelming, try breaking it down into “quadrants.” Treat each quarter of the block as a separate mini-quilt. Completing one quadrant at a time makes the project feel less daunting and allows you to catch any errors in your piecing logic early on. This modular approach to the Labyrinth Quilt Block – Pattern is a great way to maintain your motivation and ensure a high-quality result without feeling burnt out.
Once you have mastered the standard Labyrinth Quilt Block – Pattern, you can experiment with “fussy cutting” to add an unexpected element to the center. Fussy cutting involves cutting a specific motif from a fabric—like a flower or an animal—to be centered perfectly within a square. This turns the Labyrinth Quilt Block – Pattern into a frame for a central piece of art, adding a whimsical or thematic touch that makes the Pattern even more personalized and unique.
Another creative variation is the “Modern Labyrinth,” which uses asymmetrical colors or “wonky” piecing. Instead of a perfect maze, you can deliberately misalign some paths or use a “gradient” fabric that changes color across the block. This modern quilting approach takes the traditional Labyrinth Quilt Block – Pattern and turns it into something edgy and contemporary. It’s a great way to push the boundaries of what a “labyrinth” can look like while still using the core logic of the design.
The size of your Labyrinth Quilt Block – Pattern can also be scaled to suit different projects. By increasing the size of your starting squares, you can create a single, massive Labyrinth Quilt Block – Pattern that serves as a baby quilt or a bold wall hanging. Conversely, making “mini labyrinths” is a great way to create sophisticated throw pillows or a table runner. The geometric scalability of this pattern makes it one of the most versatile designs in a quilter’s repertoire.
When it comes to quilting the finished Labyrinth Quilt Block – Pattern, “straight-line quilting” often looks best. Following the lines of the maze with your stitches reinforces the optical illusion and adds a modern, architectural texture. If you prefer a more organic look, “free-motion feathers” or “swirls” in the background areas can provide a beautiful contrast to the sharp angles of the Labyrinth Quilt Block – Pattern. This textural contrast makes the pieced design “pop” even more.
Proper care is essential to ensure your Labyrinth Quilt Block – Pattern project lasts for generations. When washing your quilt, always use a gentle detergent and cold water. Avoid using an agitator-style washing machine if possible, as the intense motion can stress the many seams of the labyrinth. Laying the quilt flat to dry or using a low-heat dryer setting will prevent the cotton fibers from shrinking unevenly, preserving the symmetry of the block for years to come.
Finally, remember to document your journey with the Labyrinth Quilt Block – Pattern. Adding a custom quilt label to the back with your name, the date, and the name of the pattern is a wonderful way to honor your hard work. The Labyrinth Quilt Block – Pattern is a significant achievement in any quilter’s life, and it deserves to be recognized as an heirloom. Whether you keep it or give it as a gift, your handmade labyrinth quilt is a symbol of patience, skill, and the beautiful pathways we create with our own two hands.
Is the Labyrinth Quilt Block – Pattern suitable for absolute beginners?
While a motivated beginner can certainly tackle it, the Labyrinth Quilt Block – Pattern is generally considered an intermediate-level project. It requires a very consistent 1/4 inch seam and the ability to keep track of many similar-looking units. If you are a beginner, we recommend starting with a larger block size to make the pieces easier to handle.
How many fabrics do I need for a Labyrinth Quilt Block – Pattern?
To achieve the best 3D maze effect, you need at least three fabrics: a light (background), a medium (secondary path), and a dark (primary path). However, many quilters use four or five fabrics to add more depth and complexity to the Labyrinth Quilt Block – Pattern. The key is to maintain a high contrast between the chosen values.
What is the best way to keep track of the pieces?
Organization is key! Use alpha-numeric labels or small plastic bags to group your units by type (e.g., “HST Set A,” “Flying Geese Set B”). Keeping a printed copy of the Labyrinth Quilt Block – Pattern diagram next to your sewing machine will help you double-check the orientation of every piece before you sew it.
Can I make a Labyrinth Quilt Block – Pattern using scraps?
Yes! A “scrappy labyrinth” can be stunning. To make it work, group your scraps by color value (light, medium, dark). As long as you maintain the value contrast, the maze effect will still work even if every “dark” piece is a different fabric. This is a fantastic way to give a Labyrinth Quilt Block – Pattern a vintage, “well-loved” feel.
How do I prevent the points from being cut off?
The “secret” is to ensure your seam passes exactly 1/4 inch from the edge. When you are sewing units together, look for the “X” where the previous seams cross; your new seam should go directly through or just slightly above that “X.” This ensures your points remain sharp and visible in the finished Labyrinth Quilt Block – Pattern.
Does this pattern have a lot of wasted fabric?
If you use the “two-at-a-time” HST method or “four-at-a-time” Flying Geese method, the waste is very minimal. The Labyrinth Quilt Block – Pattern is actually quite efficient because it uses standard geometric shapes. Any small scraps left over can be saved for future paper-piecing or crumb-quilting projects.
In this article, we have explored the intricate and rewarding world of the Labyrinth Quilt Block – Pattern, a design that challenges the mind and delights the eye. We discussed the vital importance of selecting high-contrast fabrics to create the iconic maze effect and the role of neutral backgrounds in providing visual clarity. We broke down the essential construction units, emphasizing the need for precision piecing and the “squaring up” of HSTs and Flying Geese.
We also addressed common troubleshooting issues, such as avoiding point loss and managing cumulative errors through a consistent scant 1/4 inch seam. Finally, we looked at creative ways to customize the Labyrinth Quilt Block – Pattern through fussy cutting and modern layouts, as well as the importance of proper care to preserve your heirloom. Mastering this Pattern is more than just a sewing exercise; it is an exploration of geometry and art that results in a truly spectacular quilt.


