
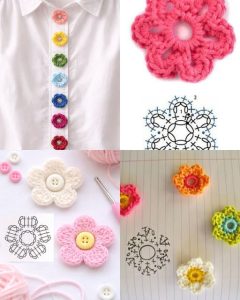
American-style placemat with a fruit theme - Pattern

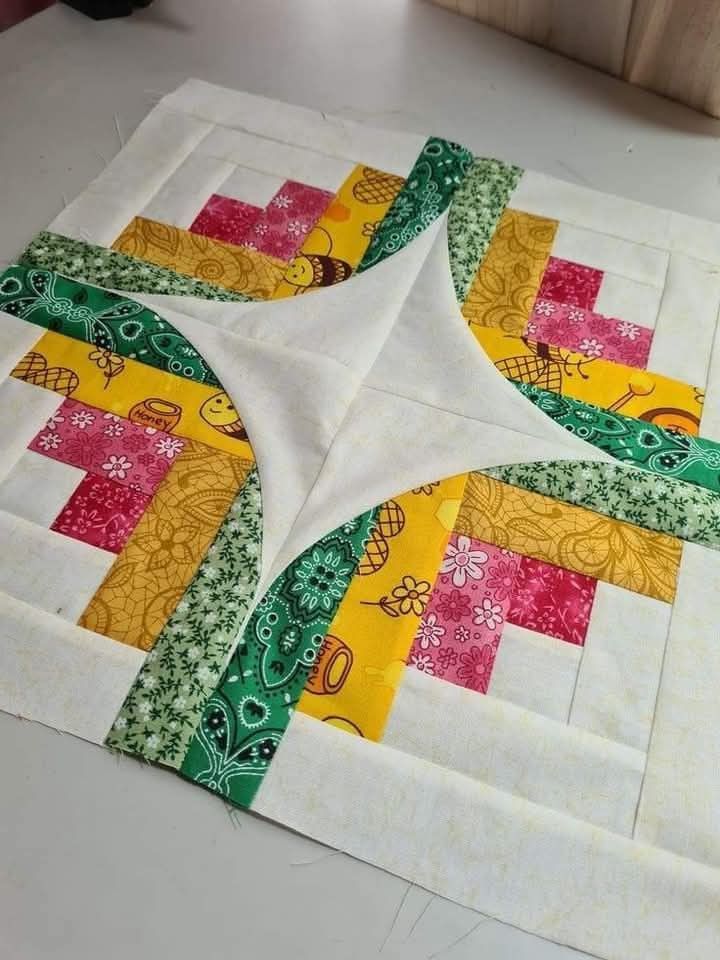
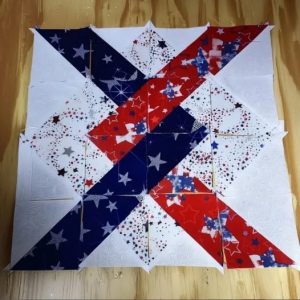
The Log Cabin Quilt Tutorial – Pattern is perhaps the most iconic and beloved design in the history of quilting, representing a beautiful harmony of tradition, storytelling, and geometric simplicity. This timeless pattern has been passed down through generations, originally symbolizing the hearth of a home with its characteristic central square and surrounding “logs” of fabric. Learning the Log Cabin Quilt Tutorial – Pattern is a rite of passage for many crafters, as it teaches fundamental skills like precise cutting, consistent seam allowances, and the art of color value placement to create stunning visual effects.
One of the most remarkable aspects of the Log Cabin Quilt Tutorial – Pattern is its inherent flexibility, allowing a quilter to create hundreds of different layouts just by rotating the finished blocks. Traditionally, one half of the block is made with light fabrics and the other with dark fabrics, representing the sunlit and shaded sides of a cabin. By mastering this Log Cabin Quilt Tutorial – Pattern, you gain the ability to construct intricate-looking designs—such as “Barn Raising” or “Sunshine and Shadows”—using nothing more than simple straight-line sewing and a thoughtful arrangement of colors.
In this comprehensive guide, we will walk you through the entire process of creating your own masterpiece using our Log Cabin Quilt Tutorial – Pattern. We will explore the essential tools required for precision, the step-by-step construction method that ensures your blocks stay flat, and creative ways to modernize this historic design. Whether you are a beginner looking for your first big project or an expert seeking a relaxing “comfort sew,” this Log Cabin Quilt Tutorial – Pattern provides all the insights and technical tips necessary to achieve a professional, heirloom-quality result that will be cherished for years to come.
The Log Cabin Quilt Tutorial – Pattern is built around a central square, which traditionally was sewn in red to represent the “hearth” or fire of the home, or occasionally in yellow to represent a “candle in the window.” This center serves as the anchor for the entire block, and its size dictates the proportions of all the strips, or “logs,” that will follow. Understanding this focal point is crucial because any inaccuracy in the center square will be magnified as you add more layers to your Log Cabin Quilt Tutorial – Pattern.
As you move outward from the center, the Log Cabin Quilt Tutorial – Pattern utilizes strips of fabric that are added in a clockwise or counter-clockwise sequence. Each strip is sewn onto the existing unit, trimmed to fit, and then pressed open to create a clean foundation for the next piece. This “building” method is what gives the pattern its name, mimicking the way real log cabins were constructed by stacking timber in a rectangular fashion to create a sturdy and warm shelter.
The distribution of light and dark values is the “secret ingredient” that makes the Log Cabin Quilt Tutorial – Pattern so visually striking. By consistently placing light-colored strips on two adjacent sides and dark-colored strips on the remaining two sides, you create a diagonal division of color. This contrast is what allows the quilter to create secondary patterns when multiple blocks are joined together, making the Log Cabin Quilt Tutorial – Pattern one of the most versatile tools in a designer’s arsenal.
Historically, the Log Cabin Quilt Tutorial – Pattern gained massive popularity in the United States during the Civil War era and the subsequent westward expansion. It was an incredibly practical design because it could be made using small scraps of fabric or even old clothing, making it a “frugal” pattern for families on the frontier. Despite its humble origins, the geometric precision required for a successful Log Cabin Quilt Tutorial – Pattern elevated it to a form of high art that remains popular in modern museums.
In contemporary quilting, the Log Cabin Quilt Tutorial – Pattern has evolved to include “Wonky” variations or “Off-Center” designs where the logs vary in width. However, the foundational logic remains the same: it is a study in growth and symmetry. For those following a traditional Log Cabin Quilt Tutorial – Pattern, consistency is key; using a standard width for your strips (commonly 1.5 or 2.5 inches) ensures that your finished blocks will align perfectly when it comes time to assemble the quilt top.
Choosing fabrics for your Log Cabin Quilt Tutorial – Pattern is an adventure in itself, as you must look at fabrics not just for their print, but for their “value”—how light or dark they appear relative to each other. A successful Log Cabin Quilt Tutorial – Pattern often features a wide range of textures and patterns, from floral to geometric, as long as they adhere to the light/dark split. This allows the quilter to tell a personal story through fabric, mixing old memories with new materials in a structured, beautiful way.
To achieve success with the Log Cabin Quilt Tutorial – Pattern, you must start with the right equipment, as precision is the difference between a block that lays flat and one that ripples. A high-quality rotary cutter with a fresh blade is essential for cutting the numerous strips required for this pattern. Using a dull blade can lead to frayed edges or slightly slanted cuts, which will quickly throw off the alignment of your Log Cabin Quilt Tutorial – Pattern as you add more layers.
A self-healing cutting mat and a long acrylic quilting ruler (at least 24 inches) are also vital components for the Log Cabin Quilt Tutorial – Pattern. These tools allow you to cut “sub-cuts” from long strips of fabric accurately. Many quilters prefer to “strip piece” their Log Cabin Quilt Tutorial – Pattern, meaning they sew a long strip to the block and then trim it even with the block’s edge, rather than pre-cutting every single small piece, which saves time and reduces measurement errors.
The choice of sewing machine needle and thread also plays a role in the durability of your Log Cabin Quilt Tutorial – Pattern. A 50-weight cotton thread is the industry standard for piecing because it is thin enough to not add bulk to the seams but strong enough to hold the quilt together over decades of use. When working on the Log Cabin Quilt Tutorial – Pattern, ensure your machine is clean and oiled, as you will be sewing many long, straight seams that require a smooth, consistent feed.
An iron and a firm pressing surface are perhaps the most used tools when executing a Log Cabin Quilt Tutorial – Pattern. Every time a new log is added, the seam must be pressed toward the newest strip to keep the block flat and prevent the fabric from bunching. A tailor’s clapper can be particularly helpful here, as it uses trapped heat to flatten the seams of your Log Cabin Quilt Tutorial – Pattern without the need for excessive steam, which can sometimes distort the grain of the cotton.
When selecting fabric for the Log Cabin Quilt Tutorial – Pattern, 100% quilting cotton is highly recommended due to its stability and ease of care. You will need a variety of “lights” and “darks.” Lights usually include creams, whites, and pale pastels, while darks include deep blues, reds, blacks, or saturated jewel tones. Using “Fat Quarters” is a great way to get a variety of prints for your Log Cabin Quilt Tutorial – Pattern without having to buy large yardages of a single fabric.
Finally, consider using starch or a fabric stiffener before cutting your strips for the Log Cabin Quilt Tutorial – Pattern. Cotton can sometimes be “fidgety” and prone to stretching, especially when cut into thin strips. Lightly starching your fabric gives it a paper-like quality that makes it much easier to sew a perfect quarter-inch seam. This small preparation step can make the entire assembly of the Log Cabin Quilt Tutorial – Pattern significantly more enjoyable and lead to a much more accurate finished block.
The assembly of the Log Cabin Quilt Tutorial – Pattern begins with the center square and the first log. Place your center square and your first “light” strip right sides together and sew along one edge using a precise 1/4″ seam allowance. After sewing, fold the strip back and press it away from the center. You have now completed the first step of your Log Cabin Quilt Tutorial – Pattern, and the journey of building the “cabin” has officially begun.
For the second step of the Log Cabin Quilt Tutorial – Pattern, you rotate the unit 90 degrees and add another “light” strip to the adjacent side, covering both the original center and the end of the first strip. This overlapping method is what gives the block its strength and structural integrity. As you continue with the Log Cabin Quilt Tutorial – Pattern, you will transition to the “dark” side, adding two dark strips in the same rotating fashion to complete the first full “round” or circuit of the block.
The beauty of the Log Cabin Quilt Tutorial – Pattern is its repetitive nature; once you finish the first round, you simply repeat the process. Add two light strips, then two dark strips, always moving in the same direction around the center. As the block grows, you will notice the diagonal line of the Log Cabin Quilt Tutorial – Pattern becoming more prominent. It is helpful to check the squareness of your block with a ruler after every round to ensure it hasn’t become skewed.
If you find that your Log Cabin Quilt Tutorial – Pattern is becoming “wavy” at the edges, it is usually a sign that your seams are slightly too large or that you are pulling the fabric as you sew. To fix this, focus on a “scant” quarter-inch seam and let the machine’s feed dogs do the work of moving the fabric. The Log Cabin Quilt Tutorial – Pattern is very sensitive to seam width because there are so many seams in a single block; even a tiny deviation can add up to a half-inch difference by the time you reach the outer logs.
Trimming is an essential part of the Log Cabin Quilt Tutorial – Pattern workflow. After adding a strip, use your acrylic ruler to trim the excess fabric so it is perfectly flush with the existing block. This prevents “snowballing” errors where a slightly long strip causes the next strip to be even further out of alignment. Maintaining a clean, square edge at every stage of the Log Cabin Quilt Tutorial – Pattern is the hallmark of a meticulous and successful quilter.
Once you have reached your desired size—whether it’s a 6-inch miniature or a 14-inch large block—the final step in the Log Cabin Quilt Tutorial – Pattern construction is the final press. Lay the block face down on a soft towel and press from the back, then flip it over for a final hit of heat on the front. This ensures all the “logs” are settled into place. Your Log Cabin Quilt Tutorial – Pattern block is now ready to be joined with its siblings to create a breathtaking quilt top.
One of the most thrilling moments in quilting is “the reveal,” where you take your completed Log Cabin Quilt Tutorial – Pattern blocks and arrange them on a design wall or the floor. Because each block is half-light and half-dark, you can create a “Fields and Furrows” look by arranging them in straight diagonal lines. Alternatively, you can create the “Barn Raising” layout by pointing the dark centers toward a central point, making the Log Cabin Quilt Tutorial – Pattern look like a series of concentric diamonds.
For a modern twist on the Log Cabin Quilt Tutorial – Pattern, consider using a “Wonky” approach where the logs are cut at different angles or widths. This breaks the rigid geometry of the traditional design and creates a sense of movement and energy. You can also use a “Courthouse Steps” variation of the Log Cabin Quilt Tutorial – Pattern, where logs are added to opposite sides in pairs rather than in a spiral, resulting in a symmetrical block that looks beautiful in contemporary settings.
When it comes to quilting the layers together, the Log Cabin Quilt Tutorial – Pattern offers several great options. “Stitch in the ditch” is a popular choice because it hides the quilting thread in the seams, allowing the fabric colors to take center stage. For a more decorative look, you can use a contrasting thread and quilt large, sweeping feathers or swirls over the top of the Log Cabin Quilt Tutorial – Pattern, providing a soft, organic contrast to the sharp straight lines of the blocks.
The binding of your quilt is the final frame that holds the Log Cabin Quilt Tutorial – Pattern together. Many quilters choose a dark fabric for the binding to “contain” the design, or a scrappy binding made from the leftover “logs” to give it a whimsical, unified feel. Since the Log Cabin Quilt Tutorial – Pattern is often quite busy visually, a solid-color binding can provide a much-needed resting place for the eye, acting as a professional border for your hard work.
Labeling your quilt is a vital final step for any Log Cabin Quilt Tutorial – Pattern project. Because this pattern has such deep historical roots, adding a label with your name, the date, and the location helps preserve the “heritage” of the piece. You might even include a note about why you chose specific fabrics, turning your Log Cabin Quilt Tutorial – Pattern into a personal diary that will be read by future generations who wrap themselves in your handmade creation.
Finally, remember that the Log Cabin Quilt Tutorial – Pattern is a journey, not just a destination. Each block you sew is an opportunity to refine your craft and explore the endless possibilities of color and shape. Whether you make a small wall hanging or a king-sized bedspread, the Log Cabin Quilt Tutorial – Pattern will always be a rewarding and comforting design that connects you to the rich history of the quilting community worldwide.
1. Is the Log Cabin Quilt Tutorial – Pattern hard for a beginner?
Not at all! It is actually one of the best projects for a beginner because it only uses straight seams. The most important part is maintaining a consistent 1/4″ seam allowance and pressing carefully.
2. How do I choose the best “center” color?
Tradition says red for a fireplace or yellow for a candle, but you can use any color! Just make sure it has enough contrast so it doesn’t disappear into the first round of logs. It should be the “heart” of your Log Cabin Quilt Tutorial – Pattern.
3. What is “strip piecing” in this pattern?
Strip piecing involves sewing a long, uncut strip of fabric to your block and then trimming it to the correct length using the block as your guide. It is often faster and more accurate than pre-cutting dozens of small pieces.
4. Why is my block getting “bowed” or curved?
This usually happens if you are “stretching” the fabric as you sew or if your iron is “dragging” the fabric during pressing. Always lift the iron up and down rather than sliding it, and let the machine feed the fabric naturally.
5. Can I use different widths for the logs?
Yes! This is called a “Wonky Log Cabin” or an “Improv Log Cabin.” It creates a very modern and artistic look, but it can be a bit harder to join the blocks together at the end if the final sizes aren’t consistent.
6. How many blocks do I need for a throw quilt?
For a standard 50″ x 60″ throw, you would need about 30 blocks if each block is 10 inches square. The Log Cabin Quilt Tutorial – Pattern is very easy to scale up or down depending on your needs.
In this article, we have traveled through the rich history and technical execution of the Log Cabin Quilt Tutorial – Pattern. We explored how to select fabrics based on color value, the essential tools like rotary cutters and clappers that ensure success, and the step-by-step clockwise assembly method that brings the block to life. We also discussed how the Log Cabin Quilt Tutorial – Pattern can be rearranged into various layouts like “Barn Raising” to create entirely different visual effects. This pattern remains a favorite because it combines the simplicity of straight lines with the complexity of infinite design possibilities.
We hope this tutorial has inspired you to start your own quilting project and explore the timeless charm of this design. Whether you are using vintage scraps or modern designer fabrics, the Log Cabin Quilt Tutorial – Pattern is sure to provide a satisfying and beautiful result. Please leave your sincere opinion and any suggestions or questions in the comments below! We would love to hear which layout is your favorite and what colors you are planning to use for your next quilt. Happy sewing!


