
American-style placemat with a fruit theme - Pattern

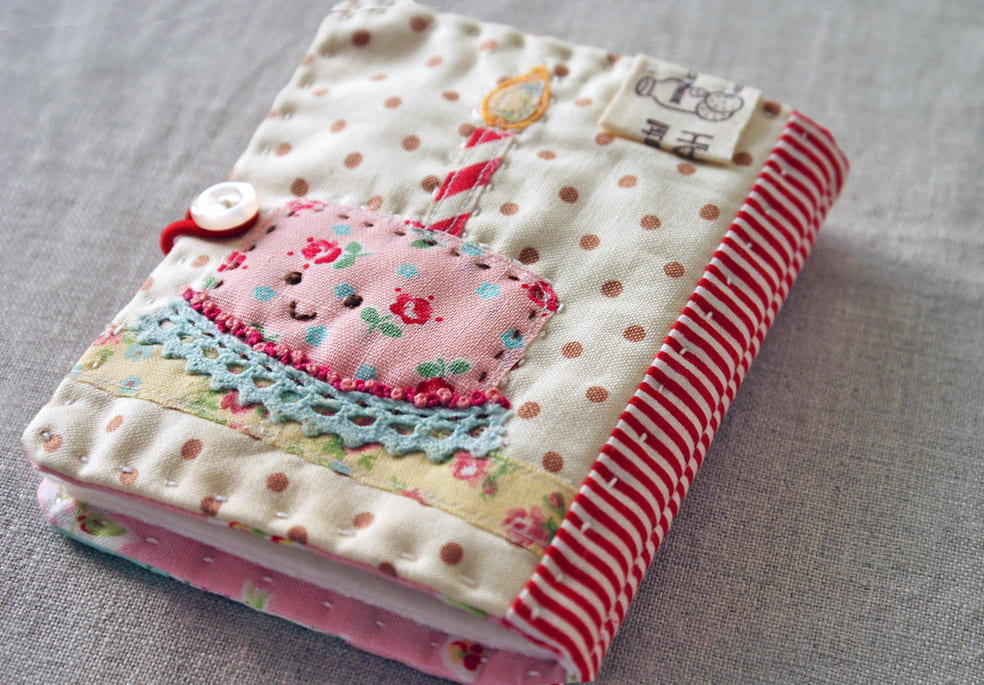
Creating a professional Needle holder – Pattern is an essential project for anyone who loves sewing, embroidery, or quilting, as it provides a safe and organized way to store your most important tools. Having a dedicated space for your needles not only prevents them from getting lost in the cushions of your sofa but also protects the sharp tips from becoming dull or rusted over time. This Needle holder – Pattern is designed to be both functional and aesthetically pleasing, making it a perfect addition to your crafting kit or a thoughtful gift for a fellow maker.
The beauty of a custom Needle holder – Pattern lies in its simplicity and the ability to personalize it with your favorite fabrics and embellishments. Whether you are looking for a compact book-style design or a more elaborate rolled pouch, following a well-structured Needle holder – Pattern ensures that your final product is durable and serves its purpose for years to come. In this guide, we will walk through the entire process of selecting materials and assembling your project, focusing on a beginner-friendly approach that yields professional results.
By choosing to make your own Needle holder – Pattern, you gain the freedom to customize the number of pages or sections based on the variety of needles you use, such as tapestry, darning, or fine sewing needles. This Needle holder – Pattern also allows you to incorporate high-quality felt or wool, which are natural materials that help keep needles clean and sharp. Over the next several sections, we will dive deep into the technical aspects of the design, ensuring you have all the information needed to complete this satisfying DIY project successfully.
When you begin working on your Needle holder – Pattern, the choice of inner lining is the most critical decision you will make. Wool felt is widely considered the gold standard for any Needle holder – Pattern because the natural lanolin in the wool helps prevent your needles from rusting over time. Unlike synthetic felt, which can be difficult to pierce and may snag, wool felt allows needles to glide in and out effortlessly, maintaining the integrity of the Needle holder – Pattern for long-term use.
For the exterior of your Needle holder – Pattern, you want a fabric that is sturdy yet flexible, such as a medium-weight cotton or a soft linen. This outer layer provides the structural support for the Needle holder – Pattern, protecting the delicate contents from dust and moisture. Many crafters enjoy using “fat quarters” for this project, as they offer just the right amount of fabric to create a beautiful, cohesive look without much waste.
Interfacing is another key component that shouldn’t be overlooked when following a Needle holder – Pattern. Adding a layer of fusible fleece or light interfacing between the outer fabric and the lining gives the Needle holder – Pattern a professional, padded feel. It helps the holder keep its shape even after being tossed into a sewing bag repeatedly, ensuring that your needles remain securely tucked away in their designated spots.
The closure system for your Needle holder – Pattern can range from a simple ribbon tie to a magnetic snap or a vintage button. Selecting a closure that complements the overall style of your Needle holder – Pattern adds a touch of personality and ensures the holder stays closed when not in use. A secure closure is vital, especially if you plan on carrying your Needle holder – Pattern in a travel kit where items might shift around.
Thread selection is also an important factor in achieving a clean finish for your Needle holder – Pattern. Using a high-quality all-purpose polyester or cotton thread that matches your fabric will make your seams nearly invisible. If you want to add a decorative element to your Needle holder – Pattern, you might consider using embroidery floss to blanket stitch the edges of the felt pages, adding a charming handmade touch.
Lastly, consider the size of the needles you intend to store before you finalize your Needle holder – Pattern dimensions. If you primarily use long quilting needles, you may need to adjust the height of the pages in the Needle holder – Pattern to accommodate them. Taking these small details into account during the material-gathering phase will result in a much more useful and personalized finished product.
The first step in the physical construction of your Needle holder – Pattern is to wash and iron your fabrics to prevent any future shrinking or warping. Once your fabric is crisp and flat, you can begin measuring and marking the rectangular pieces required for the Needle holder – Pattern covers. Accuracy at this stage is paramount, as even a small discrepancy can lead to a lopsided Needle holder – Pattern once it is fully assembled.
Using sharp fabric shears or a rotary cutter will ensure that the edges of your Needle holder – Pattern pieces are clean and fray-free. Most standard patterns suggest a cover size of approximately 4 inches by 6 inches when closed, meaning your initial fabric cut for the Needle holder – Pattern should be roughly 8.5 inches by 6.5 inches to account for seam allowances. Following these measurements precisely will give your project a professional edge.
After cutting the outer fabric, repeat the process for the lining and the interfacing of your Needle holder – Pattern. If you are using fusible interfacing, follow the manufacturer’s instructions to bond it to the wrong side of your outer fabric piece. This step is a “game changer” for the Needle holder – Pattern, as it provides the necessary body and thickness to make the holder feel substantial in your hand.
For the internal pages of the Needle holder – Pattern, cut two or three pieces of felt that are slightly smaller than the interior dimensions of the cover. A common size for these pages in a Needle holder – Pattern is 7.5 inches by 5.5 inches. Pinking shears can be used on the edges of the felt pages to add a decorative zigzag border while also preventing any minor fraying that might occur over years of use.
If your Needle holder – Pattern includes a pocket for a small pair of scissors or a needle threader, cut those pieces now as well. Adding these small features makes the Needle holder – Pattern a multifunctional tool rather than just a simple storage item. Ensure that these pocket pieces are hemmed at the top before being basted onto the lining of the Needle holder – Pattern to prevent the fabric from unraveling.
Organization is key during the cutting phase of the Needle holder – Pattern. Keeping your pieces stacked in the order they will be sewn will save you time and frustration later on. Once all the components of your Needle holder – Pattern are cut and prepared, you are ready to move to the sewing machine and begin the assembly process that will bring your vision to life.
Begin the assembly of your Needle holder – Pattern by placing the outer fabric and the lining fabric “right sides together.” If you have chosen a ribbon closure, sandwich the ribbon ends between the layers at the center of the short sides before pinning. Sewing around the perimeter of the Needle holder – Pattern while leaving a 2-inch gap for turning is the standard method for creating a clean, hidden seam.
Once the perimeter of the Needle holder – Pattern is sewn, clip the corners at a 45-degree angle, being careful not to cut through the stitches. This technique allows the corners of your Needle holder – Pattern to be turned right-side out with sharp, crisp points. Turning the fabric through the small gap might feel a bit tight, but take your time to avoid putting too much stress on the seams of the Needle holder – Pattern.
After turning the Needle holder – Pattern right-side out, use a bone folder or a blunt chopstick to push the corners out fully. Press the entire cover flat with an iron, making sure the raw edges of the opening are tucked neatly inside. Topstitching around the entire edge of the Needle holder – Pattern not only closes the gap but also adds a decorative finish and extra stability to the structure.
Now it is time to attach the felt pages to the center of your Needle holder – Pattern. Stack your felt pieces neatly and pin them along the vertical center line of the inside cover. Using a slightly longer stitch length, sew a straight line down this center mark, backstitching at the top and bottom. This line of stitching acts as the “spine” of your Needle holder – Pattern, allowing the pages to turn like a book.
If your Needle holder – Pattern includes a button closure, mark the spot on the front cover where the button will sit and sew it on securely by hand. On the opposite side, you can create a small loop using elastic cord or a fabric scrap to hook over the button. This final touch ensures that your Needle holder – Pattern stays compact and keeps all your sharp tools safely contained inside.
Inspect your finished Needle holder – Pattern for any loose threads or uneven stitches. A quick final press with the iron will set the seams and give the project a store-bought quality. Now that the physical assembly of the Needle holder – Pattern is complete, you can begin the enjoyable task of organizing your needles by size and type within the soft felt pages you’ve just installed.
One of the most exciting parts of completing a Needle holder – Pattern is the opportunity to add personal embellishments. You can use embroidery to label the pages of your Needle holder – Pattern with specific needle sizes or types, such as “Sharps,” “Betweens,” or “Crewel.” This added level of detail makes the Needle holder – Pattern even more functional, as you will never have to guess which needle you are grabbing again.
Appliqué is another wonderful way to decorate the cover of your Needle holder – Pattern. You could sew a small fabric heart, a flower, or even a miniature spool of thread onto the front to reflect your personal style. These small artistic choices turn a basic Needle holder – Pattern into a unique piece of art that reflects your passion for the craft of sewing.
For those who want to take their Needle holder – Pattern to the next level, consider adding a small magnetic strip inside one of the covers. This hidden magnet can hold a single needle or a pair of snips temporarily while you work, preventing them from falling off your workspace. This modern update to a classic Needle holder – Pattern design adds a layer of convenience that many modern makers find indispensable.
Maintenance of your Needle holder – Pattern is relatively simple but important for its longevity. If the felt pages become covered in lint or thread scraps, a gentle brush with a soft-bristled toothbrush can clean them without damaging the fibers. Since the Needle holder – Pattern is made of fabric, it is best to avoid getting it soaking wet; instead, spot-clean any stains with a damp cloth and mild soap.
Over time, the needles in your Needle holder – Pattern may leave small holes in the felt, which is perfectly normal. Because you used high-quality wool felt in your Needle holder – Pattern, the fibers will naturally “heal” or close up to some extent when you remove a needle. If the pages eventually become too worn after years of heavy use, you can easily remove the spine stitching and replace the felt pages, keeping the beautiful outer cover of your Needle holder – Pattern.
Finally, don’t forget that a Needle holder – Pattern makes an incredible gift for birthdays, holidays, or “just because” for your crafty friends. You can customize the fabric to match their sewing room or use their favorite colors. By sharing your love for the Needle holder – Pattern, you help others stay organized and inspired, continuing the tradition of handmade excellence in the sewing community.
What is a Needle holder – Pattern?
A Needle holder – Pattern is a set of instructions used to create a small fabric book or case specifically designed to store and organize sewing needles. It usually features felt “pages” that hold the needles securely in place and protect them from damage.
Why should I use wool felt for my Needle holder – Pattern?
Wool felt is preferred for a Needle holder – Pattern because it contains natural oils (lanolin) that help prevent needles from rusting. It is also more durable and easier to sew through than synthetic craft felt, providing a better experience for the user.
Can I make a Needle holder – Pattern without a sewing machine?
Yes, a Needle holder – Pattern is small enough that it can be entirely hand-sewn using a backstitch for the seams and a blanket stitch for the edges. Hand-sewing can actually add a beautiful, rustic charm to the finished project.
How many needles can a standard Needle holder – Pattern hold?
Depending on the number of pages you include, a standard Needle holder – Pattern can easily hold between 20 and 50 needles. You can organize them by type on different pages to make finding the right one easier during your projects.
What is the best size for a Needle holder – Pattern?
Most people find that a finished size of 4×5 inches or 4×6 inches is ideal for a Needle holder – Pattern. This size is large enough to hold most common needles but small enough to fit into a standard sewing basket or travel kit.
Is this Needle holder – Pattern suitable for beginners?
Absolutely! This Needle holder – Pattern focuses on basic straight seams and simple assembly techniques. It is an excellent “first project” for someone learning to sew, as it teaches fabric preparation, interfacing, and basic construction.
In this article, we have thoroughly explored how to create a functional and stylish Needle holder – Pattern from start to finish. We covered the importance of selecting high-quality materials like wool felt and sturdy cotton, the precision required during the cutting phase, and the step-by-step assembly process that ensures a professional result.
By following this Needle holder – Pattern, you have created more than just a storage tool; you have crafted a durable companion for all your future sewing adventures that keeps your needles organized, sharp, and ready for use.


