
American-style placemat with a fruit theme - Pattern

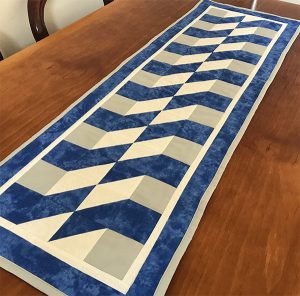
The One Seam Flying Geese Quilt – Pattern is a revolutionary approach to a classic quilting motif that has captivated the hearts of makers for generations. Traditionally, the flying geese unit involves multiple seams and a high risk of losing those precious points, but this modern pattern simplifies the geometry into a single, elegant seam. By mastering the One Seam Flying Geese Quilt, you can achieve professional results with a fraction of the effort, allowing you to focus on the joy of color selection and the rhythm of your sewing machine.
Exploring the One Seam Flying Geese Quilt – Pattern is an excellent way for quilters to expand their repertoire without the stress of complex piecing. The One Seam Flying Geese Quilt creates a 3D effect that adds texture and depth to any project, making it a standout choice for baby quilts, table runners, or even large-scale bed covers. This pattern is particularly forgiving for those who struggle with traditional methods, as the unique folding technique ensures that your “geese” are always perfectly aligned and your “sky” is always crisp.
When you dive into the One Seam Flying Geese Quilt – Pattern, you are engaging with a versatile design that bridges the gap between traditional craftsmanship and modern efficiency. The One Seam Flying Geese Quilt is not just about speed; it is about the structural integrity and the clean lines that this specific pattern provides. In the following sections, we will break down the essential steps, from choosing the right fabrics to the final press, ensuring that your journey with this pattern is as smooth as the single seam that defines it.

The success of your One Seam Flying Geese Quilt – Pattern begins with a thoughtful fabric selection. Because the One Seam Flying Geese Quilt relies on a folding technique, you want to choose high-quality cotton fabrics that can hold a crisp crease. Solid fabrics or small-scale prints often work best for this pattern, as they highlight the sharp angles and the movement of the “geese” across the quilt top.
Contrast is the secret ingredient for a stunning One Seam Flying Geese Quilt. To make the most of this pattern, select a “goose” fabric that stands out sharply against your “sky” or background fabric. If your background is a neutral cream, try a bold navy or a vibrant floral for the geese; this ensures the geometric beauty of the One Seam Flying Geese Quilt – Pattern is visible from across the room.
Consider the “weight” of your fabrics when preparing for the One Seam Flying Geese Quilt – Pattern. Since you will be folding layers of fabric, using excessively thick materials like flannel or heavy denim might make the seams of your One Seam Flying Geese Quilt too bulky. Stick to standard quilting-weight cotton to ensure that the single seam of this pattern remains flat and manageable during the assembly process.
Many modern quilters love using “fat quarter” bundles for the One Seam Flying Geese Quilt – Pattern. These curated bundles provide a cohesive color story, which is essential when the One Seam Flying Geese Quilt repeats across a large surface. Using a variety of prints within the same color family can add a sophisticated, “scrappy” look to the pattern without losing the overall design’s harmony.
Directional prints can be a bit tricky when working with the One Seam Flying Geese Quilt – Pattern. Because the fabric is folded and sewn in a specific way, stripes or one-way designs might end up upside down in your One Seam Flying Geese Quilt. For your first attempt at this pattern, it is often easier to use non-directional prints or batiks to avoid any alignment headaches.
Lastly, don’t forget to starch your fabric before starting the One Seam Flying Geese Quilt – Pattern. Starching makes the fabric slightly stiffer, which is a huge advantage when creating the precise folds required for the One Seam Flying Geese Quilt. A well-starched fabric ensures that the single seam in this pattern is straight and that the points of your geese stay sharp throughout the construction.
The assembly of a One Seam Flying Geese Quilt – Pattern starts with cutting two different sizes of squares or rectangles. For each unit in the One Seam Flying Geese Quilt, you will typically need one large rectangle for the background and one smaller square for the “goose.” This pattern is highly mathematical, so ensuring your initial cuts are exact is the foundation for a perfect finish.
Once your pieces are cut, the magic of the One Seam Flying Geese Quilt – Pattern happens through a series of folds. You will fold the “goose” square in half to create a triangle and then sandwich it between the layers of the background fabric. This unique approach to the One Seam Flying Geese Quilt is what eliminates the need for multiple seams and prevents the common “cutoff point” issue found in other patterns.
After pinning your folded units, you will sew across the top edge. This is the “one seam” that gives the One Seam Flying Geese Quilt – Pattern its name. It is vital to use a consistent 1/4 inch seam allowance during this stage. Because the One Seam Flying Geese Quilt involves multiple layers of folded fabric, a walking foot can be very helpful to prevent the layers from shifting under the needle.
After sewing, the next step in the One Seam Flying Geese Quilt – Pattern is the “flip and press.” You will open the background fabric to reveal the “goose” nestled inside. In this pattern, the points of the One Seam Flying Geese Quilt are naturally protected by the fold, meaning you don’t have to worry about losing them in the seam allowance of the next row.
As you create more units for your One Seam Flying Geese Quilt – Pattern, you will begin to see the “V” shapes emerge. These units can be sewn together end-to-end to create long columns or rows. The One Seam Flying Geese Quilt looks particularly striking when the geese are all flying in the same direction, but you can also alternate them for a zigzag effect within the pattern.
The final part of the assembly for the One Seam Flying Geese Quilt – Pattern is joining the rows. Because of the folded nature of the One Seam Flying Geese Quilt, there will be a bit more bulk where the units meet. Take your time to nest these intersections carefully; this attention to detail ensures that your pattern looks professional and lays as flat as possible for the quilting stage.
Once you have mastered the basic One Seam Flying Geese Quilt – Pattern, you can start experimenting with advanced layouts. One popular variation for the One Seam Flying Geese Quilt is the “Circle of Geese,” where the units are arranged in a ring. This transforms the linear pattern into a dynamic, radiating design that serves as a beautiful centerpiece for a wall hanging.
Another way to elevate your One Seam Flying Geese Quilt – Pattern is through “Fussy Cutting.” This involves cutting your “goose” squares so that a specific motif, like a flower or an animal, is centered in the triangle. This adds a layer of whimsy to the One Seam Flying Geese Quilt and makes the pattern feel much more customized and intricate than a standard pieced block.
Playing with scale can also change the entire feel of the One Seam Flying Geese Quilt – Pattern. You can create “Giant Geese” for a modern, minimalist look, or “Micro Geese” for a more traditional and detailed appearance. Combining different sizes of the One Seam Flying Geese Quilt within a single quilt top creates a sense of perspective and movement that is rare in simpler pattern designs.
Color blocking is a powerful tool when working with the One Seam Flying Geese Quilt – Pattern. By using a gradient of colors—moving from dark at the bottom to light at the top—you can make your One Seam Flying Geese Quilt look like it is literally taking flight. This “ombre” effect is very popular in modern quilting circles and works perfectly with this specific pattern.
For those who enjoy a challenge, try incorporating the One Seam Flying Geese Quilt – Pattern into a “Medallion Quilt” style. Surround a central block with borders of One Seam Flying Geese Quilt units. This frames the center of the quilt and adds a professional, high-end finish to the overall pattern that is sure to impress your fellow quilters.
Finally, consider adding a 3D element to your One Seam Flying Geese Quilt – Pattern. Since the geese are formed by a fold, some quilters leave the bottom edge of the triangle unsewn to create a “pouch” or a tactile flap. This makes the One Seam Flying Geese Quilt a great sensory project for a baby’s “quiet book” or a unique decorative pillow pattern.
One common issue when making the One Seam Flying Geese Quilt – Pattern is the “bulky seam” problem. Because of the folds, the center point of the One Seam Flying Geese Quilt can become quite thick. To solve this, always press your seams open when joining units in this pattern. This distributes the fabric layers evenly and makes it much easier to quilt over the One Seam Flying Geese Quilt later.
If your geese look “wonky” or distorted in your One Seam Flying Geese Quilt – Pattern, check your iron temperature. Sometimes, excessive steam can stretch the bias edges of the One Seam Flying Geese Quilt. Use a dry iron and a “pressing” motion (lifting the iron up and down) rather than an “ironing” motion (sliding it back and forth) to keep the pattern units perfectly square.
Accuracy in the initial rectangle-to-square ratio is vital for the One Seam Flying Geese Quilt – Pattern. If your rectangle is too short, the “sky” will be too narrow; if it’s too long, the geese will look squashed. Always double-check the cutting requirements for your specific One Seam Flying Geese Quilt to ensure the pattern proportions remain aesthetically pleasing.
When it comes to quilting the finished One Seam Flying Geese Quilt – Pattern, “In the Ditch” quilting is a great way to stabilize the many layers without distracting from the design. However, if you want to emphasize the movement of the One Seam Flying Geese Quilt, consider a “Wind” or “Swirl” motif across the entire pattern. This adds a layer of storytelling to the quilt.
Don’t forget the binding! A striped binding can add a playful finish to the One Seam Flying Geese Quilt – Pattern. Because the One Seam Flying Geese Quilt has so many straight lines and angles, the contrast of a bias-cut striped binding provides a nice visual frame for the pattern, pulling all the colors together for a finished look.
Finally, take a moment to label your One Seam Flying Geese Quilt – Pattern project. Include your name, the date, and the fact that it is a One Seam Flying Geese Quilt. Whether you keep it or gift it, this pattern represents a beautiful moment in your quilting journey, and a label ensures that the story of your One Seam Flying Geese Quilt is preserved for the future.
What is a One Seam Flying Geese Quilt?
The One Seam Flying Geese Quilt is a quilting technique that uses a clever folding method to create the classic “flying geese” triangle unit with only one line of stitching. This pattern is designed to save time and ensure that the points of the triangles are never accidentally cut off during assembly.
Is this pattern suitable for beginners?
Yes, the One Seam Flying Geese Quilt – Pattern is highly recommended for beginners. Because it avoids the complex bias-edge sewing found in traditional methods, it is much easier to achieve a precise and professional look on your first try with a One Seam Flying Geese Quilt.
How much fabric do I need for a standard One Seam Flying Geese Quilt?
Fabric requirements depend on the size of the quilt, but a general rule for the One Seam Flying Geese Quilt – Pattern is that your background rectangle should be exactly twice the size of your goose square plus seam allowances. Most pattern instructions provide a detailed chart for various quilt dimensions.
Can I make these units in different sizes?
Absolutely! The One Seam Flying Geese Quilt – Pattern is scalable. You can make tiny 2-inch units or massive 12-inch units. As long as you maintain the correct mathematical ratio between the two pieces of fabric, the One Seam Flying Geese Quilt will turn out perfectly every time.
Do I need any special tools for this pattern?
While not strictly necessary, a “quilter’s square” ruler and a rotating cutting mat can make the preparation for a One Seam Flying Geese Quilt – Pattern much faster. A clapper (a wooden block) is also useful for pressing the folded layers of the One Seam Flying Geese Quilt very flat.
Why are my points getting cut off?
In a One Seam Flying Geese Quilt – Pattern, points usually get cut off if the seam allowance is wider than 1/4 inch. If you find this happening, adjust your needle position. The beauty of the One Seam Flying Geese Quilt is that if your seam is accurate, the point is automatically protected by the fold.
In this comprehensive guide, we have explored the innovative and efficient world of the One Seam Flying Geese Quilt – Pattern. From the initial selection of high-contrast fabrics to the unique “fold and sew” assembly method, it is clear that the One Seam Flying Geese Quilt is a game-changer for both novice and experienced quilters alike.
We have seen how this pattern simplifies traditional geometry into a single seam, ensuring sharp points and beautiful results every time. By understanding the importance of pressing, the joy of fussy cutting, and the versatility of different layouts, you are now equipped to create a masterpiece that looks far more complex than it actually is.


