
American-style placemat with a fruit theme - Pattern

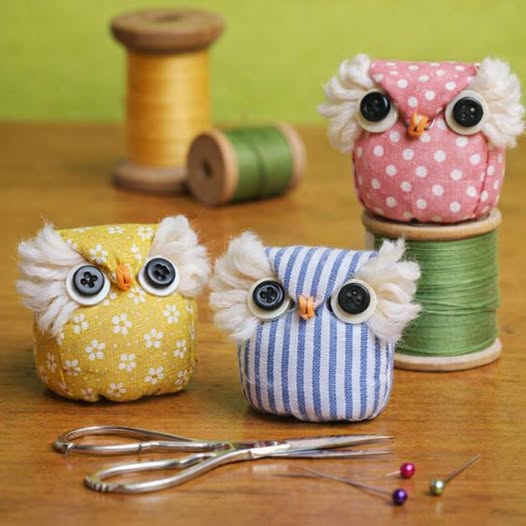
Finding the perfect Owl-shaped pincushion – Pattern is a delightful milestone for any sewing enthusiast looking to combine organization with a touch of whimsical charm. This specific craft project has gained immense popularity in the “maker” community because it transforms a basic utility item into a decorative companion that sits faithfully on your sewing table. Whether you are a beginner looking to practice your basic stitching or a professional tailor wanting to clear out your fabric scrap bin, following a well-designed Owl-shaped pincushion – Pattern provides a satisfying creative outlet that results in a highly functional tool.
The beauty of an Owl-shaped pincushion – Pattern lies in its geometric simplicity, which allows for endless customization through color and texture. Most patterns utilize a combination of a weighted base, a plump body for needle storage, and felt accents for the eyes and beak, making the owl appear “wise” as it watches over your pins. By choosing different fabric textures like linen, cotton, or even recycled wool, you can ensure your Owl-shaped pincushion – Pattern matches your sewing room’s aesthetic perfectly, while providing a soft yet firm surface that keeps your needles sharp and accessible.
In this comprehensive guide, we will explore everything you need to know about successfully completing an Owl-shaped pincushion – Pattern. We will dive into the essential materials and tools, the structural assembly required to keep the owl upright, and the creative ways you can personalize the “feathers” and facial expressions. As we move through the sections, you will discover that this project is not just about sewing; it is about creating a tiny, handmade masterpiece that brings joy to your daily crafting routine. Let’s begin our journey into the world of DIY sewing accessories with this iconic and adorable design.
The foundation of a high-quality Owl-shaped pincushion – Pattern starts with selecting the right main body fabric. Since the pincushion will be poked by needles thousands of times, you want a fabric that is tightly woven but soft, such as a high-thread-count quilting cotton or a durable linen blend. Avoid loose-weave fabrics like burlap, as the pins may slip through the gaps or the stuffing might start to leak out over time. Choosing a fabric with a small floral or geometric print can add a sophisticated look to your owl’s plumage.
For the structural details of the Owl-shaped pincushion – Pattern, wool felt is the gold standard for the eyes and the beak. Unlike synthetic felt, wool felt does not fray at the edges, which is crucial since these pieces are usually quite small and difficult to hem. The thickness of the felt also adds a nice 3D dimension to the owl’s face, making the features stand out. You can experiment with layered circles of different colored felt to create a wide-eyed, curious expression that gives your pincushion a unique personality.
The secret to a functional Owl-shaped pincushion – Pattern lies in the filling material. While standard polyester fiberfill (poly-fill) is excellent for creating a soft, plump shape, it can sometimes be too light, causing the pincushion to tip over when you pull out a needle. Many experienced crafters recommend a mix of crushed walnut shells or steel wool inside the base. The walnut shells provide a satisfying weight and actually help to sharpen your pins every time you insert them, making your Owl-shaped pincushion – Pattern a self-maintaining tool.
Don’t overlook the importance of high-quality thread and a sharp needle for the assembly. Since you will be sewing curves and potentially thick layers of felt, a 100% polyester thread is recommended for its strength and slight elasticity. Using a contrasting thread color for the “feather” details can create a beautiful hand-stitched look that highlights the craftsmanship of your Owl-shaped pincushion – Pattern. Small details like embroidery floss can also be used to add eyelashes or decorative swirls to the owl’s wings.
To ensure your Owl-shaped pincushion – Pattern has a professional finish, you will also need a few specific sewing notions. A pair of micro-tip scissors is essential for cutting out the tiny felt circles of the eyes, and a fabric marking pen (water-soluble) is helpful for tracing the pattern onto the cloth. A “stuffing tool” or a simple chopstick can also be a lifesaver when you need to push the filling into the small corners of the owl’s ears, ensuring the shape is even and firm throughout.
Lastly, consider the bottom stabilization of your project. If you aren’t using heavy filling, you can cut a small circle of stiff cardboard or plastic (like from a clean yogurt lid) to place at the very bottom of the owl before closing it up. This creates a flat “footing” for your Owl-shaped pincushion – Pattern, ensuring it sits perfectly flat on your workspace. Preparation is the key to a stress-free sewing experience, and having these materials ready will set you up for a successful and adorable result.
The most common Owl-shaped pincushion – Pattern usually begins with a “triangular pyramid” or “conical” base. By sewing two or three curved pieces of fabric together, you create a hollow body that tapers toward the top to form the ears. This geometric design is brilliant because it provides a wide base for stability while naturally creating the pointed ear shapes that define an owl’s silhouette. Accuracy in your seam allowance is vital here to ensure the owl looks symmetrical once it is turned right-side out.
Once the main body is sewn, you will focus on the facial placement, which is the most critical aesthetic step of the Owl-shaped pincushion – Pattern. It is often easier to sew the felt eyes and beak onto the front panel before you sew the body pieces together. This allows you to hide your knots on the inside and ensures the face is centered. Using a running stitch or a blanket stitch around the eyes adds a lovely “handmade” texture that complements the overall theme of the pincushion.
After the face is secured, you move on to the assembly and turning phase. You will sew around the perimeter of your Owl-shaped pincushion – Pattern, leaving a small 2-inch gap at the bottom for turning and stuffing. Before you flip it right-side out, it is important to “clip the curves” and “notch the corners.” Clipping the seam allowance helps the fabric lay flat once turned, preventing the unsightly puckering that can happen on the rounded edges of the owl’s head.
Stuffing your Owl-shaped pincushion – Pattern requires a “firm but not bursting” approach. Start by filling the ears first, using your stuffing tool to get the fiberfill right into the points. Then, fill the middle of the body with your weighted material (like the walnut shells) and finish with a layer of poly-fill around the edges. A well-stuffed Owl-shaped pincushion – Pattern should feel solid to the touch; if it is too soft, your pins will wobble and may even fall out during use.
The final closure of the Owl-shaped pincushion – Pattern is done using a ladder stitch (also known as an invisible stitch). This hand-sewing technique allows you to close the bottom gap without any visible thread on the outside. It requires a bit of patience, but it is the difference between a “homemade” look and a professional “handmade” finish. Pulling the thread tight at the end will “zip” the seam shut, leaving your owl looking like a seamless, three-dimensional sculpture.
To add the finishing touches, some versions of the Owl-shaped pincushion – Pattern include “wings” made from contrasting fabric scraps. These can be top-stitched onto the sides of the body after it is stuffed, or sewn into the side seams during the initial assembly. Adding these wings gives you more surface area for needle storage, as you can use the wings for small sewing needles and the main body for larger glass-head pins. This functional layering makes the owl a versatile tool for any sewing project.
The versatility of the Owl-shaped pincushion – Pattern means it can be adapted to fit any style, from “Vintage Shabby Chic” to “Modern Minimalist.” For a vintage look, consider using recycled lace or antique buttons for the eyes. Scraps from an old quilt or a worn-out denim jacket can also give the owl a rugged, “upcycled” feel. This approach not only makes your Owl-shaped pincushion – Pattern unique but also contributes to an eco-friendly crafting lifestyle by reducing fabric waste.
If you prefer a more modern aesthetic, try using bold, solid colors like mustard yellow, charcoal grey, or teal. For a minimalist Owl-shaped pincushion – Pattern, you can skip the intricate embroidery and use simple felt shapes with clean, sharp lines. Using a monochromatic color palette—where the eyes, beak, and body are all different shades of the same color—creates a sophisticated and “designer” look that would fit perfectly in a contemporary studio or a high-end craft room.
Seasonal variations are another fun way to use the Owl-shaped pincushion – Pattern. For a “Winter Owl,” you could use white fleece or faux fur and add a tiny felt scarf around the neck. For a “Spring Owl,” use pastel fabrics and sew tiny silk flowers near the ears. These seasonal crafts make wonderful gifts for friends in your sewing guild, as they are practical but also serve as a festive decoration for their respective holidays throughout the year.
Texture plays a huge role in the tactile experience of using an Owl-shaped pincushion – Pattern. Using corduroy or velvet for the body provides a rich, luxurious feel and grips the pins slightly differently than flat cotton. However, be aware that thicker fabrics might require a slightly larger seam allowance to account for the bulk. Mixing textures, such as a corduroy body with satin wings, creates a “sensory” object that is just as pleasant to hold as it is to look at.
For those who want to take their Owl-shaped pincushion – Pattern to the next level, you can add functional embellishments. Consider sewing a small loop of ribbon to the top of the head so you can hang the owl from your sewing machine’s spool pin or a wall hook. You could even add a tiny pocket to the owl’s back to hold a small pair of embroidery scissors or a thimble. These “utility upgrades” turn the pincushion into a mini-organizer for your most-used tools.
Finally, don’t be afraid to experiment with the size of the pattern. While most pincushions are around 4 inches tall, you can easily scale up the Owl-shaped pincushion – Pattern to create a “doorstop” or a decorative shelf-sitter. Scaling down, on the other hand, allows you to create “finger pincushions” or “wrist pincushions” that are incredibly convenient for when you are draping fabric on a mannequin. The owl shape remains recognizable and charming regardless of the dimensions you choose.
To ensure your Owl-shaped pincushion – Pattern remains a staple in your sewing room for years, a little maintenance goes a long way. Over time, the fabric may collect “lint” or dust from your threads. A quick swipe with a lint roller or a piece of sticky tape will keep the owl looking fresh. If you used wool felt, be careful not to rub too hard, as this can cause the fibers to “pill.” A gentle touch is all that’s needed to keep the owl’s face looking bright and clean.
Over years of use, the pins may occasionally leave tiny holes in the fabric of your Owl-shaped pincushion – Pattern. This is natural, but choosing a busy print fabric can help hide these punctures. If you find the stuffing is becoming compressed or “lumpy,” you can gently massage the owl to redistribute the fibers. The beauty of a handmade item is that you can always perform “surgery” if needed—simply open the bottom seam, add fresh stuffing, and sew it back up for another decade of service.
The sharpness of your pins is vital for protecting your fabrics, and your Owl-shaped pincushion – Pattern can help with this. As mentioned earlier, filling the base with crushed walnut shells or a small amount of emery sand acts as a natural abrasive. Every time you push a needle into the cushion, it cleans off any microscopic burrs or rust. If your pins start feeling “sticky” when they enter the fabric, try moving them to a different section of the owl to utilize the sharpening properties of the filling.
Safety is another consideration for your Owl-shaped pincushion – Pattern. If you have small children or pets in your home, ensure that the eyes and beak are securely stitched rather than just glued on. Small buttons or beads can be a choking hazard if they come loose. For a “child-safe” version, stick strictly to embroidered features or felt pieces that are double-stitched. This ensures that your owl remains a safe part of your home environment while still looking adorable.
If you ever need to wash your Owl-shaped pincushion – Pattern, proceed with extreme caution. Most pincushions are “spot clean only” because the inner filling (especially walnut shells or cardboard bases) does not react well to water. Use a damp cloth with a tiny drop of mild detergent to clean any stains on the surface. If the owl gets completely soaked, the inner filling may mold or the cardboard may warp, so it is always best to keep your handmade owl away from spills and moisture.
Lastly, consider the pincushion’s environment. Constant exposure to direct sunlight can fade the vibrant colors of your Owl-shaped pincushion – Pattern over time. If your sewing table is near a window, try to place the owl in a shaded spot when not in use. By following these simple care guidelines, your owl will continue to be a “wise” and helpful assistant in your creative journey, standing the test of time as both a tool and a treasured keepsake of your sewing skills.
What is the best size for an Owl-shaped pincushion – Pattern?
A finished height of 4 to 5 inches is ideal. This size is large enough to hold several dozen pins without being so big that it takes up too much valuable “real estate” on your sewing table or cutting mat.
Can I use rice or beans as filling for my owl?
While rice and beans are weighted, they can attract pests or hold moisture, which may cause your pins to rust. It is much better to use crushed walnut shells, plastic pellets, or clean aquarium gravel for weight, as these are inorganic and safer for your needles.
I am a complete beginner; is this pattern too hard?
Not at all! The Owl-shaped pincushion – Pattern is one of the best projects for beginners because it involves small seams and basic hand-stitching. It is a “low-stakes” way to learn how to sew curves and handle stuffing techniques.
What kind of pins should I use with my owl?
You can use any type, but glass-head pins look particularly nice as they don’t melt if you accidentally iron near them, and they add a bit of “jewelry” to your owl’s appearance. Avoid using bent or rusted pins, as they can damage the fabric of your pincushion.
Do I need a sewing machine to make this?
While a machine makes the body seams faster, an Owl-shaped pincushion – Pattern can absolutely be made entirely by hand. In fact, many people prefer the relaxing process of hand-sewing the entire project while watching a movie or listening to a podcast.
How do I make the ears look sharp?
The secret is in the turning and poking. When you turn the owl right-side out, use a “point turner” or a blunt knitting needle to gently push the fabric of the ears out from the inside. Be careful not to poke through the stitches!
Creating an Owl-shaped pincushion – Pattern is a wonderful journey that blends practicality with the joy of handmade artistry. In this article, we have explored the importance of choosing the right cotton fabrics and wool felt, the technical steps of “clipping curves” for a smooth finish, and the secret to using weighted fillings like walnut shells to keep your owl upright and your pins sharp.
We also discussed how you can customize your owl to fit any holiday or home decor style, ensuring that your sewing room is as unique as the projects you create within it.


