
American-style placemat with a fruit theme - Pattern

Finding the perfect Patchwork Bargello – Pattern can feel like discovering a hidden rhythm in the world of textile arts, transforming simple strips of fabric into a visual masterpiece that looks far more complex than it actually is. This unique technique, inspired by 17th-century Florentine embroidery, has been adapted for modern quilters who want to create a sense of movement and flow in their projects. When you master the Patchwork Bargello – Pattern, you aren’t just sewing scraps together; you are orchestrating a mathematical dance of colors and gradients that results in a stunning, wave-like aesthetic.
The beauty of a Patchwork Bargello – Pattern lies in its accessibility for both beginners and seasoned pros, provided you have a keen eye for color value and a bit of patience for organized cutting. Unlike traditional blocks that repeat a static image, this style relies on the “tube method,” where fabric strips are sewn into a loop and then cut vertically at varying widths to shift the design up or down. Because the Patchwork Bargello – Pattern is so versatile, it can be used for everything from small table runners to massive, room-defining wall hangings that draw the eye with their hypnotic curves.
To truly excel at creating a Patchwork Bargello – Pattern, one must understand the relationship between contrast and continuity, as the success of the visual “wave” depends entirely on how your colors transition from light to dark. Many quilters find that using a pre-cut jelly roll or a curated fabric collection helps maintain a harmonious palette, ensuring the final Patchwork Bargello – Pattern looks professional and polished. In the following sections, we will dive deep into the technicalities, the creative choices, and the step-by-step logic required to bring your very own Bargello quilt to life.
The core identity of a Patchwork Bargello – Pattern is defined by its mathematical precision hidden behind a veil of artistic fluidity. Unlike standard quilting where you might focus on a specific motif, here the “motif” is the movement itself, created by shifting the alignment of fabric squares. By following a specific quilting chart, you determine where each color lands, creating the illusion of peaks and valleys across the fabric surface.
Choosing your fabric palette is perhaps the most critical step in the entire process of making a Patchwork Bargello – Pattern. You need a clear progression of tones—often referred to as a color wash—where each fabric shares a common hue or intensity with its neighbor. Without this gradual transition, the signature “wave” of the Patchwork Bargello – Pattern can look disjointed or cluttered, losing its hypnotic charm.
The technical term for the most common construction method is the strip piecing technique, which is the backbone of any modern Patchwork Bargello – Pattern. Instead of sewing individual tiny squares, you sew long strips of fabric together to form a “stratified” sheet. This sheet is then sewn into a tube, allowing you to “unseam” at different points to create the staggered effect that characterizes the Bargello style.
Precision in seam allowance is non-negotiable when working with a Patchwork Bargello – Pattern. Because you will be making many vertical cuts and then re-sewing those columns, even a tiny 1/16th of an inch error can compound across the width of the quilt. Most experts recommend using a quarter-inch presser foot and a high-quality rotary cutter to ensure every piece fits perfectly within the overall quilt design.
Understanding the vertical shift is what separates a simple striped quilt from a true Patchwork Bargello – Pattern. By varying the width of the vertical strips you cut from your fabric tube, you can speed up or slow down the “frequency” of the wave. Narrower strips create a sharp, dramatic curve, while wider strips result in a more gentle, rolling slope that is often easier for beginners to manage.
Lastly, the Patchwork Bargello – Pattern requires a high level of organization, often involving labeling each column with a number. Since you are essentially working with a puzzle, keeping your fabric strips in the correct order is vital to preventing a “broken wave.” A design wall or a large flat surface is your best friend here, allowing you to step back and see the geometric pattern emerge before you commit to the final stitch.
When selecting materials for your Patchwork Bargello – Pattern, think in terms of “gradients” rather than individual prints. You want fabrics that “bleed” into one another visually, which is why batiks and solids are popular choices. These fabrics often lack a distinct “up or down” direction, making them much easier to use when your Patchwork Bargello – Pattern requires flipping or rotating strips.
The color value is the secret weapon of any successful Patchwork Bargello – Pattern. Value refers to how light or dark a color is, regardless of the actual hue. If you take a black-and-white photo of your fabric selection and can still see a clear transition from white to black, your Bargello quilt will have incredible depth. This contrast is what makes the zigzag effect pop against the background.
Incorporating blender fabrics—those subtle prints that look like a solid from a distance—can add texture to your Patchwork Bargello – Pattern without distracting from the overall flow. Large, busy prints can sometimes break the visual line of the wave, so they should be used sparingly or as a border fabric. The focus should always remain on the rhythmic transition of the quilt top.
Don’t be afraid to experiment with complementary colors to add energy to your Patchwork Bargello – Pattern. While monochromatic schemes (all blues or all greens) are classic and soothing, adding a “pop” of orange to a blue quilt can make the waves look like they are glowing. This color theory application is what turns a standard project into a piece of textile art.
The weight of the fabric matters just as much as the color when executing a Patchwork Bargello – Pattern. Using 100% high-quality quilting cotton ensures that the fabric won’t stretch or warp as you press and sew. Since this technique involves a lot of seam intersections, having a stable, non-stretching fabric is essential for keeping your quilt lines straight and crisp.
Before you make your first cut, it is wise to create a fabric key for your Patchwork Bargello – Pattern. Tape a small scrap of each fabric to a piece of paper and number them in the order they will appear in your gradient. This simple step prevents the common mistake of accidentally swapping two similar shades, which could ruin the “flow” of your Bargello wave.
The primary efficiency of a Patchwork Bargello – Pattern comes from the strip-piecing method. You begin by sewing your fabric strips together into one large rectangle, making sure to press your seams in alternating directions. This nesting seams technique allows the columns to lock together perfectly when you assemble the final quilt top, resulting in perfectly matched corners.
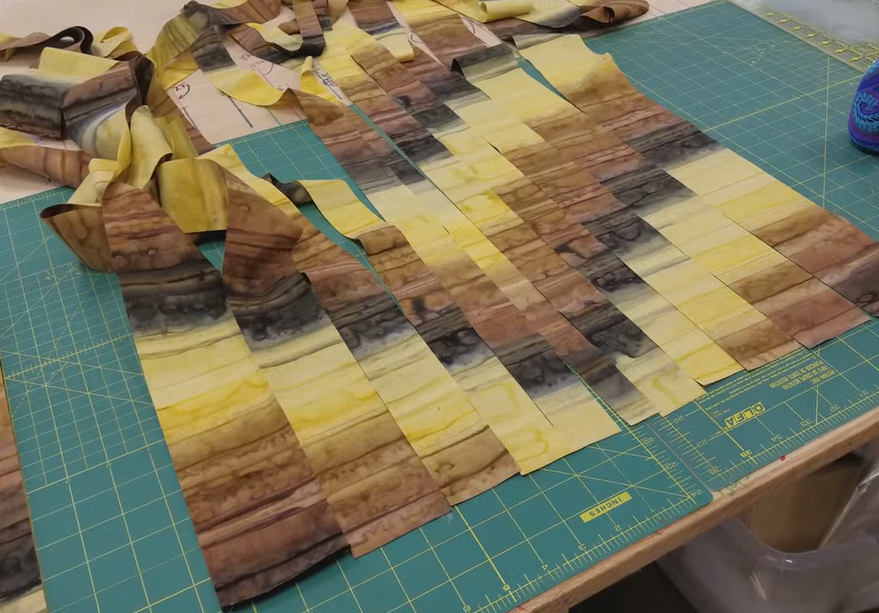
Once your strips are joined, the next phase of the Patchwork Bargello – Pattern involves sewing the top strip to the bottom strip, creating a fabric cylinder or “tube.” This might feel counterintuitive at first, but this tube is the “magic” that allows you to shift the pattern. By using a seam ripper to open the tube at a different color junction for each column, the zigzag pattern begins to form.
Cutting the tube into vertical segments of varying widths is where the Patchwork Bargello – Pattern truly takes shape. If your pattern calls for a “narrow-wide-narrow” sequence, you will use your acrylic ruler to cut strips of exactly those measurements. These varied widths are what create the illusion of a curved line using only straight-line sewing and rectangular pieces.
Layout is the most rewarding part of the Patchwork Bargello – Pattern process. You will lay your unseamed columns side-by-side on a flat surface, following your quilt map. As you shift each column up or down by one square, you will see the rhythmic movement appear. It is at this stage that you can make creative adjustments to the Bargello design before the final assembly.
Pinning is your best friend when joining the columns of a Patchwork Bargello – Pattern. Because there are so many horizontal seams to align, taking the time to match seams and pin at every intersection is the difference between a wavy mess and a professional finish. Using fine quilting pins will help you maintain accuracy without distorting the fabric as it passes under the needle.
After the columns are joined, a final pressing strategy is crucial for a flat Patchwork Bargello – Pattern. Pressing the long vertical seams to one side—or open, depending on your preference—will ensure that the quilt lays flat and is easy to quilt later. Avoid “steaming” too aggressively, as this can stretch the fabric and cause the Bargello waves to warp or ripple.
Once your Patchwork Bargello – Pattern top is complete, the way you quilt it can either enhance or hide the design. Many quilters choose echo quilting, where the stitching lines follow the shape of the fabric waves. This reinforces the sense of movement and adds a beautiful texture that complements the mathematical nature of the Bargello style.
Choosing the right thread color is another important decision for your Patchwork Bargello – Pattern. A neutral, high-quality polyester or cotton thread in a “dove gray” or “tan” often blends perfectly across all colors in the gradient. Alternatively, you can use variegated thread that changes color to match the different sections of your quilt design, adding an extra layer of detail.
The quilt backing should be simple so it doesn’t compete with the complexity of the Patchwork Bargello – Pattern on the front. A wide-back fabric or a subtle print allows the intricate piecing of the front to remain the star of the show. Many people also find that a solid backing highlights the beautiful stitching patterns created during the quilting process.
When it comes to the binding, a dark or high-contrast fabric can act as a frame for your Patchwork Bargello – Pattern. A “frame” helps to contain the energy of the waves and gives the eye a place to rest. You might even consider a scrappy binding using leftover pieces from your gradient strips to give the edges a cohesive, finished look.
Maintaining the squareness of your quilt is vital when finishing a Patchwork Bargello – Pattern. Because the “wave” can sometimes create a slight distortion in the edges, you must carefully square up the quilt top before adding borders or binding. Use a large square ruler to ensure that your corners are exactly 90 degrees, keeping the geometric integrity intact.
Finally, don’t forget to add a quilt label to your finished Patchwork Bargello – Pattern. Bargello is a historic technique with a rich lineage, and documenting the date, the maker, and the pattern name adds value to your work. Whether it’s a gift or a family heirloom, a label ensures that the effort put into the intricate piecing is remembered for generations.
Is the Patchwork Bargello – Pattern suitable for beginners?
Yes! While it looks incredibly complex, the strip-piecing method makes it very systematic. If you can sew a straight line and follow a numbered chart, you can successfully complete a Bargello quilt. It is mostly an exercise in organization and precision rather than difficult sewing maneuvers.
How many different fabrics do I need for a good wave effect?
Most Patchwork Bargello – Patterns recommend using between 10 and 20 different fabrics. The more fabrics you use, the smoother the “gradient” will appear. If you use too few, the transitions may look blocky rather than like a fluid wave.
Can I use scraps for a Bargello quilt?
While you can, it is much harder to achieve the signature “flow” with random scraps. A Patchwork Bargello – Pattern usually relies on a coordinated color run. However, if you have a large collection of scraps in the same color family (e.g., 15 different shades of blue), a scrappy Bargello can look stunning.
Do I need a special ruler to cut the strips?
No special “Bargello ruler” is required, but a long acrylic quilting ruler (usually 6″ x 24″) and a rotary cutter are essential. The key is accuracy in the width of the strips, so a ruler with clear 1/8-inch markings is highly recommended.
Why does my Bargello quilt look crooked?
This usually happens due to inconsistent seam allowances or improper pressing. If your seams aren’t a consistent 1/4 inch, the columns won’t align. Also, be careful not to stretch the fabric when pressing, as “dragging” the iron can distort the Patchwork Bargello – Pattern.
What is the “tube method” in Bargello quilting?
The tube method involves sewing your initial horizontal strips into a continuous loop or “tube.” You then cut vertical strips from this tube. This allows you to open the seam at a different spot for each column, naturally creating the staggered zigzag design without having to cut individual squares.
In this article, we explored the fascinating world of the Patchwork Bargello – Pattern, a technique that combines the precision of geometry with the beauty of a color gradient.
We covered the importance of fabric selection, the efficiency of the strip-piecing method, and the “magic” of the tube technique which creates those iconic waves. By focusing on color value and maintaining a strict seam allowance, anyone can transform simple strips of cotton into a dynamic work of art.


