
American-style placemat with a fruit theme - Pattern

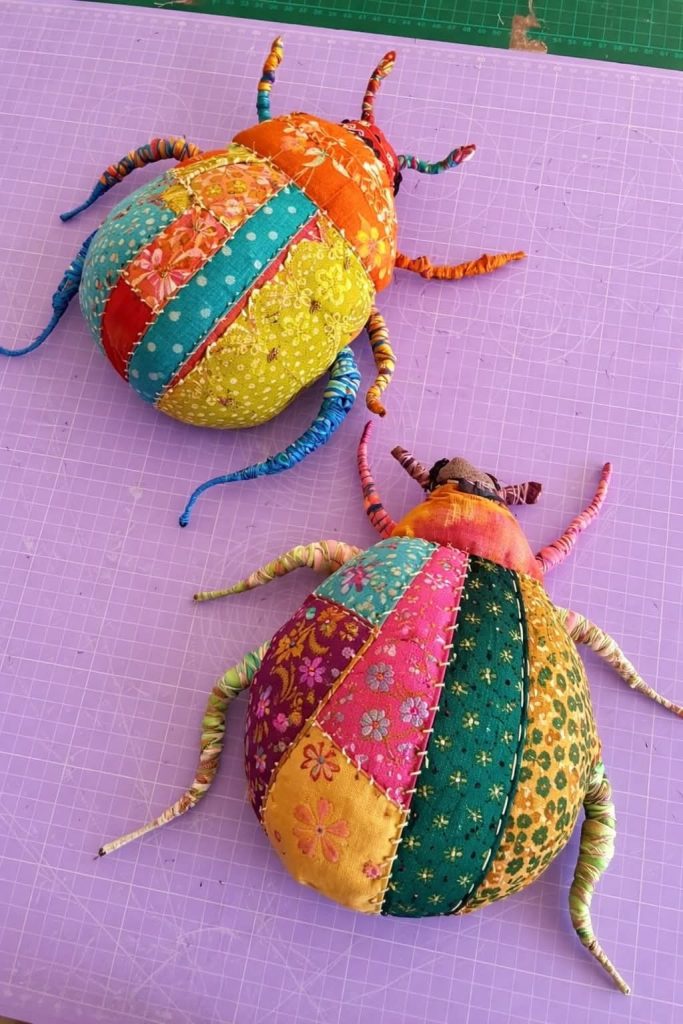
The Patchwork beetle – Pattern is one of the most whimsical and engaging designs in the modern quilting world, combining the precision of geometric shapes with the organic charm of nature. Creating a Patchwork beetle is a rewarding experience that allows crafters to play with color, texture, and symmetry to bring a small, vibrant insect to life in fabric form. This specific pattern has gained popularity among those who love “fussy cutting” and using scrap fabrics to create detailed, artistic representations that go beyond traditional block styles.
When you dive into a Patchwork beetle – Pattern, you are essentially building a mosaic where every tiny piece of fabric contributes to the beetle’s unique personality. The Patchwork beetle design typically utilizes a mix of squares, triangles, and sometimes curved piecing to mimic the iridescent shell and delicate legs of the beetle. Using this pattern is an excellent way to practice precision piecing while also expressing your individual style through bold fabric choices and imaginative color schemes.
Understanding the structure of the Patchwork beetle – Pattern is the first step toward creating a stunning textile masterpiece. This pattern often serves as a focal point for larger quilts or as a standalone project like a decorative pillow or a wall hanging. Because the Patchwork beetle involves many small intersections, it encourages quilters to refine their technical skills, specifically in maintaining accurate seam allowances and sharp points. In the following sections, we will explore everything you need to know to master this delightful and intricate design.
Choosing the right textiles is the foundation of any successful Patchwork beetle – Pattern. Since the Patchwork beetle represents an insect often known for its metallic or vibrant shell, you should look for fabrics with subtle sheens or intricate prints. Batiks are a fantastic choice for this pattern because their variegated colors can mimic the natural shifts in a beetle’s carapace, giving your work a more realistic and organic feel.
Consider the “value” of your colors when planning the Patchwork beetle. To make the Patchwork beetle – Pattern visually striking, you need high contrast between the beetle’s body and the background fabric. If your pattern uses dark, rich tones for the beetle, a light, neutral background will make the insect appear to pop off the surface of the quilt, creating a stunning three-dimensional effect that draws the eye.
Fussy cutting is a technique often used within the Patchwork beetle – Pattern to add extra detail. By specifically cutting out a motif from your fabric—like a flower or a small geometric shape—and placing it in the center of the Patchwork beetle, you can create a “jeweled” look. This adds a layer of sophistication to the pattern that makes the final piece look much more complex and professional than it actually is to sew.
Texture also plays a significant role in the Patchwork beetle. While standard quilting cotton is the most common choice for the Patchwork beetle – Pattern, you can experiment with small scraps of silk, linen, or even velvet for certain parts of the beetle. Mixing textures within the pattern adds tactile interest and can simulate the different parts of the insect, such as the hard wings versus the softer underbelly.
Don’t be afraid to use small-scale prints within your Patchwork beetle – Pattern. Tiny polka dots, micro-stripes, or “ditsy” floral prints can add a sense of movement to the Patchwork beetle. When these small prints are joined together according to the pattern instructions, they create a cohesive yet busy look that mirrors the complexity of nature’s own designs.
Lastly, always wash and press your fabrics before starting the Patchwork beetle – Pattern. Since this pattern involves many small pieces, any shrinkage or bleeding of colors can ruin the precision of the Patchwork beetle. Ensuring your fabric is stable and flat will make the cutting and sewing process much smoother, resulting in a crisp and clean final design that you can be proud of.
Precision is the most important element when assembling a Patchwork beetle – Pattern. Because the Patchwork beetle consists of numerous small segments, even a slight deviation in your seam allowance can throw off the entire block. Most quilters find that using a dedicated 1/4 inch foot on their sewing machine is essential for keeping the pattern aligned and ensuring that all the points of the beetle meet perfectly.
Pinning is your best friend when working on the Patchwork beetle. Before sewing two sections of the Patchwork beetle – Pattern together, use fine glass-head pins to secure the intersections. This prevents the fabric from shifting and ensures that the legs and antennae of the Patchwork beetle are accurately placed according to the pattern diagram, maintaining the symmetry that makes this design so appealing.
Pressing as you go is a non-negotiable step in the Patchwork beetle – Pattern. After sewing each seam of the Patchwork beetle, press it flat to set the stitches, then press it to one side (usually toward the darker fabric). This habit keeps the pattern from becoming bulky and helps the Patchwork beetle lay perfectly flat, which is especially important if you plan to quilt over it later with intricate designs.
For those who find traditional piecing difficult, many versions of the Patchwork beetle – Pattern are designed for Foundation Paper Piecing (FPP). Using the FPP method for your Patchwork beetle allows you to sew directly onto paper templates, guaranteeing perfect angles and sharp points every time. This technique is highly recommended for the pattern because it handles the tiny, sharp triangles of the beetle’s legs with ease.
Tension control is another factor to watch when sewing the Patchwork beetle. Ensure your machine’s thread tension is balanced so that the seams of your Patchwork beetle – Pattern don’t pucker. Since you are often sewing through multiple layers of fabric in the center of the Patchwork beetle, a strong but thin 50wt cotton thread is ideal to keep the pattern strong without adding unnecessary thickness.
Take your time with the final assembly of the Patchwork beetle – Pattern. It can be tempting to rush once you see the Patchwork beetle taking shape, but the last few seams are often the most critical for the overall squareness of the block. Measure your pattern frequently against your cutting mat to ensure it hasn’t become distorted, and trim sparingly only when necessary to keep the proportions correct.
One of the joys of the Patchwork beetle – Pattern is that no two beetles ever have to look the same. You can transform your Patchwork beetle into a ladybug by using red and black fabrics, or into a majestic scarab by using metallic golds and deep turquoises. The pattern is a blank canvas that allows you to explore different species of insects simply by changing your color palette.
You can also play with the scale of the Patchwork beetle – Pattern. If you want a bold statement piece, you can enlarge the pattern to create a single, giant Patchwork beetle that covers the center of a quilt. Conversely, shrinking the pattern allows you to create a “swarm” of tiny Patchwork beetle blocks that can be scattered across a background for a more modern and energetic look.
Adding embroidery is a wonderful way to enhance the Patchwork beetle. Once the fabric Patchwork beetle – Pattern is pieced together, you can use embroidery floss to add extra details like delicate wing veins or fuzzy legs. This mixed-media approach to the pattern gives the Patchwork beetle a high-end, artisanal feel that is common in contemporary art quilts and fiber galleries.
Background quilting can also change the vibe of your Patchwork beetle – Pattern. Consider quilting organic, swirling lines around the Patchwork beetle to simulate wind or movement. If you want the pattern to feel more scientific, you could quilt a grid or geometric lines that mimic a collector’s display case, making the Patchwork beetle look like a specimen preserved in fabric.
Appliqué is another technique that can be combined with the Patchwork beetle – Pattern. While the main body of the Patchwork beetle is usually pieced, you can appliqué small circles or shapes onto the wings after the block is finished. This is an easy way to add spots or patterns to your Patchwork beetle without having to deal with the complexity of piecing tiny circles into the pattern.
Finally, consider the layout of multiple Patchwork beetle blocks. Instead of a standard grid, you can rotate the Patchwork beetle – Pattern blocks so the beetles appear to be crawling in different directions. This creates a sense of life and whimsy in your quilt, making the pattern feel dynamic rather than static, and allowing the Patchwork beetle to truly “live” within the fabric.
Once your Patchwork beetle – Pattern is fully pieced and quilted, it’s time to think about the finishing touches. A thin binding in a color that matches the background of the Patchwork beetle can give the piece a “borderless” look, while a bold, contrasting binding can frame the pattern like a painting. Choosing the right frame for your Patchwork beetle is just as important as the sewing itself.
If your Patchwork beetle is a standalone block, consider turning it into a wall hanging. You can add small fabric loops to the top of your Patchwork beetle – Pattern and hang it from a decorative wooden dowel. This is a great way to showcase a single Patchwork beetle as a piece of art in a nursery, office, or craft room, highlighting the beauty of the pattern in a simple way.
For those who want to incorporate the Patchwork beetle – Pattern into wearable art, these blocks make excellent pockets for jackets or central panels for tote bags. Because the Patchwork beetle is so visually interesting, it works perfectly as a statement piece on clothing. Just ensure you use a stabilizer behind the pattern to keep the Patchwork beetle from stretching with frequent use.
Proper care will ensure your Patchwork beetle lasts for years. If your Patchwork beetle – Pattern project is meant to be used, such as a quilt or pillow, wash it on a gentle cycle with cold water. Avoid high heat when drying, as it can damage the delicate seams of the Patchwork beetle. Taking care of the pattern ensures that the colors remain vibrant and the structure stays sound.
Displaying your Patchwork beetle – Pattern in a shadow box is another sophisticated option. This protects the Patchwork beetle from dust and UV rays while giving it a professional gallery appearance. This method is particularly effective if you have added three-dimensional elements like beads or heavy embroidery to your pattern, as it keeps the Patchwork beetle safe from being crushed.
Sharing your completed Patchwork beetle with others is the ultimate reward. Whether you post a photo of your Patchwork beetle – Pattern on social media or enter it into a local quilt show, you are contributing to a community of makers. The Patchwork beetle is a design that sparks conversation and inspires others to pick up their needles and explore the wonderful possibilities of a well-crafted pattern.
What is the best background fabric for a Patchwork beetle – Pattern?
A solid or “read-as-solid” fabric is usually best. This provides a clean slate that allows the intricate details of the Patchwork beetle to be the star. High-contrast colors help the pattern stand out, while subtle textures can add depth to the Patchwork beetle without being distracting.
Is the Patchwork beetle – Pattern difficult for beginners?
It is considered an intermediate pattern. While a dedicated beginner can certainly complete a Patchwork beetle, it requires a high level of attention to detail and consistent seam allowances. If you are new to quilting, try making a larger version of the Patchwork beetle first before attempting a smaller, more detailed block.
Can I use the Patchwork beetle – Pattern for a full-sized quilt?
Yes! Many people make a whole “specimen quilt” by repeating the Patchwork beetle block multiple times. You can use different colors for each Patchwork beetle to create a rainbow of insects across the pattern, making for a stunning and cohesive quilt design.
How do I handle the tiny legs in the Patchwork beetle design?
The legs are often the most delicate part of the Patchwork beetle – Pattern. Using Foundation Paper Piecing (FPP) is the most effective way to ensure the legs of the Patchwork beetle look sharp. Alternatively, some quilters choose to embroider the legs onto the pattern after the body is finished to simplify the process.
What size thread should I use for my Patchwork beetle?
A 50wt or 60wt cotton thread is recommended for the Patchwork beetle – Pattern. These thinner threads allow the many seams within the Patchwork beetle to lay flatter, which prevents the block from becoming bulky and helps you maintain the accuracy required for the pattern.
Are there different types of beetles I can make with this pattern?
Absolutely. By simply changing the colors and perhaps adding a few spots or stripes, the Patchwork beetle – Pattern can be adapted to look like a stag beetle, a ladybug, a June bug, or even a fantasy insect. The pattern is incredibly versatile and encourages creative interpretation of the Patchwork beetle.
In this article, we have journeyed through the artistic and technical process of creating a Patchwork beetle – Pattern. From selecting the perfect batik fabrics to mastering the precision of 1/4 inch seams and exploring creative variations like embroidery and scaling, it is clear that the Patchwork beetle is a design that offers endless possibilities for expression. We have taught you how to plan your colors for maximum impact, how to use Foundation Paper Piecing for perfect results, and how to finish your project so it can be displayed as true textile art. The pattern is a wonderful bridge between traditional quilting and modern, illustrative fiber art.


