
American-style placemat with a fruit theme - Pattern

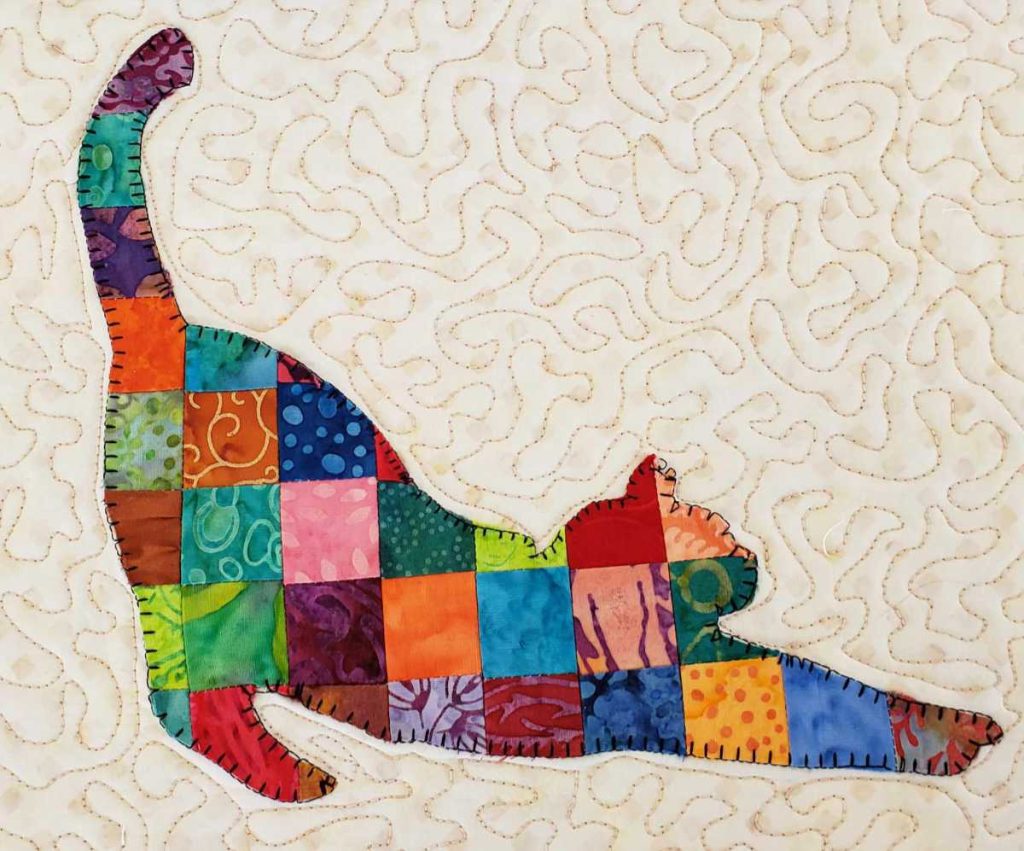
The Patchwork Cat Quilt – Pattern is a delightful and creative way to combine your love for feline friends with the timeless art of quilting. Crafting a Patchwork Cat Quilt – Pattern allows you to transform simple scraps of fabric into a whimsical gallery of stylized cats, each with its own personality and charm. Whether you are a seasoned quilter looking for a playful new challenge or a beginner eager to make something special for a pet lover, this Pattern offers a structured yet flexible approach to creating a functional piece of art that radiates warmth and personality.
One of the most appealing aspects of the Patchwork Cat Quilt – Pattern is its inherent ability to tell a story through fabric selection and block arrangement. By following a well-designed Patchwork Cat Quilt – Pattern, you can learn how to use geometric shapes—like squares, rectangles, and triangles—to build the recognizable silhouettes of sitting, sleeping, or stretching cats. The process is deeply rewarding, as it encourages you to play with color and texture, making every single cat in your quilt unique while maintaining a cohesive look across the entire project.
In this comprehensive guide, we will explore the technical nuances and creative possibilities of the Patchwork Cat Quilt – Pattern, ensuring you have all the tools and knowledge needed to start your next masterpiece. We will dive into the best fabric choices for durability, the essential piecing techniques for sharp feline features, and how to scale the Pattern for various project sizes. By mastering the fundamentals of the Patchwork Cat Quilt – Pattern, you will be able to create an heirloom-quality quilt that celebrates the joy cats bring to our lives in a beautiful, handmade format.
When beginning your Patchwork Cat Quilt – Pattern, the first and perhaps most exciting step is selecting the fabrics that will represent your cats. High-quality 100% quilting cotton is the gold standard for this project, as it provides the stability needed for precise piecing while ensuring the finished quilt is soft and durable. Since a Patchwork Cat Quilt – Pattern often involves many small seams, using a fabric with a tight weave prevents fraying and keeps your “cat ears” and “tails” looking sharp and defined over years of use.
Color coordination is vital to making the cat silhouettes “pop” within your Patchwork Cat Quilt – Pattern. Many quilters find success using a high-contrast color palette, where the cats are made from dark or vibrant prints while the background remains light or neutral. This contrast ensures that the intricate shapes of the Pattern are visible from across the room. If you want a more subtle look, you can experiment with “low-volume” prints for both the cats and the background, creating a sophisticated and modern aesthetic.
Texture can add a layer of realism to your Patchwork Cat Quilt – Pattern that standard flat cottons might lack. Consider incorporating small amounts of flannel or brushed cotton for the cat bodies to mimic the softness of fur. However, be mindful that different fabric types can shrink at different rates, so pre-washing your fabrics is highly recommended for this Pattern. This extra step ensures that your cat blocks won’t pucker or distort the first time you wash the completed quilt.
The background fabric of your Patchwork Cat Quilt – Pattern should act as a quiet stage for your feline stars. Solid fabrics are excellent for highlighting the geometry of the Pattern, but subtle “tone-on-tone” prints can add depth without being distracting. When choosing a background for your Patchwork Cat Quilt – Pattern, think about where the quilt will be used; a dark background might be better for a pet bed, while a bright, airy background is perfect for a nursery or living room throw.
Don’t overlook the importance of “scrappy” designs within a Patchwork Cat Quilt – Pattern. This project is a fantastic way to utilize leftover pieces from previous quilting endeavors. By using a variety of prints for different cats, you can create a “calico” effect across the quilt top. Following a Patchwork Cat Quilt – Pattern with a scrappy mindset adds a sense of history and charm to the piece, making each cat a small memory of a different project or a different time in your life.
Finally, ensure you have the right weight of cotton thread for your Patchwork Cat Quilt – Pattern. A neutral-colored 50wt thread is usually ideal, as it is strong enough to hold the many seams together without adding unnecessary bulk. Bulk can be an issue in a Pattern with many intersections, so using a thin, high-quality thread helps your cat blocks lie flat. With your materials gathered, you are ready to move on to the precise cutting and assembly that brings the Patchwork Cat Quilt – Pattern to life.
The core of the Patchwork Cat Quilt – Pattern lies in its clever use of basic units like Half-Square Triangles (HSTs) to create ears and tails. Mastering the “two-at-a-time” HST method is a great way to ensure consistency in your Pattern while saving time. Accuracy in cutting these initial shapes is the foundation of the entire quilt; even a 1/8-inch error can result in a cat that looks a bit lopsided. Using a sharp rotary cutter and a non-slip ruler is essential for this level of precision.
“Stitch and Flip” is another common technique used in the Patchwork Cat Quilt – Pattern to create the angled corners of a cat’s head or paws. This involves placing a small square on a larger rectangle, sewing diagonally, and then flipping the fabric back to create a triangle. This diagonal piecing technique is what allows the Patchwork Cat Quilt – Pattern to achieve organic-looking shapes without the need for difficult curved sewing. It is a beginner-friendly way to achieve complex-looking results.
Consistent 1/4 inch seam allowances are non-negotiable when working through a Patchwork Cat Quilt – Pattern. Because these blocks are often made of many small pieces, an inconsistent seam will cause the cat’s features to misalign. Most modern sewing machines have a specific “quarter-inch foot” that can help you maintain this measurement throughout the Pattern. Taking the time to test your seam allowance on a few scrap pieces before starting your cat blocks will save you a lot of frustration later on.
Pressing is the “secret ingredient” that turns a bunch of sewn fabric into a professional-looking Patchwork Cat Quilt – Pattern. For this specific design, it is often best to press seams open to reduce the bulk at the points where the cat’s ears and head meet. A flat, well-pressed block is much easier to join with other blocks in the Pattern. Using a dry iron and a “pressing” motion rather than a “sliding” motion prevents the fabric from stretching out of shape during assembly.
As you assemble the blocks for your Patchwork Cat Quilt – Pattern, it helps to work in rows or “units.” For example, sew the head unit together first, then the body, and finally the tail before joining them into a complete cat. This modular assembly approach makes the Patchwork Cat Quilt – Pattern feel much more manageable and allows you to catch any errors early in the process. Organization is key; keeping your pieces labeled in small piles will ensure that you don’t accidentally sew a tail onto a head.
Finally, “squaring up” each cat block is a vital step in the Patchwork Cat Quilt – Pattern. Once a cat block is fully assembled, use a large square ruler to trim it to the exact size specified in the instructions. This ensures that every block in your Patchwork Cat Quilt – Pattern is uniform, making it much easier to sew the blocks together into the final quilt top. A squared-up block is the mark of a meticulous quilter and guarantees a smooth, professional finish for your feline-inspired masterpiece.
One of the greatest joys of the Patchwork Cat Quilt – Pattern is the ability to customize the cats to look like your own pets. You can use fussy cutting to place a specific fabric motif, like a small flower or a heart, on the cat’s chest or tail. This level of personalization turns the Pattern from a generic design into a custom portrait of your furry family members. It’s these small, thoughtful details that make the Patchwork Cat Quilt – Pattern such a beloved choice for gift-giving.
The scale of your Patchwork Cat Quilt – Pattern can be easily adjusted to fit your needs. By doubling the size of the initial squares and rectangles, you can turn a small wall-hanging Pattern into a large bed quilt. Conversely, you can shrink the measurements to create “mini cat blocks” that are perfect for quilted coasters or decorative pillows. The mathematical logic of the Patchwork Cat Quilt – Pattern remains the same regardless of size, making it a versatile template for any project.
Embellishments can add a 3D element to your Patchwork Cat Quilt – Pattern. Many quilters like to add embroidery for whiskers or tiny buttons for eyes after the quilt top is pieced. While buttons should be avoided for baby quilts for safety reasons, they add a charming, “folk-art” feel to decorative wall hangings. Following a Patchwork Cat Quilt – Pattern allows you to be as simple or as detailed as you like, catering to your specific skill level and artistic vision.
If you want to add movement to your Patchwork Cat Quilt – Pattern, consider “flipping” the direction of the cat blocks. By mirroring the units, you can have some cats looking left and some looking right, creating a sense of interaction across the quilt. This layout variation prevents the quilt from looking too static and enhances the “playful” theme of the Patchwork Cat Quilt – Pattern. It’s a simple change that makes a big impact on the final visual flow of the piece.
Borders and sashing can also transform the look of your Patchwork Cat Quilt – Pattern. Sashing—the strips of fabric between the blocks—acts as a frame for each cat, giving them room to breathe. Using a contrasting sashing color can make the individual cat blocks look like framed portraits. If you prefer a more “huddled” look, you can sew the cat blocks directly to one another, creating a “clowder” of cats that fills the entire Pattern with cozy energy.
For those who enjoy a challenge, you can incorporate “Appliqué” elements into your Patchwork Cat Quilt – Pattern. While the main body is pieced, you could add an appliqué ball of yarn or a small fish bone in the corners of the quilt. This mixed-media approach adds interest and allows you to practice multiple quilting techniques within the same Patchwork Cat Quilt – Pattern. It’s a wonderful way to expand your skills while staying within the fun and accessible cat theme.
Once your Patchwork Cat Quilt – Pattern top is complete, it’s time to think about the “quilting”—the stitching that holds the three layers together. For a cat-themed quilt, “meandering” or “stippling” stitches look great because they add a soft, cloud-like texture. Alternatively, you can do “straight-line quilting” to emphasize the geometric lines of the Pattern. Choosing the right quilting design is crucial because it adds the final layer of character to your Patchwork Cat Quilt – Pattern.
The “batting” or middle layer of your Patchwork Cat Quilt – Pattern will determine its weight and warmth. A 100% cotton batting is traditional and provides a lovely “crinkled” look once washed, which many quilters adore. If you want a puffier look that highlights the cat silhouettes, a polyester or wool-blend batting might be a better choice for your Pattern. The batting is the “soul” of the quilt, providing the comfort that makes a handmade item so special.
Binding is the final “frame” of your Patchwork Cat Quilt – Pattern. A “double-fold bias binding” is the most durable method for finishing the edges. For a playful touch, you could use a striped or polka-dot fabric for the binding to contrast with the cat blocks. The binding protects the raw edges of your Patchwork Cat Quilt – Pattern, ensuring that it doesn’t fray over time, even with frequent use and trips through the washing machine.
Labeling your quilt is a step you should never skip when finishing a Patchwork Cat Quilt – Pattern. Use a fabric pen or embroidery to record your name, the date, and the name of the Pattern on a small piece of fabric and sew it to the back. This turns your Patchwork Cat Quilt – Pattern into a documented piece of history. Future generations will appreciate knowing who put so much love and effort into creating this beautiful feline-inspired heirloom.
To ensure the longevity of your Patchwork Cat Quilt – Pattern, proper care is essential. Always wash your quilt on a gentle cycle with cold water and a mild, fragrance-free detergent. Avoid using harsh chemicals or bleach, which can fade the vibrant colors of your cat blocks. Drying on a low-heat setting or air-drying flat will help the cotton fibers in your Patchwork Cat Quilt – Pattern stay strong and prevent the batting from bunching up.
Storing your Patchwork Cat Quilt – Pattern creation correctly is just as important as washing it. Instead of folding it the same way every time, which can create permanent creases, try rolling the quilt or folding it loosely in a breathable cotton bag. This prevents the fibers from breaking along the fold lines and keeps the quilt fresh. Your Patchwork Cat Quilt – Pattern is a labor of love, and with the right care, it will remain a cozy companion for many years—and perhaps many cats—to come.
Is the Patchwork Cat Quilt – Pattern suitable for a beginner?
Yes! Because it relies on basic shapes like squares and triangles, the Patchwork Cat Quilt – Pattern is a fantastic project for someone who has mastered the basics of a sewing machine. The most important skill is maintaining a consistent seam allowance, which is a great habit for any beginner to develop.
How much fabric do I need for a standard throw-sized quilt?
For a standard throw (approx. 50″ x 60″) following a Patchwork Cat Quilt – Pattern, you will typically need about 3 to 4 yards of background fabric and a variety of fat quarters or scraps for the cats. Always check your specific Pattern instructions for exact yardage, as different layouts can change these requirements significantly.
Can I make this quilt without a rotary cutter?
While a rotary cutter and mat make the process much faster and more accurate, you can certainly make a Patchwork Cat Quilt – Pattern using traditional fabric scissors. You will just need to be very careful when tracing your templates to ensure that every piece is cut precisely to size.
How do I choose the best colors for my cat blocks?
The best advice for a Patchwork Cat Quilt – Pattern is to look at real cats for inspiration! Gingers, tabbies, calicos, and tuxedo cats provide wonderful color palettes. Using high-contrast colors against your background fabric will ensure that your cat silhouettes are the focal point of the quilt.
Can I machine-wash a patchwork quilt?
Absolutely! Most quilts made with 100% quilting cotton are designed to be machine-washed. To protect the seams of your Patchwork Cat Quilt – Pattern, use a gentle cycle and cold water. Many quilters actually prefer the “crinkled” look that occurs after the first wash, as it gives the quilt a cozy, antique feel.
What is the best way to add eyes and whiskers?
For a professional look on your Patchwork Cat Quilt – Pattern, hand-embroidery using embroidery floss is highly recommended. A “satin stitch” works well for eyes, and a “backstitch” is perfect for whiskers. This adds a personalized, handmade touch that machine-stitching simply cannot replicate.
The Patchwork Cat Quilt – Pattern is more than just a sewing project; it is a heartfelt celebration of the bond between humans and their pets. Throughout this guide, we have explored the essential steps of creating your own feline masterpiece, from selecting high-quality quilting cottons and coordinating high-contrast colors to mastering the geometric piecing techniques like HSTs and the “stitch and flip” method. We’ve discussed how to customize the Pattern to reflect your own pets through fussy cutting and embroidery, and how to scale the design for everything from coasters to bed quilts.
Finally, we touched on the importance of professional finishing—including squaring up blocks, careful pressing, and proper laundry care—to ensure your heirloom lasts for generations. By following a Patchwork Cat Quilt – Pattern, you are creating a durable and beautiful piece of art that brings a touch of whimsy and comfort to any home.


