
American-style placemat with a fruit theme - Pattern

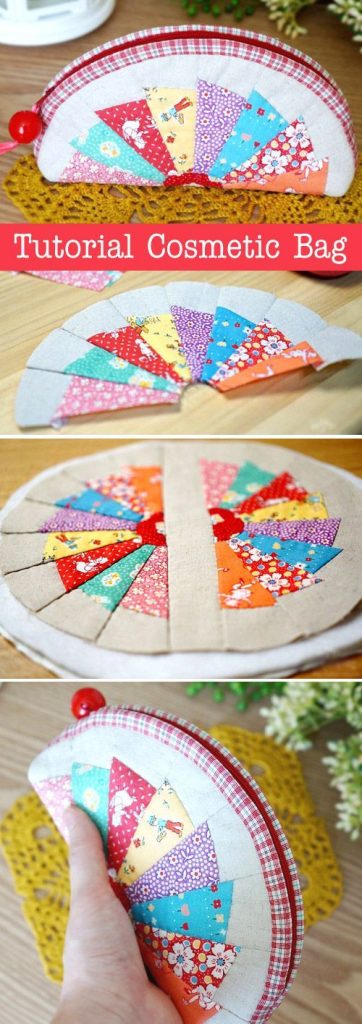
A Patchwork Cosmetic Bag Tutorial – Pattern is the perfect weekend project for anyone looking to combine functionality with artistic flair. Whether you are a seasoned quilter or a beginner with a sewing machine, creating your own Patchwork Cosmetic Bag allows you to repurpose fabric scraps into something truly beautiful and useful. This guide will walk you through the essential steps, providing a clear Pattern and expert tips to ensure your finished product looks professional and stands the test of time.
Customizing a Patchwork Cosmetic Bag means you get to choose the exact colors, textures, and sizes that fit your lifestyle. In an era of mass-produced plastic items, a handmade Patchwork Cosmetic Bag stands out as a sustainable and thoughtful alternative. By following a structured Pattern, you can master the art of precision cutting and seam nesting, which are foundational skills in the world of quilting and accessory design.
To get started with this Patchwork Cosmetic Bag Tutorial – Pattern, you only need a few basic supplies: cotton fabric scraps, batting for structure, a zipper, and your standard sewing kit. The beauty of the Patchwork Cosmetic Bag lies in its versatility; you can go for a chaotic “crazy quilt” look or a meticulously planned geometric Pattern. This article is designed to be your comprehensive resource, covering everything from the initial layout to the final stitch of your new favorite travel companion.
Choosing high-quality fabrics is the first secret to a successful Patchwork Cosmetic Bag. Since these bags often hold liquids or sharp items like tweezers, opting for 100% cotton is ideal because it is durable and easy to wash. When following a Patchwork Cosmetic Bag Tutorial, look for colors that complement each other to create a cohesive Pattern that reflects your personal style.
The internal structure of the Patchwork Cosmetic Bag is just as important as the exterior. Using a medium-weight fusible fleece or batting will give the Pattern the “body” it needs to stand upright. Without proper stabilization, your Patchwork Cosmetic Bag might feel flimsy and fail to protect your makeup or toiletries during travel.
Zippers are another crucial component of the Patchwork Cosmetic Bag Tutorial – Pattern. A nylon coil zipper is usually preferred for beginners because it is easy to sew over if you accidentally hit the teeth. Make sure your zipper is at least two inches longer than the width of your Pattern to make the installation process much smoother and frustration-free.
Don’t forget the lining of your Patchwork Cosmetic Bag. While the exterior showcases the intricate Patchwork design, the interior should be a smooth, snag-free fabric. Some makers prefer using a water-resistant lining for their Patchwork Cosmetic Bag to make cleaning up spills from foundation or lotions a total breeze.
Thread choice can make or break the aesthetic of your Patchwork Cosmetic Bag. A strong polyester or cotton-wrapped polyester thread in a neutral color like gray or tan usually blends perfectly with most Patchwork designs. This ensures that the focus remains on your beautiful Pattern rather than the individual stitches holding it all together.
Lastly, consider the “fussy cutting” technique for your Patchwork Cosmetic Bag Tutorial. This involves cutting specific motifs from your fabric to place them prominently within the Pattern. It adds a level of detail to the Patchwork Cosmetic Bag that makes it look like a high-end designer piece rather than a simple DIY project.
The core of any Patchwork Cosmetic Bag Tutorial – Pattern is the preparation phase. Before you even touch your sewing machine, you must ensure your fabric is ironed flat. Wrinkles can distort the size of your pieces, leading to a Patchwork Cosmetic Bag that is lopsided or doesn’t align correctly with the intended Pattern.
For this specific Patchwork Cosmetic Bag, we will use a standard rectangular Pattern consisting of 2.5-inch squares. You will need to cut approximately 24 squares for each side of the bag. This layout provides a classic Patchwork look that highlights the variety of prints you’ve selected for your unique Pattern design.
Precision is your best friend when cutting for a Patchwork Cosmetic Bag. Using a rotary cutter and a quilting ruler will help you achieve the perfectly straight edges required for a professional-grade Pattern. Even a slight deviation in cutting can compound as you sew the pieces of the Patchwork Cosmetic Bag together.
Once your squares are cut, lay them out on a flat surface to visualize the final Patchwork Cosmetic Bag. This is the stage where you can play with the Pattern, moving colors around until you find a balance that is visually pleasing. Taking a quick photo of your layout can serve as a helpful reference as you begin the assembly.
Labeling your pieces can prevent confusion during the Patchwork Cosmetic Bag Tutorial. If you are working on a complex Pattern, use small sticky notes or fabric markers to number the rows. This keeps your Patchwork Cosmetic Bag organized and ensures that the design you painstakingly planned is the one that actually gets sewn.
Remember to cut your batting and lining fabric slightly larger than the finished Patchwork panel. This “overcut” accounts for any shifting that might occur during the quilting process of the Patchwork Cosmetic Bag Tutorial – Pattern. You can always trim the excess later to match the exact dimensions of your Patchwork Cosmetic Bag.
Now comes the most satisfying part of the Patchwork Cosmetic Bag Tutorial: sewing the squares together. Use a consistent 1/4-inch seam allowance to join your squares into rows. This consistency is vital for the Pattern to line up perfectly at the intersections, giving your Patchwork Cosmetic Bag a crisp, high-quality finish.
After sewing each row for your Patchwork Cosmetic Bag, press the seams in alternating directions. This technique, known as “nesting seams,” reduces bulk where the corners meet in the Pattern. It allows your sewing machine to glide over the fabric easily and results in a flatter, more professional Patchwork Cosmetic Bag exterior.
Once the rows are joined into a full panel, it’s time to quilt it to the batting. Quilt-as-you-go is a popular method in any Patchwork Cosmetic Bag Tutorial – Pattern. You can sew simple straight lines or a “stitch-in-the-ditch” style to secure the layers of your Patchwork Cosmetic Bag while adding a beautiful quilted texture.
The quilting process does more than just look good; it adds durability to the Patchwork Cosmetic Bag. By securing the fabric to the batting, you prevent the Pattern from shifting or sagging over time. This structural integrity is what allows a Patchwork Cosmetic Bag to withstand the rigors of being tossed into a suitcase or handbag.
If you want to add a bit of “flair” to your Patchwork Cosmetic Bag, try using decorative stitches during the quilting phase. Many modern machines have built-in patterns that can enhance the visual appeal of your Patchwork. This customization turns a standard Pattern into a one-of-a-kind Patchwork Cosmetic Bag that reflects your creativity.
Finally, trim your quilted panels to the final dimensions specified in your Patchwork Cosmetic Bag Tutorial – Pattern. Use your ruler to ensure the corners are perfectly square (90 degrees). Accurate trimming at this stage makes the final assembly of the Patchwork Cosmetic Bag much easier and ensures the zipper sits straight.
The final hurdle in the Patchwork Cosmetic Bag Tutorial – Pattern is attaching the zipper and boxed corners. Start by sandwiching the zipper between the exterior Patchwork panel and the lining fabric. This “sandwich” method hides the raw edges of the zipper tape inside the Patchwork Cosmetic Bag, creating a clean look both inside and out.
When sewing near the zipper pull, stop your machine, lift the presser foot, and slide the pull out of the way. This prevents the needle from hitting the metal or plastic, which could damage your machine or ruin the Pattern of your Patchwork Cosmetic Bag. Patience is key during this part of the Patchwork Cosmetic Bag Tutorial.
After the zipper is installed, it is time to sew the side seams. Ensure the zipper is left halfway open! This is a critical step in the Patchwork Cosmetic Bag Tutorial – Pattern—if the zipper is closed, you won’t be able to turn the Patchwork Cosmetic Bag right-side out once you finish sewing the perimeter.
To give your Patchwork Cosmetic Bag its signature 3D shape, you will need to “box” the corners. This involves pinching the corners of the bag so the side seam meets the bottom seam, creating a triangle shape. Sewing across this triangle gives the Pattern depth, allowing the Patchwork Cosmetic Bag to sit flat on a vanity.
Once the corners are sewn, trim the excess fabric and finish the raw edges with a zigzag stitch or a serger. This prevents fraying inside the Patchwork Cosmetic Bag. In a high-quality Patchwork Cosmetic Bag Tutorial – Pattern, every detail—even the ones you don’t see—contributes to the longevity of the item.
Turn your Patchwork Cosmetic Bag through the open zipper and use a blunt tool to gently push out the corners. Give it one final press with the iron to set the seams. Congratulations, you have successfully completed the Patchwork Cosmetic Bag Tutorial – Pattern! You now have a custom, handmade Patchwork Cosmetic Bag ready for use.
What is the best size for a Patchwork Cosmetic Bag?
The most common size for a Patchwork Cosmetic Bag is approximately 9 inches wide by 6 inches tall. However, the beauty of using a Pattern is that you can scale the dimensions up or down depending on whether you need it for travel-sized items or full-sized palettes.
Can I make a Patchwork Cosmetic Bag if I don’t have a sewing machine?
While a machine is much faster, you can certainly hand-sew a Patchwork Cosmetic Bag. You will need to use a very tight backstitch to ensure the seams are strong enough to hold the weight of your cosmetics.
How do I clean my Patchwork Cosmetic Bag?
Most Patchwork Cosmetic Bag designs made from 100% cotton are machine washable. Use a gentle cycle with cold water and air dry to prevent the Pattern from shrinking or the colors from fading.
What kind of stabilizer should I use for the Pattern?
For a soft but structured Patchwork Cosmetic Bag, fusible fleece is the gold standard. If you want a very stiff bag, you can use a heavy-duty interfacing like Peltex, though this can be more difficult to turn right-side out.
How many fabric scraps do I need for a Patchwork Cosmetic Bag?
This depends on the Pattern. For a standard medium-sized Patchwork Cosmetic Bag, you can usually use about 40 to 50 squares that are 2.5 inches each. It is a fantastic way to use up those “leftover” strips from previous quilting projects.
Creating a Patchwork Cosmetic Bag is a rewarding journey that blends the traditional art of quilting with modern utility. Through this Patchwork Cosmetic Bag Tutorial – Pattern, we have explored how to select the right materials, cut with precision, quilt for durability, and master the technical aspects of zipper installation. By following these steps, you have transformed simple scraps of fabric into a structured, beautiful, and highly functional Patchwork Cosmetic Bag that will serve you for years to come.
The skills learned in this Pattern—such as nesting seams and boxing corners—are transferable to many other sewing projects. We hope this guide has inspired you to experiment with different colors and textures to make your Patchwork Cosmetic Bag truly unique.


