
Bird-shaped Pincushion - Pattern

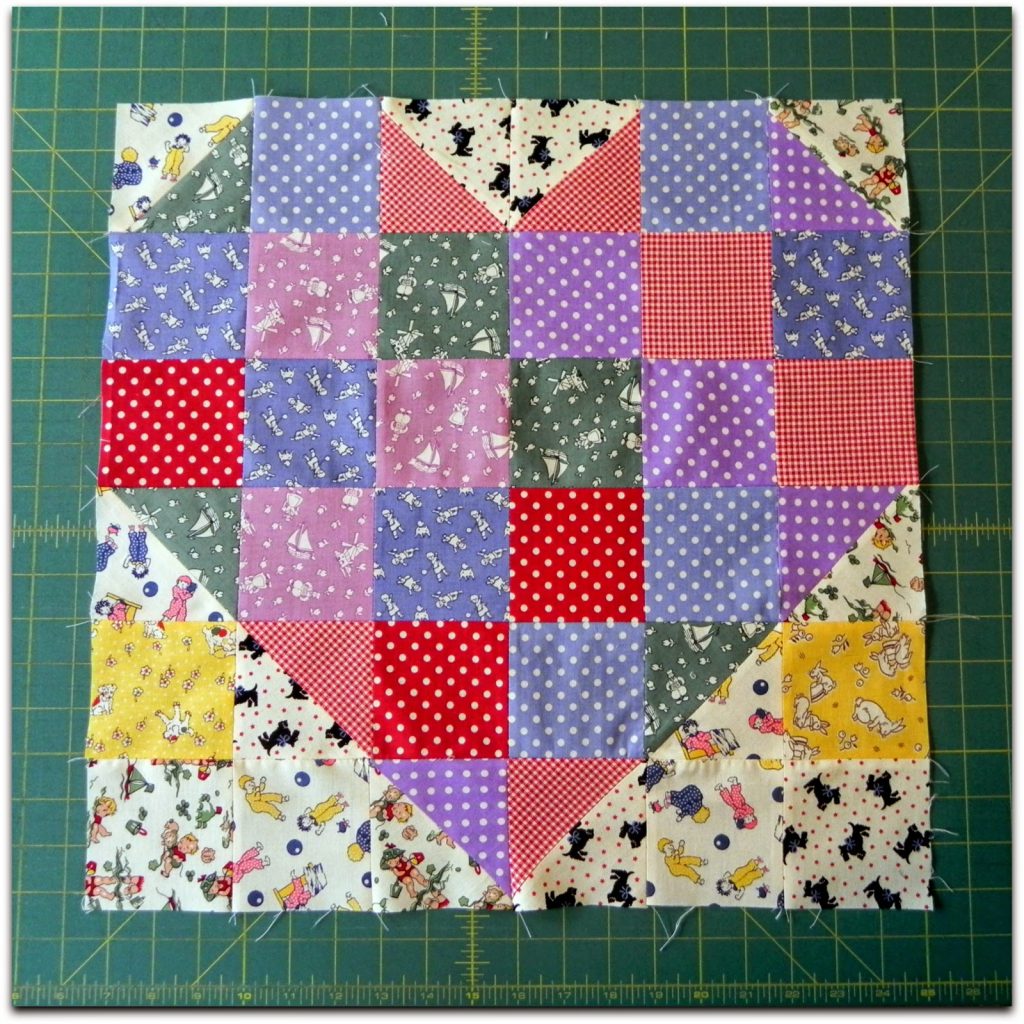
The Patchwork Heart Quilt – Pattern is one of the most beloved designs in the world of textile arts, combining the rustic charm of traditional quilting with a universal symbol of love and affection. Creating a Patchwork Heart Quilt – Pattern allows quilters to experiment with various fabric scraps, textures, and color palettes, making every single project entirely unique to the creator. Whether you are looking to create a sentimental wedding gift, a cozy nursery blanket, or a decorative wall hanging, mastering the Patchwork Heart Quilt – Pattern provides a foundation for endless creative possibilities in your sewing room.
Engaging with a Patchwork Heart Quilt – Pattern requires a blend of precision cutting and imaginative fabric selection. The beauty of the heart motif lies in its versatility; it can be achieved through simple half-square triangles (HSTs), stitch-and-flip techniques, or intricate foundation paper piecing. By following a well-structured Patchwork Heart Quilt – Pattern, even beginners can achieve professional-looking results while learning the essential basics of quilt block construction and seam allowance management.
As you embark on your journey to complete a Patchwork Heart Quilt – Pattern, it is important to consider the “patchwork” element as an opportunity to recycle and upcycle. Using a scrappy quilt approach within the Patchwork Heart Quilt – Pattern framework not only saves money on materials but also adds a layer of depth and history to the finished piece. In this comprehensive guide, we will explore the essential steps, tools, and creative strategies needed to turn a simple Patchwork Heart Quilt – Pattern into a stunning masterpiece that will be cherished for generations to face.
The first step in bringing your Patchwork Heart Quilt – Pattern to life is selecting a cohesive yet diverse range of fabrics. For a classic look, many quilters choose high-quality cotton fabrics in varying shades of red, pink, and white, though modern interpretations often feature bold teals or even neutral grays. Choosing a mix of solids and prints helps the heart shape pop against the background, ensuring your quilting design is clearly visible.
When working with a Patchwork Heart Quilt – Pattern, consider the “value” of your colors, which refers to how light or dark a fabric is. Using a high-contrast background fabric—such as a crisp white or a deep navy—is essential to define the silhouette of the heart. If your fabric selection lacks contrast, the beautiful geometric work of your Patchwork Heart Quilt – Pattern might get lost in the visual noise of the prints.
Texture also plays a significant role in the tactile appeal of your Patchwork Heart Quilt – Pattern. While quilting cotton is the standard, some adventurous makers incorporate flannel or linen to add a different feel to the quilt top. However, if you are a beginner, staying with 100% cotton ensures that the pieces won’t slip or stretch while you are executing the precise seams required by the Patchwork Heart Quilt – Pattern.
Pre-washing your fabrics is a debated topic, but for a Patchwork Heart Quilt – Pattern involving high-contrast colors like red and white, it is highly recommended. This prevents fabric bleeding during the first wash of the finished quilt. Ensuring your materials are “shrunk and set” before you begin cutting your quilt blocks will help maintain the integrity of the quilt dimensions over time.
Don’t forget to organize your scraps by size before starting the Patchwork Heart Quilt – Pattern. Many heart designs utilize 2.5-inch squares or 5-inch charms, making them perfect for using pre-cut fabric packs. Using pre-cuts can significantly speed up the assembly process of your Patchwork Heart Quilt – Pattern, allowing you to focus more on the creative layout and less on the repetitive cutting.
Lastly, think about the thread choice for your Patchwork Heart Quilt – Pattern. A neutral 50wt cotton thread is usually best for piecing, as it creates strong seams without adding bulk. Since the Patchwork Heart Quilt – Pattern involves many intersecting corners, using a thin but strong thread helps your points stay sharp and your quilt layout looking professional and clean.
To successfully execute a Patchwork Heart Quilt – Pattern, you need a few specialized tools that ensure mathematical accuracy. A rotary cutter, a self-healing cutting mat, and a non-slip acrylic ruler are the “big three” for any modern quilter. These tools allow you to cut multiple layers of fabric into the exact squares and triangles required by the Patchwork Heart Quilt – Pattern with minimal effort.
Precision cutting is the secret ingredient to a flat and square Patchwork Heart Quilt – Pattern. Even a difference of an eighth of an inch can cause the heart to look lopsided or the rows to misalign. When following your Patchwork Heart Quilt – Pattern instructions, always “measure twice and cut once” to ensure that your quilt units fit together like a perfect puzzle.
The Patchwork Heart Quilt – Pattern often utilizes the Easy Corner Triangle method. This involves drawing a diagonal line on a small square, placing it on a larger rectangle, and sewing directly on that line. This technique creates the rounded “shoulders” of the heart without requiring you to sew difficult curves, making the Patchwork Heart Quilt – Pattern accessible to those who prefer straight-line sewing.
Pressing is just as important as sewing when working on a Patchwork Heart Quilt – Pattern. Using a hot iron to press seams to the dark side prevents the seam allowance from showing through lighter fabrics. In a complex Patchwork Heart Quilt – Pattern, consistent pressing ensures that your seam intersections nest together perfectly, resulting in those coveted “crisp points” that quilters love.
If your Patchwork Heart Quilt – Pattern calls for Half-Square Triangles (HSTs), consider using the “two-at-a-time” method. This is an efficient way to generate the angled pieces needed for the bottom point of the heart. Mastery of the HST is a fundamental skill in quilting, and the Patchwork Heart Quilt – Pattern is an excellent project for practicing this technique until it becomes second nature.
Always keep a seam ripper nearby while working on your Patchwork Heart Quilt – Pattern. Even the most experienced quilters occasionally sew a piece upside down or catch a fold of fabric in a seam. Viewing the seam ripper as a tool for “editing” rather than a sign of failure will make your experience with the Patchwork Heart Quilt – Pattern much more relaxing and enjoyable.
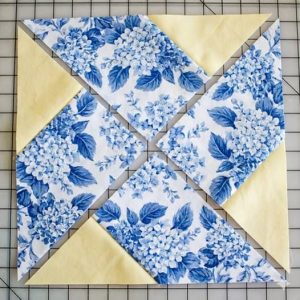
The assembly phase of the Patchwork Heart Quilt – Pattern is where the magic truly happens. You will typically start by creating the top two lobes of the heart and then the larger bottom section. Following the Patchwork Heart Quilt – Pattern step-by-step ensures that you don’t skip a crucial joining seam that could compromise the overall structural integrity of the quilt block.
Maintaining a consistent quarter-inch seam allowance is the most critical factor in the Patchwork Heart Quilt – Pattern. Most sewing machines have a specific “patchwork foot” designed to help you maintain this distance. If your seams are too wide, your heart will be too small; if they are too narrow, the Patchwork Heart Quilt – Pattern will result in a block that is too large and difficult to quilt.
As you join the rows of your Patchwork Heart Quilt – Pattern, use plenty of pins. Pinning at the intersections prevents the fabric from shifting as it moves through the feed dogs of your machine. For a perfect Patchwork Heart Quilt – Pattern, you want the center vertical seam of the heart to line up exactly, creating a symmetrical and pleasing visual effect.
Once the individual blocks are finished, you must decide on the sashing and borders for your Patchwork Heart Quilt – Pattern. Sashing—the strips of fabric between blocks—can provide “breathing room” for each heart, making the overall design feel less cluttered. A well-chosen border acts as a frame, containing the energy of the Patchwork Heart Quilt – Pattern and giving it a finished, professional look.
“Squaring up” your blocks is a vital step before joining them into a full quilt top. Use your square ruler to trim away any excess fabric, ensuring every block in your Patchwork Heart Quilt – Pattern is the exact same size. This extra bit of effort prevents the dreaded “wavy borders” and ensures that the finished Patchwork Heart Quilt – Pattern will lay perfectly flat on a bed or wall.
Finally, consider the layout of your blocks. You can arrange the hearts in straight rows, or you can “on-point” the Patchwork Heart Quilt – Pattern to create a diamond-like secondary pattern. Some quilters even choose to flip some hearts upside down for a whimsical, modern twist on the traditional Patchwork Heart Quilt – Pattern, proving that the design is as flexible as your imagination allows.
After the quilt top is complete, the next phase of the Patchwork Heart Quilt – Pattern is the “quilting” itself—the process of stitching the three layers (top, batting, and backing) together. You can choose straight-line quilting using a walking foot, which complements the geometric nature of the heart. This method is very beginner-friendly and adds a clean, modern texture to your Patchwork Heart Quilt – Pattern.
For those with more experience, free-motion quilting offers a way to add organic movement to the Patchwork Heart Quilt – Pattern. You might quilt small swirls, stippling, or even “echo” the heart shape itself to emphasize the motif. The choice of quilting pattern will greatly influence the “drape” and softness of the final Patchwork Heart Quilt – Pattern project.
The batting selection is another crucial component of finishing your Patchwork Heart Quilt – Pattern. Cotton batting provides a traditional, flat look that crinkles beautifully after washing, while polyester or wool batting offers more “loft” and warmth. The thickness of the batting will dictate how much your quilting stitches stand out against the fabric of the Patchwork Heart Quilt – Pattern.
Once the quilting is done, it is time for the binding, which covers the raw edges of the Patchwork Heart Quilt – Pattern. Choosing a striped or bias-cut fabric for the binding can add a fun “pop” of detail. The binding is the most handled part of a quilt, so ensuring it is sewn securely will help your Patchwork Heart Quilt – Pattern withstand years of use and laundering.
Don’t forget to add a quilt label to the back of your Patchwork Heart Quilt – Pattern. Include your name, the date, and the occasion for which the quilt was made. This transforms your Patchwork Heart Quilt – Pattern from a simple craft project into a historical document and a personal legacy that can be passed down through your family.
The final wash is a transformative moment for any Patchwork Heart Quilt – Pattern. It softens the fibers, creates that classic “quilt crinkle,” and blends the stitches into the fabric. Seeing your finished Patchwork Heart Quilt – Pattern emerge from the dryer, ready to provide comfort and warmth, is the ultimate reward for all the hours of careful cutting and sewing.
Can a beginner sew a Patchwork Heart Quilt – Pattern?
Yes! While it looks complex, most heart patterns are made of basic squares and triangles. If you can sew a straight line and maintain a consistent seam allowance, you can successfully finish a heart quilt.
What is the best size for a heart quilt block?
The most common sizes are 6-inch, 10-inch, and 12-inch blocks. Smaller blocks are great for pillows, while larger blocks make the assembly of a full-size bed quilt much faster.
How much fabric do I need for a Patchwork Heart Quilt – Pattern?
This depends on the size of the quilt. Generally, for a throw-size quilt, you will need about 3 to 4 yards of background fabric and a variety of fat quarters or scraps for the hearts themselves.
Is it better to use scraps or new fabric for this pattern?
Both work beautifully. A “scrappy” heart quilt has a charming, vintage feel, while using a specific fabric collection creates a more modern and coordinated look.
How do I prevent the points of my hearts from being cut off?
The key is to sew exactly 1/4 inch from the edge. When you join the blocks, make sure your needle passes exactly through the “V” where the seams meet.
Can I use this pattern for a baby quilt?
Absolutely. The heart is a very popular motif for nursery decor. Using soft flannels or organic cottons makes the quilt extra cozy for a new arrival.
In this article, we have explored the intricate and rewarding process of creating a Patchwork Heart Quilt – Pattern. From the initial selection of vibrant fabrics and the importance of high contrast, to the technical precision of rotary cutting and quarter-inch seams, we have covered the essential steps to ensure your project is a success.
We discussed how sashing, quilting textures, and binding provide the finishing touches that turn fabric scraps into a cohesive work of art. The Patchwork Heart Quilt – Pattern remains a timeless choice because it is more than just a design; it is a labor of love that represents the heart and soul of the maker.


