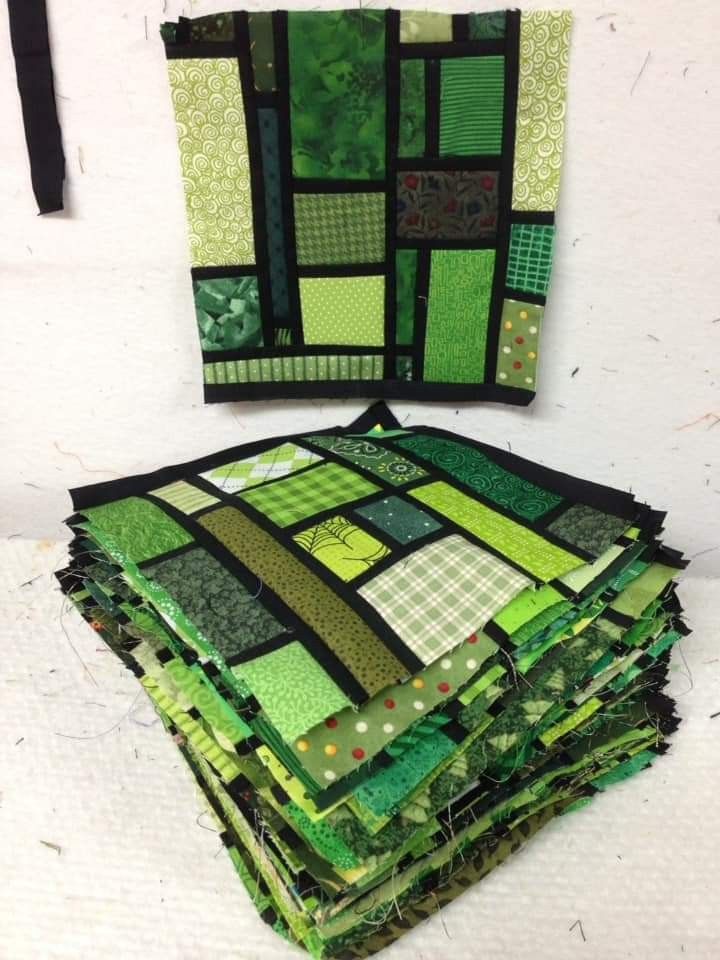
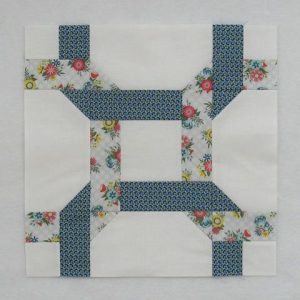
Stained Glass Block Made From Scraps - Tutorial

The Patchwork Pincushion – Pattern is more than just a functional sewing accessory; it is a miniature canvas where quilters can experiment with colors, textures, and geometric precision. Whether you are a seasoned seamstress or a beginner looking for a manageable weekend project, creating your own Patchwork Pincushion allows you to repurpose tiny fabric scraps into something both beautiful and indispensable. This guide is designed to walk you through the nuances of selecting the right pattern, mastering the assembly, and understanding why this specific craft remains a staple in the sewing community.
In the world of textile arts, the Patchwork Pincushion – Pattern represents the perfect intersection of utility and artistic expression. Many crafters find that a well-designed pincushion serves as a reliable companion during long hours of garment construction or quilting, keeping pins organized and needles sharp. By focusing on a specific patchwork layout, you can practice intricate techniques like “fussy cutting” or “foundation paper piecing” on a small scale before committing to a full-sized quilt.
Understanding the foundational elements of a Patchwork Pincushion – Pattern is crucial for achieving a professional finish. This article will explore the essential materials, the step-by-step construction process, and creative variations that can turn a simple tool into a cherished heirloom. From choosing the right fabric weights to selecting the best pincushion filling, every detail contributes to the longevity and effectiveness of your final piece.
Selecting a Patchwork Pincushion – Pattern is the first step toward a successful sewing project. For beginners, a simple four-patch or nine-patch design is ideal because it focuses on basic seam alignment and pressing techniques. These foundational patterns help you understand how small increments of fabric come together to form a cohesive geometric shape.
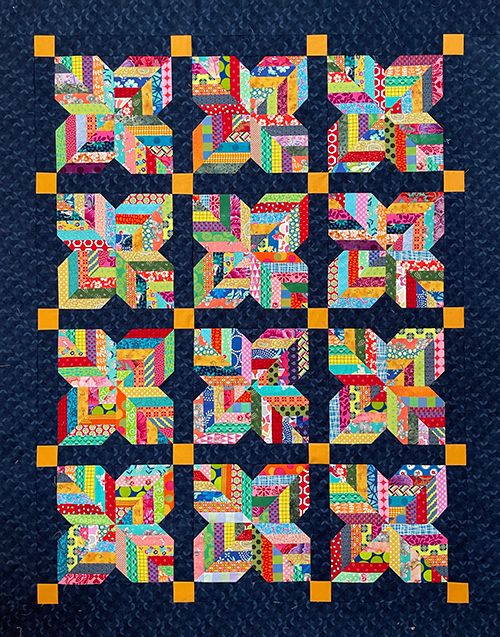
The beauty of a Patchwork Pincushion lies in its versatility. You can opt for a star pattern, a log cabin design, or even a hexagonal grandmother’s flower garden style. Each pattern offers a different level of complexity, allowing you to challenge yourself as your skills evolve. A well-written pattern will provide clear measurements and seam allowance instructions to ensure your corners match perfectly.
When looking for a Patchwork Pincushion – Pattern, consider the final size of the project. Most standard pincushions range from 4 to 6 inches square. This small size means that even the slightest deviation in your seam allowance can result in a distorted final shape. Precision is the name of the game when working with such small pieces of quilting cotton.
Another factor to consider is the visual weight of the fabrics within the pattern. Using high-contrast colors can make a simple patchwork design pop, while monochromatic tones create a sophisticated, modern look. Many quilters use the Patchwork Pincushion – Pattern as a “test block” to see how certain fabric combinations work together before starting a larger quilt.
Digital platforms and sewing blogs are excellent resources for finding a unique Patchwork Pincushion – Pattern. Many designers offer PDF patterns that include printable templates, which are incredibly helpful for maintaining accuracy. Always check if the pattern includes instructions for adding decorative elements like buttons or embroidery, which can elevate the overall aesthetic.
Ultimately, the best Patchwork Pincushion – Pattern is one that inspires you to sit down at your sewing machine. It should be clear enough to follow without frustration but detailed enough to produce a high-quality result. Remember that the pattern is just a roadmap; your choice of fabrics and thread will provide the unique personality that makes the item truly yours.
To bring your Patchwork Pincushion – Pattern to life, you need high-quality materials. The most common choice is 100% quilting cotton, as it is easy to handle, doesn’t slip, and holds a crisp crease when pressed. Since you only need small amounts, this is the perfect time to dive into your scrap bin and pull out those precious leftovers from previous projects.
Beyond the fabric, the filling or stuffing is a vital component of any Patchwork Pincushion. While polyester fiberfill is common, many professionals prefer crushed walnut shells or emery sand. These heavier fillings provide stability, preventing the pincushion from sliding around your workspace, and the abrasive nature of the shells helps keep your pins sharp and clean.
A sharp rotary cutter and a self-healing mat are indispensable when cutting the small pieces required for a Patchwork Pincushion – Pattern. Precision cutting ensures that every square or triangle fits together like a puzzle. Using a clear acrylic ruler with 1/4-inch markings will help you maintain the consistent seam allowances necessary for patchwork success.
Don’t overlook the importance of your sewing machine needles and thread. A fine, strong thread like 50wt cotton is perfect for patchwork because it doesn’t add bulk to the seams. A fresh 70/10 or 80/12 universal needle will ensure smooth stitching without snagging the fabric, which is especially important when dealing with the multiple layers of a Patchwork Pincushion.
Pressing is a non-negotiable step in the Patchwork Pincushion – Pattern process. A small travel iron or a seam roller can be very handy for working with these tiny pieces. Pressing your seams flat (or to one side, depending on the pattern instructions) ensures that the finished pincushion lays correctly and doesn’t have unsightly lumps at the intersections.
Finally, you may want to include embellishments such as twill tape, lace, or a decorative button for the center. These small touches transform a functional item into a piece of art. Having all your tools ready before you start the Patchwork Pincushion – Pattern ensures a smooth, enjoyable crafting experience without unnecessary interruptions.
Once you have selected your Patchwork Pincushion – Pattern and gathered your materials, it is time to start sewing. Begin by cutting your fabric pieces exactly as specified in the pattern. Labeling your pieces can be helpful if the design is complex, ensuring you don’t accidentally swap a background piece for a focal fabric during the assembly process.
The next step in the Patchwork Pincushion – Pattern is piecing the top. Lay out your fabrics on your workspace to visualize the final design. Sew the pieces together in rows, using a consistent 1/4-inch seam allowance. After sewing each row, press the seams in opposite directions so they “nest” together, which helps you achieve those perfectly sharp quilt corners.
After the top is fully assembled, it’s time to prepare the backing. You can use a single piece of fabric or a coordinating patchwork design for the back of your Patchwork Pincushion. If you want to add a loop for hanging, sew a small piece of ribbon or folded fabric to the top edge of the front piece, facing inward, before joining the front and back.
Place the front and back pieces right sides together. Sew around the perimeter, leaving a small opening (about 1.5 to 2 inches) on one side for turning. It is often best to leave this opening on a straight edge rather than a corner, as it makes the final hand-stitching much easier and cleaner once the Patchwork Pincushion is stuffed.
Clip the corners of your Patchwork Pincushion to remove excess bulk, being careful not to cut through the stitching. Turn the piece right side out through the opening and use a turning tool or a dull chopstick to gently push out the corners. Press the edges flat to give the pincushion a professional, crisp appearance before adding the filling.
The final construction phase involves stuffing the Patchwork Pincushion – Pattern. Fill it firmly with your chosen material; if using walnut shells, a small funnel can be very helpful. Once the pincushion is plump and holds its shape, use a ladder stitch (invisible stitch) to close the opening. Your Patchwork Pincushion is now ready for its first pin!
To truly make the Patchwork Pincushion – Pattern your own, consider experimenting with textural contrasts. Mixing cotton with small bits of linen, velvet, or silk can add a luxurious feel to the project. Just be mindful that different fabrics may require different tension settings on your sewing machine or specific needles to prevent puckering.
Adding embroidery is another fantastic way to enhance a Patchwork Pincushion. You can add simple running stitches, French knots, or even small floral motifs to the individual patches. This customization turns a standard pattern into a “crazy quilt” style piece that showcases your hand-stitching skills alongside your machine piecing.
If you find that your Patchwork Pincushion – Pattern feels a bit light, you can add a weighted base. Some crafters place a heavy washer or a small bag of glass beads at the bottom before adding the rest of the stuffing. This ensures the pincushion stays exactly where you put it, even when you are pulling out pins quickly during a project.
For those who love a vintage look, consider using tea-dyed fabrics or reproduction prints in your Patchwork Pincushion. You can also “fussy cut” a specific motif from a fabric—like a tiny bird or flower—to be the center square of your patchwork. This gives the impression of a much more intricate and planned design.
Another advanced variation is the pincushion with a scrap catcher. You can extend the Patchwork Pincushion – Pattern by attaching a weighted fabric strip that hangs off the edge of your sewing table, ending in a small fabric bin. This dual-purpose tool keeps your pins handy and your workspace free of thread “tails” and fabric snippets.
Finally, don’t be afraid to scale the Patchwork Pincushion – Pattern up or down. A giant patchwork cushion can serve as a decorative pillow for your sewing room, while a tiny one can be attached to a ring base for a convenient finger-held pincushion. The possibilities are limited only by your imagination and your love for patchwork quilting.
What is the best fabric for a Patchwork Pincushion – Pattern?
The most recommended fabric is high-quality quilting cotton. It is durable, comes in endless prints, and is easy for sewing machines to handle. Avoid stretchy fabrics like jersey unless you use an interface, as they can distort the patchwork shapes.
How do I keep my pins from rusting inside the pincushion?
Using crushed walnut shells or emery sand as a filler helps prevent rust. These materials are dry and abrasive, which cleans the pins every time you poke them in. Avoid using organic materials like rice or sawdust in humid environments, as they can hold moisture.
Can I sew a Patchwork Pincushion by hand?
Absolutely! In fact, many people find that English Paper Piecing (EPP) is a wonderful way to create a Patchwork Pincushion – Pattern by hand. Hand-sewing allows for extreme precision on very small scales that might be difficult to achieve with a machine.
What size should a standard patchwork pincushion be?
Most patterns result in a finished product that is between 4×4 inches and 5×5 inches. This size is large enough to hold a significant number of pins but small enough to not clutter your sewing machine extension table.
How do I get the corners of my patchwork to line up?
The secret is consistent seam allowances and pinning. Use a 1/4-inch quilting foot if available, and use “nesting seams” (pressing adjacent seams in opposite directions) to help the fabric “lock” into place before you sew over the intersection.
In this article, we have explored the delightful world of the Patchwork Pincushion – Pattern, covering everything from initial fabric selection to advanced personalization techniques.
We discussed the importance of precision cutting, the role of different pincushion fillings, and how a simple patchwork design can serve as a perfect practice project for larger quilting endeavors. By following these steps, you can create a functional tool that also serves as a beautiful piece of decor for your sewing space.


