
American-style placemat with a fruit theme - Pattern

The Patchwork Prism Quilt – Pattern is a breathtaking journey into the world of geometric symmetry and vibrant color play, offering a modern twist on traditional quilting techniques. This specific design has captured the hearts of makers worldwide because it transforms simple fabric scraps into a sophisticated visual masterpiece that mimics the way light refracts through glass. Whether you are a seasoned quilter looking for your next challenge or a curious beginner eager to master precision, the Patchwork Prism Quilt – Pattern provides the perfect blueprint for creating a functional piece of art that radiates energy and warmth in any room.
When you decide to embark on a project using the Patchwork Prism Quilt – Pattern, you are not just sewing fabric together; you are exploring the intricate relationship between hue, value, and shape. The “prism” effect is achieved through a strategic arrangement of triangles or diamonds, creating a sense of depth and movement that draws the eye toward the center of the quilt. Utilizing a high-quality Patchwork Prism Quilt – Pattern ensures that your measurements are accurate and your points are sharp, which is essential for maintaining the clean lines that make this specific quilt design so iconic and visually striking.
In the current landscape of home decor, the Patchwork Prism Quilt – Pattern stands out as a versatile choice that bridges the gap between vintage charm and contemporary minimalism. By choosing different color palettes—from bold rainbows to monochromatic gradients—the quilting enthusiast can customize the Patchwork Prism Quilt – Pattern to fit any aesthetic. This article will dive deep into the technicalities of this quilt pattern, offering insights into fabric selection, cutting accuracy, and the assembly process, ensuring that your final product is a durable and beautiful handmade quilt that will last for generations.
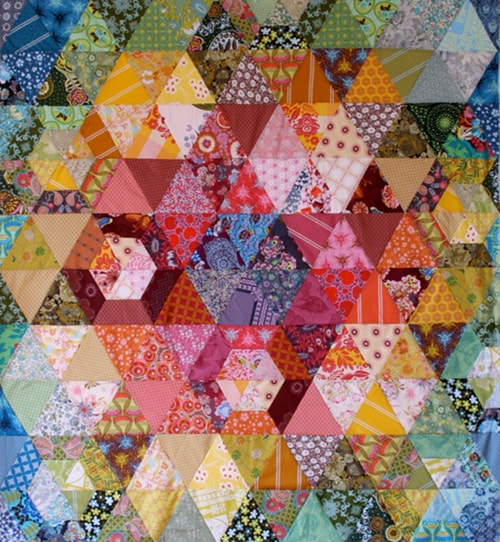
The foundation of any successful quilting project lies in understanding the geometry behind the design. The Patchwork Prism Quilt – Pattern relies heavily on equilateral triangles or 60-degree diamonds to create its signature kaleidoscopic effect. By mastering these shapes, you unlock the ability to play with light and shadow across the surface of your textile art.
Fabric selection is the most critical step when working with the Patchwork Prism Quilt – Pattern. To achieve a true “prism” look, you should look for fabrics that offer a wide range of color gradients. Using a mix of solids and subtle prints helps maintain the focus on the geometric structure without overwhelming the viewer’s eye.
Precision cutting is the secret ingredient for a flawless Patchwork Prism Quilt – Pattern. Because this design involves many bias edges, using a rotary cutter and a specialized quilting ruler is non-negotiable. Taking your time during the cutting phase prevents the fabric from stretching, which ensures your blocks align perfectly during the sewing process.
The layout phase is where the Patchwork Prism Quilt – Pattern truly comes to life. Many quilters find it helpful to use a design wall to arrange their pieces before stitching. This allows you to step back and see if the color flow is balanced and if the prism effect is working effectively across the entire quilt top.
Stitching the Patchwork Prism Quilt – Pattern requires a consistent quarter-inch seam allowance. Even a tiny deviation can lead to “blunt points,” where the tips of your triangles are cut off. Focus on “pinning for perfection” to keep those delicate intersections aligned as they pass under the sewing machine needle.
Finally, pressing is just as important as sewing when executing a Patchwork Prism Quilt – Pattern. Pressing your seams to one side (or open, depending on your preference) helps the quilt lie flat and reduces bulk at the intersections. A flat quilt top makes the subsequent quilting and binding steps much easier and more professional in appearance.
To begin your journey with the Patchwork Prism Quilt – Pattern, you will need a variety of high-quality quilting cottons. It is often recommended to use a “fussy cut” technique if you are using patterned fabric to highlight specific motifs. However, for the most striking prism effect, high-density solid fabrics are usually the preferred choice among modern makers.
A sharp rotary blade is your best friend when tackling the Patchwork Prism Quilt – Pattern. Since you will be cutting through multiple layers of fabric to create your triangles, a dull blade can cause jagged edges or inaccurate shapes. Always start a large project like this with a fresh blade to ensure clean, crisp cuts every single time.
Thread choice might seem secondary, but for a Patchwork Prism Quilt – Pattern, a fine 50wt cotton thread is ideal. This weight is strong enough to hold the quilt together but thin enough to prevent seam buildup. Neutral colors like grey or tan usually blend well with a variety of colors, making them perfect for this multi-colored quilt.
The quilt batting you choose will determine the final “loft” or thickness of your project. For a Patchwork Prism Quilt – Pattern, a low-loft cotton or bamboo batting is often preferred because it highlights the intricate piecing work without making the quilt too puffy. This ensures that the geometric lines remain the star of the show.
Do not overlook the importance of a 60-degree triangle ruler when following the Patchwork Prism Quilt – Pattern. While you can use a standard ruler, a specialized template significantly speeds up the process and reduces the margin for error. It is a small investment that pays off in the quality of your finished quilt top.
Lastly, ensure you have plenty of marking tools that disappear with heat or water. When working on a complex Patchwork Prism Quilt – Pattern, marking your sewing lines at the intersections can help you achieve those coveted “perfect points.” Having the right tools on hand turns a potentially frustrating task into a relaxing and rewarding creative hobby.
The first step in assembling your Patchwork Prism Quilt – Pattern is organizing your cut pieces by color and value. Create “stacks” of light, medium, and dark tones to ensure the visual depth is consistent. This organization prevents mistakes during the fast-paced sewing sessions and keeps your workspace tidy.
Begin by sewing your triangles into horizontal rows as instructed by the Patchwork Prism Quilt – Pattern. It is often easier to sew the pieces into pairs first, then join those pairs into longer strips. This “chain piecing” method saves time and thread, making the assembly of your geometric quilt much more efficient.
As you join the rows of your Patchwork Prism Quilt – Pattern, pay close attention to the nesting of the seams. Nesting involves pressing the seams of adjacent rows in opposite directions so they “lock” together. This technique is vital for ensuring that the points of your prisms meet exactly, creating a professional quilt finish.
Once the rows are joined, you will start to see the Patchwork Prism Quilt – Pattern emerge. At this stage, it is crucial to measure your quilt top to ensure it isn’t “waving” or becoming distorted. If the edges are uneven, a light steam press can often help block the quilt fabric back into its intended square or rectangular shape.
After the top is complete, it is time for the “quilting” part of the Patchwork Prism Quilt – Pattern. Many quilters choose “stitch in the ditch” or a simple diagonal grid to complement the geometric shapes. Others prefer free-motion quilting to add a contrasting organic texture to the sharp lines of the prism design.
The final touch is the quilt binding. For a Patchwork Prism Quilt – Pattern, a solid-colored binding often provides a nice frame that contains the explosion of color within. Using a double-fold bias binding ensures the edges are durable enough to withstand years of use and frequent washing.
One of the best tips for the Patchwork Prism Quilt – Pattern is to use fabric starch. Spraying your fabric before cutting makes it stiffer and less likely to stretch on the bias. This is a game-changer when working with triangles, as it keeps your shapes stable and your quilting points incredibly sharp.
If you find the Patchwork Prism Quilt – Pattern intimidating, try making a “mini quilt” first. This allows you to practice the technique on a smaller scale without committing to a full-sized bed quilt. Small wall hangings are a great way to test out different color palettes before diving into a larger investment.
Don’t be afraid of negative space. Some of the most beautiful versions of the Patchwork Prism Quilt – Pattern use a neutral background color, like white or charcoal, to make the colorful prisms appear as if they are floating. This “modern quilting” approach adds a sense of airiness and sophistication to the overall design.
Lighting is your best ally when working on a Patchwork Prism Quilt – Pattern. Ensure your sewing area is well-lit so you can see the subtle differences in fabric values. Using a daylight lamp can help you distinguish between a dark navy and a black, which is crucial for maintaining the integrity of the prism’s color transition.
Keep a “seam ripper” handy, but don’t let it discourage you. Even expert quilters have to unpick seams occasionally when working on a complex Patchwork Prism Quilt – Pattern. View it as a part of the process of achieving excellence in your handmade craft, rather than a mistake.
Sharing your progress on social media or with a local quilting guild can provide valuable feedback and motivation. The quilting community loves seeing different interpretations of the Patchwork Prism Quilt – Pattern. Engaging with others can give you new ideas for quilting motifs or color combinations you might not have considered.
Is the Patchwork Prism Quilt – Pattern suitable for absolute beginners?
While it requires a bit of patience due to the diagonal seams, many beginners successfully complete it by following a step-by-step quilt tutorial. If you can sew a straight line and use a ruler, you can master this pattern.
How much fabric do I need for a queen-sized Patchwork Prism Quilt – Pattern?
Generally, a queen-sized version requires about 8 to 10 yards of fabric in total, depending on how many different colors you want to include. It is always better to buy a little extra for miscuts or mistakes.
Can I use scraps for a Patchwork Prism Quilt – Pattern?
Absolutely! This is a fantastic scrap-busting project. Just ensure that your scraps are of a similar weight (all 100% cotton is best) to ensure the quilt wears evenly over time.
What is the best way to wash a finished Patchwork Prism Quilt – Pattern?
We recommend washing on a cold, gentle cycle with a “color catcher” sheet to prevent the vibrant dyes from bleeding. Air drying or tumble drying on low heat will help preserve the quilt’s longevity.
Does the Patchwork Prism Quilt – Pattern require paper piecing?
Most versions of this pattern use traditional piecing with rulers and templates, but there are foundation paper piecing (FPP) versions available for those who prefer extreme precision.
Can I sell quilts made from this Patchwork Prism Quilt – Pattern?
This depends on the specific designer’s licensing. Most patterns allow you to sell items made on a small scale (handmade), but it is always polite to credit the pattern designer in your listing.
The Patchwork Prism Quilt – Pattern is more than just a sewing project; it is an exploration of geometry, color, and personal creativity. Throughout this article, we have covered the importance of fabric selection, the necessity of precision cutting, and the step-by-step journey from individual triangles to a completed quilt masterpiece.
By focusing on consistent seams and thoughtful color placement, anyone can create a stunning visual effect that looks far more complex than it actually is to assemble. We hope this guide inspires you to pick up your rotary cutter and start your own quilting adventure.


