
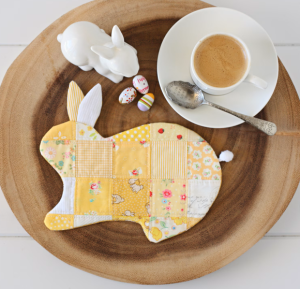
American-style placemat with a fruit theme - Pattern

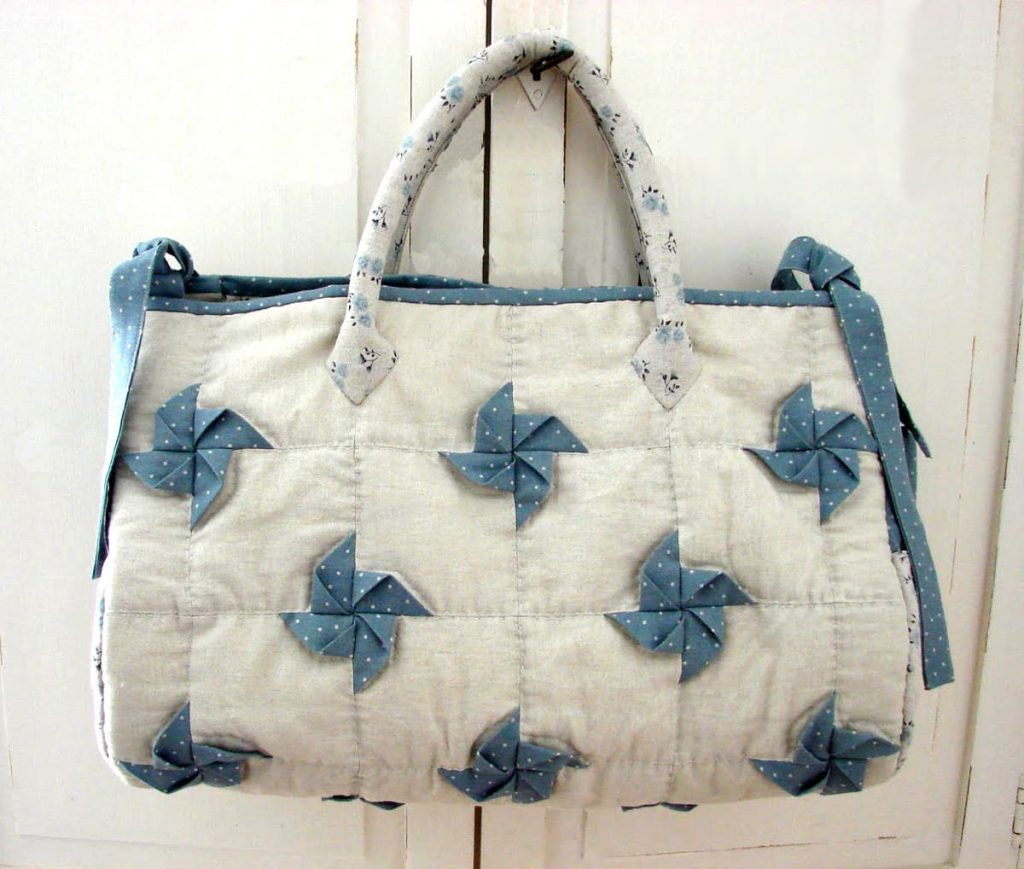
Finding the perfect Pinwheel Patchwork Bag – Pattern is an exciting journey for any sewing enthusiast who loves combining geometric precision with artistic flair. This specific design is a classic in the world of quilting and accessory making, offering a dynamic visual effect that mimics the movement of a spinning toy. By mastering a Pinwheel Patchwork Bag – Pattern, you are not just creating a functional item to carry your essentials; you are crafting a piece of wearable art that showcases your ability to align seams and balance contrasting fabric colors effectively.
The beauty of working with a Pinwheel Patchwork Bag – Pattern lies in its incredible versatility and the way it utilizes “half-square triangles” to create its signature look. Whether you are a seasoned quilter or a beginner looking to expand your skills beyond simple blankets, this patchwork accessory provides the perfect medium-scale challenge. Many crafters enjoy this specific sewing project because it allows for extensive personalization through fabric choice, ranging from vintage florals to bold, modern solids that make the pinwheel shape pop against a neutral background.
As you prepare to start your Pinwheel Patchwork Bag – Pattern, it is essential to focus on the preparation and the technical details that ensure a professional finish. Achieving sharp points and flat seams is the secret to a high-quality handmade handbag that looks like it came from a boutique. In the following guide, we will break down the essential components of the process, ensuring that your experience with this Pinwheel Patchwork Bag – Pattern is rewarding, educational, and results in a durable, stylish bag you will be proud to carry every day.
The first step in executing a stunning Pinwheel Patchwork Bag – Pattern is selecting the right quilt-weight cotton fabric. Because the pinwheel design relies on visual contrast, you should choose at least two colors—one light and one dark—to ensure the “blades” of the pinwheel are clearly visible. Using high-quality cotton ensures that your patchwork bag is sturdy enough for daily use while remaining easy to manipulate under the sewing machine foot.
When picking your materials for the Pinwheel Patchwork Bag – Pattern, consider the scale of the prints you are using. Small-scale prints or “solids” work best because they don’t distract from the geometric lines of the pinwheel blocks. If you choose a print that is too large, the pattern might get “lost” when you cut the fabric into small triangles, which can diminish the overall impact of your hand-sewn bag.
Interfacing is another critical component often mentioned in a professional Pinwheel Patchwork Bag – Pattern. To give your bag structure and prevent it from sagging, you should use a fusible fleece or a heavy-weight stabilizer. This adds a layer of “body” to the cotton fabric, making your custom tote bag feel more substantial and helping it maintain its shape even when it is filled with heavy items like books or tablets.
Don’t overlook the importance of the lining fabric when following your Pinwheel Patchwork Bag – Pattern. While the exterior is the star of the show, a coordinated lining adds a touch of hidden luxury. Many quilters choose a complementary color for the interior, ensuring that every time you open your handmade bag, you see a beautiful, finished product that reflects a high level of craftsmanship and attention to detail.
Thread selection also plays a role in the longevity of your Pinwheel Patchwork Bag – Pattern. Using a strong, 100% cotton thread in a neutral color like grey or tan allows the stitches to blend into the fabric. Since this project involves several layers of fabric meeting at a single point in the center of the pinwheel, a high-quality thread prevents breakage and keeps your sewing seams secure under tension.
Lastly, consider the hardware you want to incorporate into your Pinwheel Patchwork Bag – Pattern. Whether you prefer magnetic snaps, heavy-duty zippers, or simple wooden buttons, the hardware should match the aesthetic of your fabric. Choosing the right “finish” for your bag—be it rustic, modern, or whimsical—is what truly brings your unique patchwork project to life and makes it a one-of-a-kind accessory.
The core of a Pinwheel Patchwork Bag – Pattern is the construction of the half-square triangles (HSTs). To get the best results, many sewers use the “two-at-a-time” method, where two squares of fabric are sewn together and cut diagonally to create two identical triangles. This technique is a staple in any modern patchwork pattern because it saves time and improves accuracy, which is vital for the points of your pinwheel to meet perfectly.
Accuracy in your seam allowance is perhaps the most important tip for a successful Pinwheel Patchwork Bag – Pattern. A standard 1/4 inch seam is the industry norm for quilting. If your seams are even slightly inconsistent, the pinwheel will not lay flat, and the bag will look distorted. Using a quarter-inch sewing foot on your machine can help you maintain this precision throughout the entire bag-making process.
Pressing is the “secret weapon” of any Pinwheel Patchwork Bag – Pattern. You must press your seams as you go, usually toward the darker fabric to prevent the seam allowance from showing through the lighter side. For a pinwheel, “spinning the seams” at the center point reduces bulk, allowing your sewing machine to glide over the thickest part of the patchwork block without skipping stitches or breaking needles.
Once your blocks are assembled according to the Pinwheel Patchwork Bag – Pattern, you will need to “square them up.” This means using a rotary cutter and a quilting ruler to trim each block to the exact same size. This step is often skipped by beginners, but it is essential for ensuring that when you sew the blocks together to form the body of the tote bag, all the edges align perfectly without any bunching.
The layout phase of your Pinwheel Patchwork Bag – Pattern is where the magic happens. You can arrange your pinwheel blocks in rows, or even set them on point (diagonally) for a more complex look. Taking a photo of your layout before sewing the blocks together is a great quilting tip, as it allows you to see the color balance from a distance and make adjustments before the design becomes permanent.
Finally, reinforcing the handles is a crucial step in completing your Pinwheel Patchwork Bag – Pattern. Since the bag is made of multiple joined pieces of fabric, the stress points where the handles attach should be sewn with a cross-stitch (an ‘X’ inside a square). This ensures that the weight of the bag’s contents doesn’t pull on the delicate patchwork seams, making your handmade creation as durable as it is beautiful.
Once you are comfortable with the basic Pinwheel Patchwork Bag – Pattern, you can start experimenting with different block sizes. Smaller pinwheels create a “mosaic” effect that is very intricate, while larger pinwheels give the bag a bold, graphic look. Adjusting the scale of the quilted pattern allows you to create everything from a small makeup pouch to a large weekend travel bag using the same fundamental design.
Adding decorative topstitching or “quilting in the ditch” can elevate your Pinwheel Patchwork Bag – Pattern to a professional level. By sewing along the lines of the pinwheel, you secure the exterior fabric to the batting, creating a quilted texture that adds depth and visual interest. Using a walking foot for this stage is highly recommended to prevent the layers from shifting while you sew your quilted bag.
For those who want to add extra functionality to their Pinwheel Patchwork Bag – Pattern, adding internal pockets is a must. You can create a simple slip pocket for your phone or a zippered pocket for valuables. Integrating these features into the sewing instructions ensures that your bag is not only a decorative piece but also a highly organized tool for your daily life.
Another way to customize a Pinwheel Patchwork Bag – Pattern is through the use of “fussy cutting.” This involves cutting your fabric so that a specific motif—like a flower or an animal—is centered perfectly within the triangle of the pinwheel. While this requires more fabric and careful planning, the result is a bespoke patchwork bag that tells a story and showcases your advanced sewing skills.
The handles of your Pinwheel Patchwork Bag – Pattern offer another opportunity for creativity. Instead of standard fabric straps, you could use leather handles, cotton webbing, or even braided fabric ropes. The choice of handle can completely change the “vibe” of the bag, taking it from a casual beach tote to a sophisticated handcrafted purse suitable for more formal outings.
Finally, consider adding a fabric charm or a tassel made from the leftover scraps of your Pinwheel Patchwork Bag – Pattern. This is a great way to use every bit of your beautiful fabric and adds a playful, finished touch to the exterior. Little details like these are what make handmade sewing projects so special and distinguish them from mass-produced items found in stores.
Because a Pinwheel Patchwork Bag – Pattern involves many seams, proper care is essential to keep the bag looking its best for years. If you used 100% cotton, the bag is likely washable, but it should be treated with care. Washing your handcrafted bag in a mesh laundry bag on a cold, gentle cycle helps prevent the seams from being pulled or frayed by the agitator of the washing machine.
Avoid using harsh detergents or bleach on your Pinwheel Patchwork Bag – Pattern project, as these can fade the vibrant colors that make the pinwheel design so striking. Instead, opt for a mild, eco-friendly soap. If you used a specific stabilizer or interfacing, check the manufacturer’s instructions, as some heavy-duty stabilizers are “spot clean only” and can lose their stiffness if fully submerged in water.
Drying your Pinwheel Patchwork Bag – Pattern creation is just as important as washing it. Never put a patchwork bag in a high-heat dryer, as the heat can cause the cotton to shrink unevenly, which might distort the pinwheel shape. The best method is to reshape the bag while damp and lay it flat on a clean towel to air dry, ensuring it retains its original dimensions and crisp lines.
If your bag becomes wrinkled after use or washing, a quick press with a steam iron can restore its beauty. Use a “pressing cloth” between the iron and the bag to protect the fabric and any decorative elements like buttons or vinyl. Ironing the patchwork seams flat again will make the pinwheel pattern “pop” and give the bag that freshly-made, professional appearance once more.
For those who use their Pinwheel Patchwork Bag – Pattern daily, applying a fabric protectant spray can be a wise choice. These sprays create an invisible barrier that repels water and stains, which is particularly useful for the bottom of the bag. Keeping your sewing project clean from the start will reduce the need for deep cleaning and help preserve the integrity of the fiber art.
Ultimately, the best way to care for your Pinwheel Patchwork Bag – Pattern is to treat it as the piece of art it is. Store it in a cool, dry place when not in use, and avoid overloading it with excessively heavy items that could stress the seams. With the right care, your patchwork masterpiece will remain a functional and beautiful part of your wardrobe, serving as a constant reminder of your creativity and skill.
1. Is the Pinwheel Patchwork Bag – Pattern suitable for absolute beginners?
While it requires some basic knowledge of how to operate a sewing machine, a Pinwheel Patchwork Bag – Pattern is a great “step-up” project. If you can sew a straight line and are willing to take your time with measuring and cutting, you can certainly succeed.
2. How much fabric do I need for a standard size bag?
Most Pinwheel Patchwork Bag – Pattern designs require about 1/2 yard of two contrasting fabrics for the exterior and 1 yard for the lining and handles. However, it is always best to check your specific pattern’s material list.
3. Can I make this bag using scraps from other projects?
Yes! This is an excellent “scrap-buster” project. You can make a “scrappy pinwheel” where every triangle is a different fabric, as long as you maintain a consistent contrast between the light and dark halves of the pinwheels.
4. Do I need a special ruler to make the pinwheels?
While a standard quilting ruler works perfectly, a tri-recs ruler or a specialized HST (half-square triangle) ruler can make the cutting process faster and more accurate for your Pinwheel Patchwork Bag – Pattern.
5. Why do my pinwheel points not line up in the center?
This usually happens due to inconsistent seam allowances or failing to “trim” the blocks to size. Ensure you are using a precise 1/4 inch seam and that you have pressed your seams flat before joining the blocks.
6. What is the best way to attach handles to a patchwork bag?
The most secure method is to sandwich the handles between the exterior and the lining fabric during the final assembly. Reinforcing the attachment point with multiple rows of stitching will ensure the Pinwheel Patchwork Bag – Pattern stays intact during use.
In this article, we have delved deep into the creative process of making a Pinwheel Patchwork Bag – Pattern. We covered everything from selecting high-contrast quilt-weight fabrics to the technical mastery of creating perfect half-square triangles. We also explored ways to customize your bag with unique handles and internal pockets, as well as the essential care steps to ensure your handmade accessory lasts for years.
Crafting a Pinwheel Patchwork Bag – Pattern is a fulfilling experience that combines the logic of geometry with the beauty of textile art. It is a project that grows with you—as your skills improve, your designs can become more intricate and personal. We hope this guide has provided you with the confidence and inspiration to start your own patchwork journey today.


