
American-style placemat with a fruit theme - Pattern

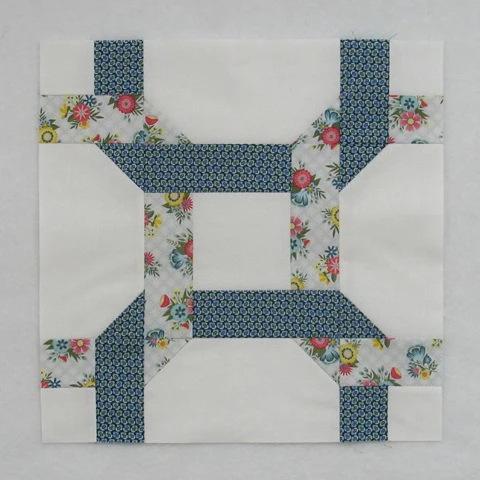
The Plaited Quilt Block Tutorial – Pattern is an absolute favorite among quilting enthusiasts who love designs that create a striking visual illusion of woven fabric strips. This specific block offers a sophisticated geometric look that resembles interlaced ribbons, making it a centerpiece for any modern or traditional quilt project. Whether you are a seasoned pro or a beginner looking to expand your skills, mastering this quilt block pattern is a rewarding journey into the world of precision piecing and creative color play.
Choosing a Plaited Quilt Block Tutorial – Pattern allows you to experiment with contrasting colors and textures to highlight the “over-under” effect that defines this style. The beauty of this sewing pattern lies in its versatility; you can use scrap fabrics for a cozy, eclectic look or select a monochromatic palette for a sleek, contemporary finish. By following a structured step-by-step guide, you ensure that your seams line up perfectly, preserving the 3D optical illusion that makes this design so captivating.
In this comprehensive Plaited Quilt Block Tutorial – Pattern, we will explore the essential techniques required to bring this design to life, focusing on accurate cutting and the importance of a consistent 1/4-inch seam allowance. Quilting is not just about joining fabric; it is about the storytelling found in every stitch and the satisfaction of creating something durable and beautiful. Let’s dive into the details of this unique quilt design and unlock the secrets to a flawless finish that will impress anyone who sees your handiwork.
The Plaited Quilt Block Tutorial – Pattern starts with selecting the right fabric, as the contrast between your “plaits” and the background determines the depth of the design. You will typically need at least three different fabric tones to make the woven effect stand out effectively against the base.
Preparation is key when working with a geometric quilt block like this one, so ensure your fabric is ironed flat and free of wrinkles before you begin cutting. Using a rotary cutter and a non-slip ruler will help you achieve the crisp edges necessary for the interlocking appearance of the strips.
The core concept of the Plaited Quilt Block Tutorial – Pattern involves sewing strips at specific angles or in a staggered formation to mimic a braid. Beginners often find that using pre-cut fabric strips like Jelly Rolls can save significant time while maintaining a consistent width throughout the project.
Consistency in your seam allowance is perhaps the most critical factor in ensuring your block remains square and doesn’t warp during assembly. A standard scant quarter-inch seam is highly recommended for this quilting technique to account for the fold of the fabric after pressing.
When you follow this Plaited Quilt Block Tutorial – Pattern, you are engaging in a tradition of precision that dates back generations but remains fresh today. Labeling your fabric pieces as you cut them can prevent confusion, especially when dealing with multiple shades that look similar under studio lighting.
Finally, remember that the Plaited Quilt Block Tutorial – Pattern is highly adaptable to different sizes, from small 6-inch blocks for pillows to large 12-inch blocks for king-sized quilts. Taking the time to understand the math behind the block dimensions will empower you to customize any future project with confidence and ease.
To successfully complete the Plaited Quilt Block Tutorial – Pattern, you will need a reliable sewing machine equipped with a quarter-inch foot for maximum accuracy. High-quality cotton quilting thread in a neutral color like grey or cream is best, as it blends seamlessly with most fabric choices.
Your cutting station should include a large self-healing cutting mat to protect your surfaces and provide a grid for measuring your fabric strips. A sharp blade in your rotary cutter is essential to prevent frayed edges, which can compromise the integrity of your quilt seams over time.
For the Plaited Quilt Block Tutorial – Pattern, having a variety of quilting rulers—specifically a square ruler for trimming—is a game-changer for finishing blocks. Accurate trimming ensures that when you join multiple blocks together, the interwoven design flows perfectly across the entire quilt top without interruptions.
Starch is a secret weapon often mentioned in a Plaited Quilt Block Tutorial – Pattern because it adds stiffness to the fabric, making it easier to handle. Spraying your fabric with a bit of quilting starch before cutting can prevent the strips from stretching, which is vital for maintaining the geometric precision.
Don’t forget the importance of fine glass-head pins or clips to hold your fabric layers together without adding bulk or leaving permanent marks. In this Plaited Quilt Block Tutorial – Pattern, pinning at every intersection helps maintain the alignment of the “plaits,” ensuring the final result looks professional.
Lastly, a high-quality steam iron and a padded ironing board are indispensable for pressing your seams as you go through the construction process. Following the rule of “press, don’t iron” will keep your quilt block from distorting, which is a common pitfall in many DIY quilting projects.
The first step in assembling your Plaited Quilt Block Tutorial – Pattern is to arrange your cut strips in the order they will be sewn to visualize the final look. This “dry run” allows you to adjust the color placement and ensure that the braided effect flows in the direction you desire.
Begin by sewing your initial center units, which often act as the anchor for the rest of the Plaited Quilt Block Tutorial – Pattern. These center pieces are the heart of the woven design, and getting them perfectly square sets the tone for the remainder of the assembly process.
As you add more strips to the sides, always refer back to your Plaited Quilt Block Tutorial – Pattern diagram to ensure the overlapping sequence is correct. It is easy to accidentally flip a strip, which can break the visual rhythm of the “plait” and require the use of a seam ripper.
Pressing each seam as you go is a non-negotiable step in this Plaited Quilt Block Tutorial – Pattern to achieve a flat, professional-looking block. Most quilters prefer to press seams to the dark side to prevent the fabric edges from showing through the lighter sections of the quilt.
Once all the strips are attached, use your square ruler to perform a final trim on the Plaited Quilt Block Tutorial – Pattern unit. This ensures the block is exactly the size required by your quilt layout, making the eventual “quilt top” assembly much smoother and more enjoyable.
The beauty of the Plaited Quilt Block Tutorial – Pattern is revealed once the block is fully pressed and trimmed, showcasing those beautiful interlocking lines. Take a moment to inspect your work, checking that the corners meet neatly and that the woven illusion is vibrant and clear.
Once you have mastered the basic Plaited Quilt Block Tutorial – Pattern, you can begin experimenting with different fabric styles like batiks or flannels. Each fabric type offers a different texture, which can drastically change the tactile feel and visual depth of your finished quilt.
One popular variation of the Plaited Quilt Block Tutorial – Pattern is the use of a “scrappy” approach, where no two strips are the same fabric. This creates a vibrant, energetic quilt design that is perfect for using up leftovers from previous projects while still looking intentional.
You can also play with the orientation of the Plaited Quilt Block Tutorial – Pattern when joining blocks together to create secondary patterns like stars or diamonds. By rotating the blocks 90 degrees, the plaits can be made to run in opposite directions, creating a dynamic sense of movement.
Adding a sashing or border around each Plaited Quilt Block Tutorial – Pattern can help the individual designs “breathe” and stand out more clearly. Choosing a solid, neutral color for the sashing often provides a rest for the eyes and emphasizes the complexity of the woven block.
For those who enjoy a challenge, try scaling down the Plaited Quilt Block Tutorial – Pattern to create miniature quilts or decorative wall hangings. Working with smaller fabric strips requires even more precision but results in a delicate and intricate piece of textile art that is truly unique.
The final step in your journey with the Plaited Quilt Block Tutorial – Pattern is choosing the right quilting motif to stitch over the top. Whether you choose “stitch in the ditch” or a free-motion floral design, the quilting should complement the plaited structure without overshadowing it.
1. Is the Plaited Quilt Block Tutorial – Pattern suitable for absolute beginners?
Yes, while it looks complex, it is essentially a series of straight seams. If you can sew a consistent 1/4-inch seam, you can successfully complete this quilt pattern.
2. How much fabric do I need for a standard Plaited Quilt Block?
Generally, for a 12-inch block, you will need approximately 1/4 yard of three different fabrics. However, using fat quarters is a great way to get variety without buying excessive yardage.
3. Can I use a sewing machine for the entire Plaited Quilt Block Tutorial – Pattern?
Absolutely. In fact, using a machine is recommended for this pattern to ensure the seams are strong and the geometric lines remain perfectly straight.
4. Why does my block look “wavy” after I finish sewing?
Waviness is usually caused by stretching the fabric strips while sewing or ironing. Using fabric starch and pressing straight down instead of sliding the iron can fix this issue in your quilt construction.
5. What is the best way to choose colors for this pattern?
To make the plaited effect pop, choose a light, a medium, and a dark value of the same color family, or use highly contrasting complementary colors for a bold modern quilt look.
Mastering the Plaited Quilt Block Tutorial – Pattern is a fantastic way to elevate your quilting skills and create a stunning visual impact with your projects.
We have covered everything from choosing the right fabric and tools to the step-by-step assembly and creative variations that make this quilt design so timeless. By focusing on precision cutting and careful pressing, you can produce a quilt block that looks far more intricate than it actually is to sew.


