
American-style placemat with a fruit theme - Pattern

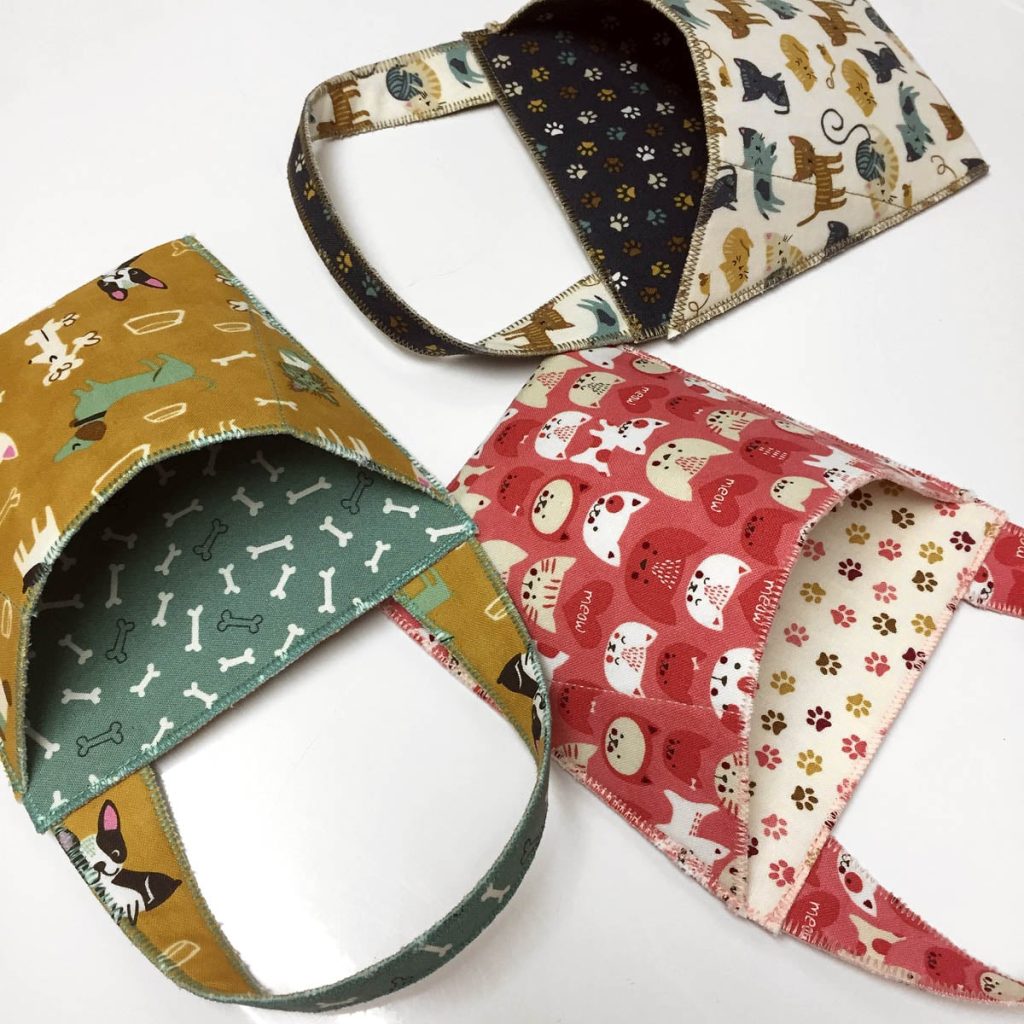
The Pocket for door handle Tissue – Pattern is a brilliant and highly practical sewing project that addresses a common household need while adding a touch of personalized charm to your interior design. Imagine never having to hunt for a stray tissue again when you have a cold or a quick spill to clean up; this Pocket for door handle Tissue – Pattern ensures that essential supplies are always exactly where you need them: right at the entrance or exit of a room. This clever accessory is essentially a small, decorative pouch designed to hang securely from a standard lever or knob, providing a dedicated space for travel-sized tissue packs or even small waste bags.
Creating a Pocket for door handle Tissue – Pattern is an ideal task for those who enjoy functional crafting and want to make the most of their fabric remnants. Because these items are small, they require very little material, allowing you to experiment with high-end fabrics or sentimental scraps that might otherwise sit in a bin. Following a well-designed Pocket for door handle Tissue – Pattern helps you master the art of sewing small-scale curves and reinforced openings, which are valuable skills for any sewist looking to expand their technical repertoire beyond simple flat garments.
In this comprehensive guide, we will explore everything you need to know about the Pocket for door handle Tissue – Pattern, including the best fabric choices, structural reinforcements, and creative ways to customize the design. We will look at how this door handle organizer can be adapted for nurseries, home offices, or even guest rooms to provide a hospitable touch that visitors will truly appreciate. By the time you finish your first Pocket for door handle Tissue – Pattern, you will have a versatile template that you can use to create thoughtful, handmade gifts for friends and family that combine utility with undeniable style.
When you begin your Pocket for door handle Tissue – Pattern, the first decision involves choosing a fabric that is both durable and easy to maintain. Since this item will be touched frequently and hangs in high-traffic areas, a medium-weight cotton canvas or a high-quality quilting cotton is usually the best choice. These fabrics provide the necessary structure to hold the weight of the tissues without sagging, ensuring that your Pocket for door handle Tissue – Pattern retains its neat, crisp appearance over months of use.
The lining of your Pocket for door handle Tissue – Pattern is just as important as the exterior. Many crafters opt for a contrasting color or a fun print for the inside to add a bit of personality to the design. Using a synthetic lining or a treated cotton can make the interior easier to clean if any dust or lint from the tissues accumulates. This attention to internal detail is a hallmark of a professional-grade handmade sewing pattern that focuses on long-term functionality.
Because the main weight of the pouch hangs from a single point, interfacing is a non-negotiable component of the Pocket for door handle Tissue – Pattern. A fusible firm interfacing should be applied to the top section where the handle hole is located. This reinforcement prevents the fabric from stretching or tearing over time due to gravity. Without proper stabilizing materials, even the most beautiful Pocket for door handle Tissue – Pattern will lose its shape and look unprofessional after just a few days of hanging.
The hardware or closures used in a Pocket for door handle Tissue – Pattern are usually minimal, but you might consider adding a small snap or a button at the top to keep the pouch closed. Using a plastic resin snap is a popular choice because it is easy to apply and doesn’t add much weight. Alternatively, some patterns favor a simple “fold-over” design that uses the weight of the tissues themselves to keep the opening secure, making the sewing process much faster for beginners.
Color coordination is key to making your Pocket for door handle Tissue – Pattern blend seamlessly with your home decor. You might choose a fabric that matches your curtains or rugs, or perhaps a bright, contrasting color that makes the tissue pocket easy to spot. If you are creating a Pocket for door handle Tissue – Pattern for a child’s room, using glow-in-the-dark fabric or bright primary colors can make it a fun and accessible tool for teaching hygiene habits early on.
Lastly, consider the “washability” factor of your chosen materials for the Pocket for door handle Tissue – Pattern. Door handles are prime spots for germs, so being able to toss your fabric tissue holder into the washing machine is a huge advantage. Stick to machine-washable fibers and avoid delicate embellishments that might fall off in the laundry. A practical Pocket for door handle Tissue – Pattern is one that stays clean and fresh with minimal effort, making it a sustainable choice for any modern household.
The core of a successful Pocket for door handle Tissue – Pattern lies in the precision of the handle opening. Whether your door has a round knob or a lever, the hole in the fabric must be large enough to slide on easily but small enough to stay put. Most Pattern designs use a circular or “keyhole” shape for this purpose. Learning to sew circular bias tape or using a satin stitch to finish this raw edge is a fantastic way to improve your detail-oriented sewing skills while working on this project.
The “pocket” portion of the Pocket for door handle Tissue – Pattern is typically created through a series of clever folds. By folding a single long strip of fabric, you can create the front pouch and the hanging tab simultaneously. This origami-style sewing method reduces the number of seams needed and creates a very clean, modern silhouette. A well-written Pocket for door handle Tissue – Pattern will guide you through these folds with clear diagrams to ensure the tissue slot is perfectly centered.
Boxing the corners is a technique that gives your Pocket for door handle Tissue – Pattern a 3D shape, allowing it to hold a full pack of tissues without looking distorted. By sewing a small triangle at the bottom corners of the pouch, you create “depth” in the fabric. This dimensional sewing technique is what separates a flat, flimsy bag from a sturdy, high-quality door handle tissue dispenser that stands out as a piece of functional home decor.
If your Pocket for door handle Tissue – Pattern features a front-loading slot, you will need to practice “felling” or “hemming” the opening edges. This is where the tissues are actually pulled through. A reinforced topstitch around this opening is vital, as it will be pulled and tugged every time a tissue is removed. Ensuring this part of the Pocket for door handle Tissue – Pattern is strong will prevent the fabric from fraying or the stitches from popping under pressure.
Assembly often involves sewing “right sides together” and then turning the entire project through a small gap. This “turn and topstitch” method ensures that all raw edges are hidden inside the Pocket for door handle Tissue – Pattern. For a professional finish, use a turning tool or a blunt chopstick to push out the corners of the hanging tab. Crisp corners are the difference between a project that looks “homemade” and one that looks “hand-crafted” with precision.
Finally, don’t forget to press your seams at every stage of the Pocket for door handle Tissue – Pattern. Using a hot iron with plenty of steam helps the interfacing bond and makes the fabric much easier to handle. A well-pressed fabric pocket will hang straighter and look significantly more expensive. In the world of small-scale sewing, the iron is just as important as the sewing machine for achieving the sharp geometric lines required for this specific pattern.
One of the best things about the Pocket for door handle Tissue – Pattern is its adaptability. For a bathroom or kitchen, you can use laminated cotton or oilcloth to make the pocket waterproof. This is a great variation for humid environments where traditional cotton might get damp. A waterproof tissue pocket is easy to wipe down and protects the paper products inside from steam and splashes, making it a highly functional addition to any utility space.
In a nursery or child’s bedroom, the Pocket for door handle Tissue – Pattern can be modified to include extra small compartments for diaper cream or a small thermometer. You can simply widen the base of the Pattern to create a multi-slot organizer. Using soft flannel fabric in pastel colors can make the organizer feel cozy and appropriate for a baby’s room, while providing parents with easy access to essentials during late-night changes or sniffles.
For those who travel frequently, a “Travel Version” of the Pocket for door handle Tissue – Pattern can be made with a Velcro strap instead of a permanent hole. This allows you to hang the tissue pouch on hotel door handles, car headrests, or even stroller bars. This portable sewing modification makes the design much more versatile and ensures that you have a familiar, clean place for tissues no matter where you are in the world.
If you are a fan of “shabby chic” or vintage styles, you can embellish your Pocket for door handle Tissue – Pattern with lace trim or embroidery. A small monogrammed initial on the front of the pocket adds a high-end, personalized touch that makes it a wonderful gift. Since the front panel is relatively flat, it provides a perfect “canvas” for decorative needlework or fabric paint, allowing you to match the pocket to the specific personality of each room.
Home offices can also benefit from a modified Pocket for door handle Tissue – Pattern. Instead of just tissues, the pocket can be sized to hold a smartphone or a pair of reading glasses. In this context, the door handle storage acts as a “landing pad” for items you need as you enter or leave your workspace. Using professional-looking wool felt or dark denim can give the pocket a more masculine or corporate aesthetic that fits a modern office environment.
Finally, consider the “Guest Room Hospitality” application of the Pocket for door handle Tissue – Pattern. When friends stay over, having a clearly labeled tissue pocket on the back of the guest room door is a thoughtful gesture that shows you’ve considered their comfort. You can even include a small scented sachet inside the pocket to keep the tissues smelling fresh. This small detail elevates the guest experience and showcases your skill with a functional fabric pattern.
The final step in your Pocket for door handle Tissue – Pattern is the topstitching. This isn’t just for looks; it provides the final layer of structural stability that keeps the lining and the outer fabric from shifting. A contrasting thread color can make the topstitching a decorative feature, while a matching thread keeps the focus on the fabric print. Using an edge-stitch foot on your sewing machine can help you achieve a perfectly straight line that follows the perimeter of the pocket.
To ensure your Pocket for door handle Tissue – Pattern lasts for years, consider using “fray check” or a similar liquid sealant on the corners of the tissue opening. Even with a good hem, this area receives the most friction. A small drop of fabric sealant can reinforce the fibers and prevent the tiny threads from coming loose over time. This is a pro-tip for anyone selling their sewing crafts at markets or online boutiques.
Maintenance of your Pocket for door handle Tissue – Pattern is straightforward. Because it hangs in the air, it won’t get as dirty as a pouch stored in a bag, but it will collect dust. A quick shake every time you refill the tissues is usually enough. For a deeper clean, follow the washing instructions for your specific fabric—usually a cold wash and a quick iron will have your tissue holder looking brand new again in no time.
If you find that your Pocket for door handle Tissue – Pattern slides around too much on a smooth metal handle, you can add a small strip of non-slip shelf liner or silicone dots to the back of the hanging tab. This “grip” ensures the pouch stays perfectly vertical even when the door is opened and closed quickly. This functional hack improves the user experience and shows a high level of thought went into the project’s design and execution.
For those making the Pocket for door handle Tissue – Pattern as a set, consider creating a “seasonal collection.” You can have one for the holidays, one for spring, and one for the flu season. Swapping them out is a fun way to keep your home decor feeling fresh and updated. Storing the off-season tissue pockets is easy since they fold flat, taking up virtually no space in your linen closet or sewing room.
Ultimately, the Pocket for door handle Tissue – Pattern is a testament to the power of small-scale sewing. It proves that you don’t need a lot of fabric or a complex machine to create something that significantly improves the daily flow of your home. Each time you reach for a tissue, you’ll be reminded of the creativity and care you put into making your space more organized and comfortable. It’s a small project with a very big impact on domestic convenience!
What size tissue pack fits in this Pocket for door handle Tissue – Pattern?
Most standard designs are sized for “travel-sized” or “pocket-sized” tissue packs, which are usually about 4.5″ x 3″. However, because it is a sewing pattern, you can easily scale the dimensions up if you want to hold a full-sized box of tissues, though you would need to reinforce the handle loop significantly to handle the extra weight.
Can I use this pattern on a round door knob?
Yes! The Pocket for door handle Tissue – Pattern usually features a circular opening that works with both levers and knobs. If you have a particularly large or unusually shaped knob, simply measure the diameter of the widest part and adjust the pattern’s handle hole to be about 1/4 inch larger for a comfortable fit.
How do I prevent the pocket from sagging?
The secret to a non-sagging pocket is heavy-duty interfacing. If you find that yours is still leaning forward, you can sew a small piece of thin plastic (like from an old ice cream lid) into the bottom of the pouch to create a “floor,” which helps the tissue pack sit upright and balances the center of gravity.
Is this project suitable for a beginner?
Absolutely! The Pocket for door handle Tissue – Pattern is a fantastic “learn-to-sew” project. It introduces the basics of straight seams, curves, and pivoting without the pressure of a large garment. Most beginners can finish a complete pocket in under an hour, making it an instant-gratification craft.
Do I need a special foot for my sewing machine?
While a standard zigzag or straight-stitch foot works fine, a zipper foot can be helpful for getting close to the edges of the handle opening. If you are using thick fabrics like denim for your Pocket for door handle Tissue – Pattern, a “denim needle” or a “walking foot” will make the sewing process much smoother and prevent skipped stitches.
What is the best way to hide the raw edges inside the pocket?
The most professional way is to use the “bagging out” method, where you sew the lining and exterior together with right sides facing, then pull it through. If you prefer a faster method, you can use pinking shears on the internal seams or finish them with a serger to ensure your handmade organizer remains tidy on the inside.
The Pocket for door handle Tissue – Pattern is a perfect blend of simplicity, style, and household utility. Throughout this article, we’ve explored the essential foundations, from selecting durable cotton canvas and reinforcing the design with fusible interfacing to mastering the “origami” folds that give the pouch its shape. We discussed how to customize the Pattern for different rooms—whether that’s using waterproof fabrics for the bathroom or adding decorative embroidery for a guest room.
We also covered technical tips like topstitching and the “bagging out” method to ensure a professional, high-end finish. By following a Pocket for door handle Tissue – Pattern, you create more than just a storage solution; you create a thoughtful detail that makes life a little bit easier and more organized.


