
Horizontal Row Quilt - Pattern

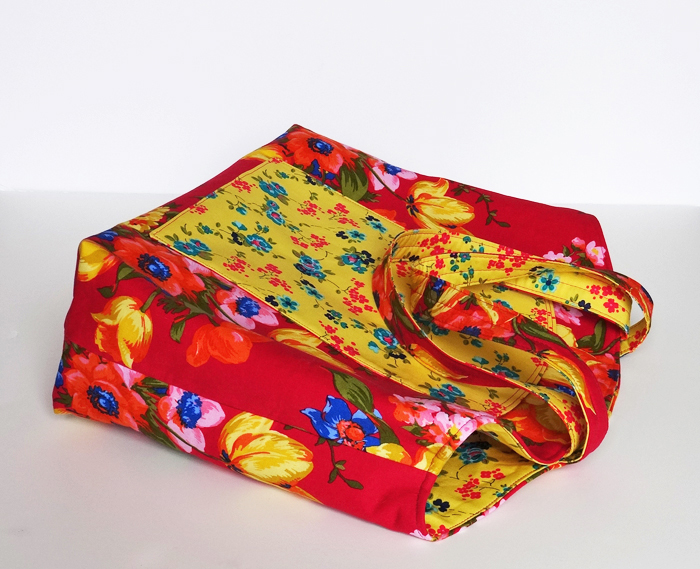
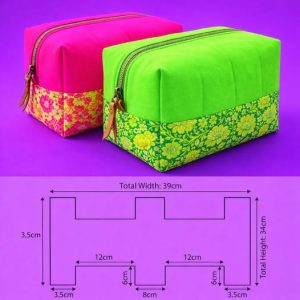
Looking for a fun and functional sewing project to showcase your favorite fabrics? The Pretty Floral Divided Tote – Pattern is a wonderful solution. Whether you’re heading to the farmer’s market, organizing craft supplies, or just want a stylish bag for everyday errands, this pattern delivers both beauty and utility. Its divided interior adds an element of organization that sets it apart from typical tote bags.
The charm of this Pretty Floral Divided Tote – Pattern lies in its ability to combine decorative design with practical features. With the right selection of floral fabrics, you can create a stunning handmade accessory that reflects your personality while helping you stay organized. It’s a great project for both beginner and experienced sewists.
In this tutorial, we’ll walk through each step of creating your own Pretty Floral Divided Tote – Pattern. From material selection to final topstitching, this guide is designed to give you a complete understanding of the process with helpful tips along the way to ensure a beautiful finish.
When starting your Pretty Floral Divided Tote – Pattern, selecting the right materials sets the tone for the whole project. Floral fabrics come in many sizes, colors, and prints, so choosing the right one can dramatically impact the aesthetic of your tote.
Cotton is a popular fabric choice for tote bags due to its durability and ease of handling. Look for medium-weight cottons or home décor fabric for the outer layer of your tote. For the interior, you can use quilting cotton with coordinating or contrasting floral patterns to add visual interest.
You’ll also need interfacing or fusible fleece to give your tote structure. This keeps the bag from being floppy and helps it hold its shape. A medium-weight interfacing or fleece is recommended for both the outer panels and the divider insert.
Gather essential tools: fabric scissors or a rotary cutter, pins or clips, a sewing machine, iron, ruler, and fabric marking tools. A walking foot attachment can also help when sewing through thicker layers.
Before cutting, pre-wash your fabric to prevent shrinkage after the tote is assembled. Iron your pieces flat to ensure clean cuts and smooth seams. Prepare all your pieces as described in your printed or digital Pretty Floral Divided Tote – Pattern template.
Mark the placement for the divider panel and any pockets before starting construction. This will make the sewing process more streamlined and reduce the risk of mistakes.
Now that your materials are prepped, it’s time to construct the outer shell and interior lining of the Pretty Floral Divided Tote – Pattern. The key here is to work methodically and press as you go to keep everything crisp and neat.
Start by sewing the outer panels together. If your pattern includes exterior pockets, add those now. Align and topstitch them to the front panel using a straight stitch and reinforcing the edges with backstitching. Don’t forget to line them if desired.
Once the exterior panels are completed, add the interfacing or fusible fleece according to the product instructions. This is often fused to the wrong side of the fabric using heat and pressure. Make sure it is smooth with no bubbles or wrinkles.
Join the front and back outer panels by sewing the side and bottom seams. Press the seams open and then box the corners by pinching each bottom corner together and sewing across it at a measured distance (usually 2-3 inches in from the point).
Repeat the same steps with the lining panels, but remember to leave a 3-4 inch opening in the bottom seam for turning the tote right-side-out later. Insert any interior pockets or slip compartments before sewing the lining together.
For the divider, sew the two divider pieces together with interfacing in between. Topstitch the upper edge for a polished finish, then baste it in place on one side of the lining before fully assembling the tote interior.
The divider should be centered vertically and sewn securely into the side seams of the lining. It will add a functional division inside your tote, perfect for separating items like books, gadgets, or groceries.
Attaching handles and assembling the full tote is a satisfying part of finishing your Pretty Floral Divided Tote – Pattern. Your bag is starting to take shape and all your hard work is about to pay off.
Prepare your handles by folding the long fabric strips in half lengthwise, pressing, then folding the raw edges to the center and pressing again. Sew along both long edges to finish the straps. You can also add fusible fleece inside the handles for extra padding and strength.
Pin the handles in place on the outer tote panels. Make sure the straps are equally spaced from the center and aligned evenly on both front and back. Baste them in place using a short stitch to hold them securely before final assembly.
Now, insert the exterior of the tote into the lining, right sides facing each other, and align the top edges. Ensure that the handles are tucked inside and between the layers. Clip or pin the edges together carefully all around the top.
Sew around the entire top edge using a ½-inch seam allowance. Backstitch over the handle areas for extra strength, as this is where the most stress will be placed when the tote is used.
Turn the bag right-side-out through the opening in the lining. Push out the corners gently, press the bag well, and tuck in the raw edges of the lining opening. Sew the opening closed with a small topstitch.
Finish by topstitching around the top edge of the tote. This secures the lining and gives your tote a clean, professional appearance. Your Pretty Floral Divided Tote – Pattern is now complete and ready to be filled with your favorite things!
One of the best parts about sewing your own Pretty Floral Divided Tote – Pattern is the ability to make it truly unique. From custom embellishments to thoughtful functionality, there are countless ways to personalize your bag.
Try adding magnetic snaps or Velcro for secure closure. This small detail can make the tote more secure and keep your belongings from spilling out during movement. You could also add a recessed zipper if you’re comfortable with more advanced sewing.
Add an adjustable shoulder strap or crossbody option for hands-free convenience. This is especially useful for moms on the go or busy days at the market.
Use water-resistant lining material if you plan to use your tote for groceries, gym clothes, or even as a diaper bag. Wipeable interiors add a layer of practicality to an already useful design.
Add applique or embroidery to the exterior for extra flair. Floral embellishments, monograms, or even small patchwork pieces can make your tote one of a kind.
Don’t limit yourself to floral prints! While florals are a great choice, this divided tote pattern works beautifully with stripes, geometric prints, or even solid colors. Match your tote to your wardrobe or the seasons for extra versatility.
Consider making a set as a gift. A handmade tote with coordinated fabric accessories—like a wallet, key fob, or small pouch—makes a thoughtful and personalized present for birthdays, baby showers, or holidays.
Q1: Is the Pretty Floral Divided Tote beginner-friendly?
Yes! The pattern is accessible for confident beginners. If you’ve sewn a basic tote before, you’ll be able to complete this with the added bonus of a divider for functionality.
Q2: What’s the best fabric for this tote?
Medium-weight cotton or home décor fabric is ideal for the outer shell. Quilting cotton is great for the lining. Interfacing is necessary to provide structure and durability.
Q3: Can I add extra pockets to the pattern?
Absolutely. Both interior and exterior pockets can be added to suit your organizational needs. Just plan and mark placements before you begin sewing.
Q4: How do I care for the finished tote?
If made with prewashed cotton, the bag can usually be machine washed on a gentle cycle. Air drying is best to prevent shrinking and maintain shape.
Q5: Can I resize the pattern?
Yes, you can enlarge or reduce the pattern depending on your needs. Just adjust the handle placement and divider size accordingly to keep everything proportional.
Q6: Is interfacing necessary?
Yes, interfacing or fusible fleece is essential to give the tote structure. Without it, the bag may be too floppy to hold its shape or support the divider panel.
The Pretty Floral Divided Tote – Pattern is not only a satisfying sewing project but also a practical and stylish addition to your everyday life. With its customizable features and functional divider, it’s perfect for carrying everything you need—while showing off your sewing skills and fabric taste.
We’ve walked through material selection, construction steps, final touches, and creative ideas to make your tote truly your own. With a little time and creativity, this project transforms into a beautiful handmade accessory you’ll be proud to carry or gift.


