
Horizontal Row Quilt - Pattern

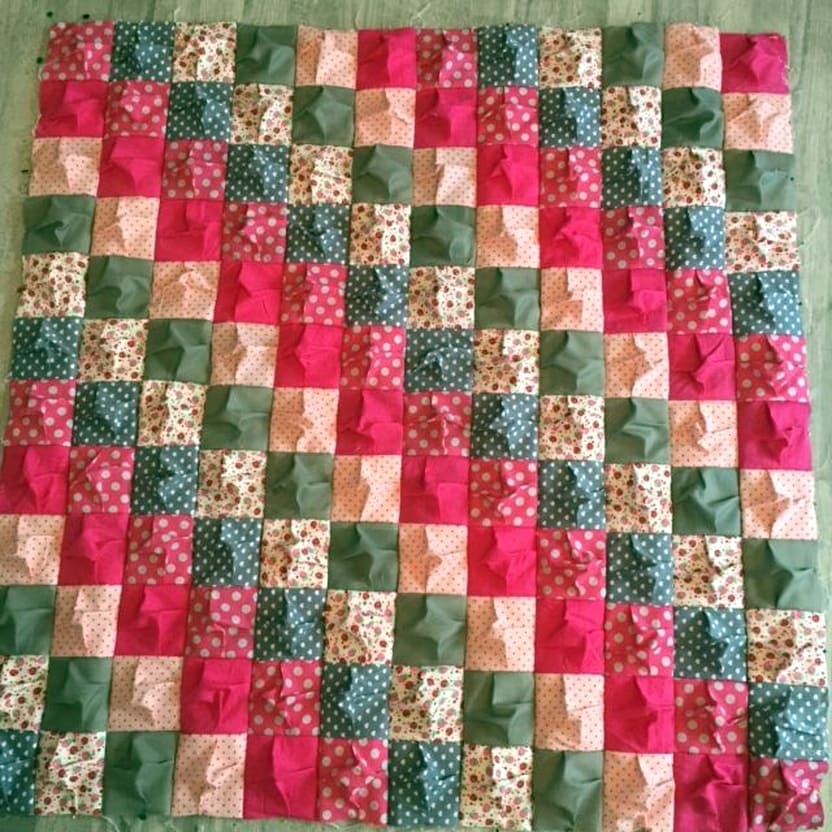
A Puff/Bubble/Biscuit Quilt – Pattern is one of the most charming and tactile projects any sewing enthusiast can take on, offering a unique 3D texture that standard quilts simply cannot match. Whether you know it as a puff quilt, a bubble quilt, or a biscuit quilt, the concept remains the same: individual fabric squares are stuffed with fiberfill before being sewn together, creating a cloud-like surface that is incredibly soft and visually striking. Learning how to master a Puff/Bubble/Biscuit Quilt – Pattern allows you to create heirloom-quality pieces that function as both heavy, warm blankets and playful nursery decor.
The beauty of a Puff/Bubble/Biscuit Quilt – Pattern lies in its versatility and the way it plays with light and shadow across its tufted surface. Unlike traditional flat quilting, where the focus is often on intricate stitching or appliqué, the biscuit quilt technique emphasizes volume and “squish factor.” Because each “puff” is essentially a small pillow, these quilts provide excellent insulation, making them a favorite for cold winters or as plush play mats for toddlers who need a soft landing spot on the floor.
Starting your first Puff/Bubble/Biscuit Quilt – Pattern might seem intimidating due to the extra steps involved in stuffing and pleating, but the process is actually quite systematic and rewarding once you break it down. By choosing the right fabrics, understanding the pleating technique, and mastering the stuffing process, you can transform simple scraps of cotton into a luxurious, dimensional masterpiece. In this guide, we will explore the essential elements of this technique to ensure your finished project looks professional, stays durable, and maintains its iconic “bubbly” appearance for years to come.
The foundation of any successful Puff/Bubble/Biscuit Quilt – Pattern starts with selecting the right materials, specifically high-quality 100% cotton fabric for the top and a sturdy muslin or scrap fabric for the internal base. Because each square is stuffed, the fabric needs to be breathable yet tight enough to prevent the poly-fill from leaking through the fibers over time.
When planning your pattern, the most important rule to remember is the size differential between your top square and your base square. In a classic bubble quilt, the top fabric square is typically one inch larger than the bottom square (for example, a 5-inch top square paired with a 4-inch base). This extra “slack” in the top fabric is what creates the space for the stuffing.
The stuffing itself is a vital component of the Puff/Bubble/Biscuit Quilt – Pattern. Most quilters prefer a high-loft polyester fiberfill because it is lightweight, washable, and retains its shape well after repeated use. You want to avoid overstuffing, which can make the quilt too stiff, or understuffing, which leaves the “biscuits” looking deflated and sad.
Another key element is the pleating technique. To make the larger top square fit onto the smaller base square, you must create small folds or pleats on each side. This is what gives the biscuit quilt its characteristic rounded, tufted look. Consistent pleating ensures that all your puffs are uniform in shape and size across the entire surface.
Don’t forget the backing and binding. Since a Puff/Bubble/Biscuit Quilt – Pattern is naturally heavy and thick, you usually don’t need a middle layer of traditional batting. Instead, you can sew a soft flannel or minky fabric directly to the back of your assembled puff grid, finishing the edges with a wide binding to accommodate the quilt’s significant loft.
Lastly, color coordination plays a huge role in the visual impact of your puff quilt. Many creators use a “gradient” or “ombre” layout, while others prefer a “scrappy” look using leftover fabric from other projects. Because the squares are so defined, the pattern acts as a grid, making it easy to visualize geometric shapes or rainbows before you even start sewing.
Before you dive into your Puff/Bubble/Biscuit Quilt – Pattern, you need to gather specific tools that make the process manageable. A rotary cutter, a self-healing mat, and a clear quilting ruler are non-negotiable for ensuring your squares are perfectly sized. Even a slight variation in the cut can lead to misaligned rows during the final assembly.
You will also need a large quantity of sewing pins or wonder clips. Because you are working with multiple layers of fabric and pleats, keeping everything in place is the biggest challenge of a bubble quilt. Many experienced quilters recommend using clips because they handle the bulk of the stuffed squares better than thin pins, which can bend.
A sewing machine with a walking foot is highly recommended for a Puff/Bubble/Biscuit Quilt – Pattern. As you begin joining rows of stuffed puffs together, the thickness increases significantly. A walking foot helps feed the top and bottom layers through the machine at the same rate, preventing the fabric from shifting or “bunching” as you sew.
Preparation also involves pre-washing your fabrics. Since you are combining many small pieces of fabric with polyester stuffing, you want to ensure that the cotton doesn’t shrink unevenly the first time the quilt is laundered. This step guarantees that your biscuit quilt maintains its structural integrity and doesn’t warp after its first wash.
Organization is your best friend when executing a Puff/Bubble/Biscuit Quilt – Pattern. I suggest using small bins or labeled piles to separate your top squares from your base squares. If you are following a specific color pattern, laying out your squares on a “design wall” or a clean floor space helps you catch any mistakes in the layout before the sewing becomes permanent.
Finally, consider your thread choice. Use a strong, high-quality polyester or cotton-poly blend thread. Since there is a lot of tension on the seams of a puff quilt due to the internal pressure of the stuffing, you need a thread that won’t snap easily. A slightly longer stitch length can also help the machine move through the thick layers more smoothly.
The actual construction of a Puff/Bubble/Biscuit Quilt – Pattern begins with sewing the top squares to the base squares on three sides. You leave one side open—this is your “pocket” for the stuffing. It is best to sew these in long chains, a method known as chain piecing, to save time and thread as you work through dozens of squares.
Once your pockets are sewn and pleated, it’s time to fill them. A common trick for a biscuit quilt is to use a small handful of fiberfill, roughly the size of a tennis ball for a 4-inch square. Consistency is key here; you want every puff in your Puff/Bubble/Biscuit Quilt – Pattern to have the same density to ensure an even surface.
After stuffing a row of squares, you sew the fourth side shut. Now you have a floppy “string” of stuffed puffs. The next stage of the pattern involves pinning two rows together, right sides facing. This is where the walking foot becomes essential, as you are now sewing through four layers of fabric plus the thickness of the stuffing.
One pro tip for a Puff/Bubble/Biscuit Quilt – Pattern is to “nest” your seams. This means pointing the seam allowance of the top row in one direction and the bottom row in the opposite direction. This reduces the bulk at the intersections, allowing your needle to glide through the “four-corners” area without getting stuck or breaking.
As you join more rows, the puff quilt will start to get heavy. Support the weight of the quilt on a large table to your left so it doesn’t pull on the needle. The weight of a completed Puff/Bubble/Biscuit Quilt – Pattern is one of its best features—it acts like a weighted blanket, providing a sense of comfort and security to the user.
Repeat this process until all your rows are joined. At this point, you will have a complete “top” made of individual stuffed biscuits. The edges might look a bit messy, but don’t worry—the binding process will clean everything up. Double-check each intersection to ensure there are no holes where the stuffing might escape.
Finishing a Puff/Bubble/Biscuit Quilt – Pattern requires a different approach than a standard quilt. Instead of “quilting” through all layers (which is nearly impossible with the stuffing), you simply lay your finished puff top onto your backing fabric. You can “tack” the layers together at the corners of the squares or simply rely on the perimeter binding to hold it all together.
For the binding, many people choose a contrasting color to frame the bubble quilt. Since the edges of the puff quilt are thick, you might want to cut your binding strips slightly wider than usual (around 3 inches). This ensures you have enough fabric to wrap around the “loft” of the outer puffs and secure it neatly on the back.
Caring for your Puff/Bubble/Biscuit Quilt – Pattern is relatively simple, but it does require some caution. Always wash it on a gentle cycle with cold water. Because of the polyester fill, high heat in the dryer can cause the fibers to “clump” or even melt slightly, so a low-heat setting or air-drying is the safest route to keep it fluffy.
If you find that your biscuit quilt has lost some of its “oomph” over time, a quick tumble in the dryer on a “no heat” setting with a few clean tennis balls can help fluff the fiberfill back up. This keeps the Puff/Bubble/Biscuit Quilt – Pattern looking as good as the day you finished the last stitch.
The Puff/Bubble/Biscuit Quilt – Pattern is also an excellent candidate for customization. You can add embroidery to individual squares before stuffing them, or use different textures of fabric like satin or velvet to create a sensory experience. These quilts are especially popular as gifts for new parents because they are so unique and handmade with love.
In conclusion, while a Puff/Bubble/Biscuit Quilt – Pattern takes more time and materials than a flat quilt, the result is a stunning, tactile work of art. It’s a project that rewards patience and precision, leaving you with a cozy, cloud-like blanket that will be cherished for generations. Whether you call it a puff, bubble, or biscuit, it is a classic design that never goes out of style.
1. How much more fabric do I need for a puff quilt compared to a regular quilt?
Generally, you will need about 25% to 30% more fabric for the top layer of a Puff/Bubble/Biscuit Quilt – Pattern because each square is cut larger than its finished size to account for the volume of the stuffing.
2. Can I use scrap fabric for the base squares?
Absolutely! Since the base squares are hidden inside the quilt once the backing is attached, many quilters use old sheets, muslin, or fabric scraps to save money. Just make sure the fabric is durable.
3. Is a puff quilt too heavy for a baby?
While they are popular as nursery decor, a bubble quilt can be quite heavy. They are excellent for supervised tummy time on the floor, but always follow safe sleep guidelines and avoid leaving heavy quilts in a crib with an unattended infant.
4. How do I prevent the stuffing from shifting?
In a Puff/Bubble/Biscuit Quilt – Pattern, the stuffing is trapped within each individual “biscuit” or square. Because each square is sewn shut on all four sides, the fiberfill cannot move to other parts of the quilt, ensuring an even distribution forever.
5. Do I need to use batting in a puff quilt?
Usually, no. The fiberfill inside the puffs provides plenty of warmth and thickness. Adding an extra layer of batting would make the quilt extremely heavy and difficult to sew through during the final assembly.
6. What is the best size for the squares?
Most patterns recommend a 5-inch top square and a 4-inch base square. This 1-inch difference provides the perfect amount of “puff.” However, you can experiment with larger squares for a bolder, chunkier biscuit quilt look.
Creating a Puff/Bubble/Biscuit Quilt – Pattern is a journey into the world of dimensional sewing that results in one of the most comfortable items you can own.
We have covered the importance of fabric selection, the mechanics of pleating and stuffing, and the best ways to assemble and finish your project for a professional look. By following these steps, you can confidently tackle this pattern and create a beautiful, “bubbly” masterpiece that stands the test of time.


