
American-style placemat with a fruit theme - Pattern

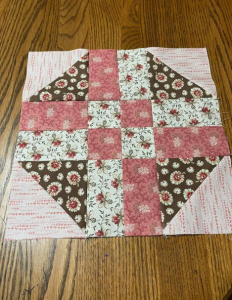
A Pumpkin Quilt Block – Pattern is the quintessential project for anyone looking to embrace the warmth and charm of autumnal decor through the art of quilting. Whether you are a seasoned quilter or a beginner picking up your rotary cutter for the first time, creating a quilt block featuring a pumpkin is a rewarding way to celebrate the harvest season. This pattern offers a versatile foundation for everything from festive table runners and cozy throw pillows to full-sized fall quilts that bring a touch of handmade magic into your home.
The beauty of a Pumpkin Quilt Block – Pattern lies in its simplicity and the endless opportunities for customization through fabric selection. By choosing various shades of orange, deep rust, and even modern teals or creams, you can transform a standard quilt design into a sophisticated piece of textile art. Many quilters find that working on a seasonal pattern like this helps them practice essential skills such as stitch-and-flip techniques, precise seam allowances, and effective color blocking, all while producing a visually stunning result.
In this comprehensive guide, we will explore the intricacies of the Pumpkin Quilt Block – Pattern, providing you with the insights needed to master this design. From selecting the perfect quilting fabrics to understanding the geometric construction of the block, we aim to provide a high-quality resource that adheres to the best SEO practices. By the end of this article, you will feel confident in your ability to execute this quilt pattern and perhaps even put your own unique spin on this timeless autumn symbol.
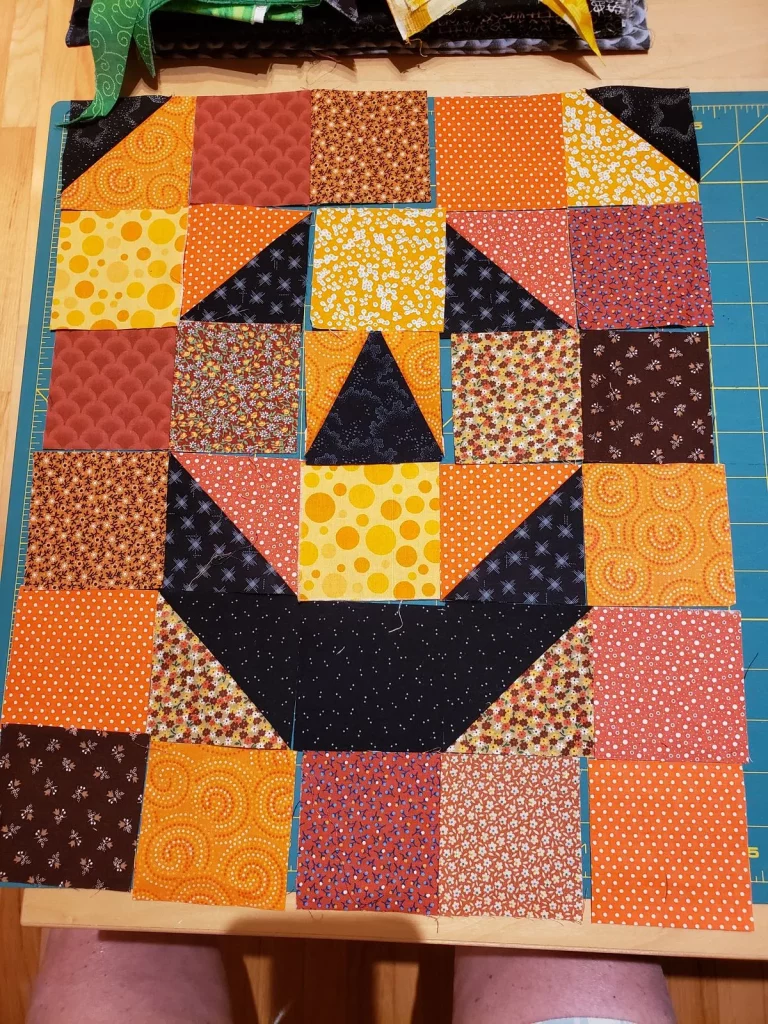
The Pumpkin Quilt Block – Pattern is primarily constructed using a technique known as “snowballing” the corners, which creates the rounded appearance of a pumpkin without requiring difficult curved piecing. This quilt block typically consists of a large central rectangle or square for the body, smaller squares for the “flip” corners, and a separate section for the stem and leaf.
When you begin working with this pattern, the most important factor is the accuracy of your 1/4-inch seam allowance. Because the design relies on geometric symmetry, even a slight deviation can result in a pumpkin that looks lopsided. Using a scant quarter-inch seam is often recommended by experts to account for the fold of the fabric when pressing.
The Pumpkin Quilt Block – Pattern is highly scalable, meaning you can easily adjust the dimensions to create different sizes of pumpkins. A standard 12-inch finished block is popular for quilts, while smaller 6-inch blocks are perfect for borders or smaller decorative items. Mastering the math behind scaling a quilt pattern allows for much more creative freedom.
Fabric choice is where your Pumpkin Quilt Block – Pattern truly comes to life. While traditionalists might reach for mottled oranges and browns, modern quilters often use low-volume fabrics for the background to make the pumpkin “pop.” Choosing a contrasting thread can also add a subtle decorative element to the final piece.
The stem of the Pumpkin Quilt Block – Pattern is usually a small rectangle of brown or green fabric. Depending on the complexity of the quilt design, the stem might be centered or slightly offset to give the pumpkin a more organic, whimsical look. Some advanced patterns even include a small green triangle to represent a leaf.
Lastly, pressing is a vital step in the quilting process. For a flat and professional-looking quilt block, always press your seams toward the darker fabric or open them up to reduce bulk. This attention to detail ensures that when you join multiple Pumpkin Quilt Block – Patterns together, the corners align perfectly for a high-quality finish.
To successfully complete a Pumpkin Quilt Block – Pattern, you need high-quality quilting tools that ensure precision and ease of assembly. A sharp rotary cutter and a self-healing cutting mat are non-negotiable for achieving clean edges on your fabric pieces. Accurate cutting is the foundation of any successful quilt project.
You will also need a reliable acrylic ruler with clear markings. Since the Pumpkin Quilt Block – Pattern involves cutting several small squares for the corners, a square ruler can help you trim your units to the exact size required. Consistency in your cuts leads to a much smoother sewing experience.
Choosing the right quilting fabric is perhaps the most enjoyable part of the process. For a classic look, look for 100% cotton fabrics in shades of tangerine, pumpkin, and terracotta. Using high-quality cotton ensures that your Pumpkin Quilt Block – Pattern will wash well and last for generations as a family heirloom.
Don’t forget the importance of quilting pins or fabric clips to hold your pieces in place. While the Pumpkin Quilt Block – Pattern is relatively straightforward, pinning the “flip” corners ensures that the fabric doesn’t shift while you are sewing across the diagonal. This simple step prevents the pumpkin from losing its intended shape.
An iron and an ironing board are just as important as your sewing machine when working on a quilt pattern. Frequent pressing sets the stitches and keeps the fabric crisp. Many quilters use fabric starch to give the pieces more stability, making it easier to handle the small components of the Pumpkin Quilt Block – Pattern.
Finally, ensure your sewing machine is fitted with a fresh universal or quilting needle. Using a neutral-colored thread, such as grey or tan, allows the stitching to blend into the seams of your Pumpkin Quilt Block – Pattern, keeping the focus on the beautiful fabric and the festive design itself.
The first step in assembling your Pumpkin Quilt Block – Pattern is to prepare the main body pieces. Typically, you will have one large rectangle for the pumpkin and four smaller squares for the corners. Mark a diagonal line on the back of each small square to serve as your sewing guide for the flip-and-stitch method.
Next, place a small square on each corner of the large pumpkin rectangle, right sides together. Sew directly on the marked diagonal line. This technique is a staple in quilt making because it creates angled corners without the need for complex templates. Once sewn, trim the excess fabric about 1/4 inch from the seam.
After trimming, flip the corners open and press them flat. Your rectangular piece should now have the rounded corners characteristic of a Pumpkin Quilt Block – Pattern. Repeat this process for all four corners. It is essential to check that your block still measures the correct size after this step to maintain the integrity of the pattern.
Now it is time to create the stem unit. This usually involves sewing two background rectangles to the sides of a smaller brown rectangle. This horizontal strip will eventually be sewn to the top of your pumpkin body. Precision here is key to ensuring the stem is perfectly centered in your Pumpkin Quilt Block – Pattern.
Once the stem unit is ready, pin it to the top of the pumpkin body, aligning the edges carefully. Sew the two sections together using your standard seam allowance. As you join these sections, you will see the Pumpkin Quilt Block – Pattern fully emerge, transforming from separate scraps into a recognizable autumn icon.
The final step in the assembly is a thorough “best press.” Lay your completed Pumpkin Quilt Block – Pattern on the ironing board and press it from the front and back. Trimming away any stray threads at this stage will give your quilt block a clean, professional look, ready to be incorporated into your larger quilting project.
Once you have mastered the Pumpkin Quilt Block – Pattern, the possibilities for its use are limited only by your imagination. A single block can be finished with a simple border and backing to create a charming quilted potholder or a festive mug rug. These make wonderful handmade gifts for friends and family during the holidays.
If you have created multiple blocks, you can arrange them in rows to form a seasonal table runner. By alternating the Pumpkin Quilt Block – Pattern with plain “checkerboard” squares or leaf-themed blocks, you can create a dynamic and visually interesting piece of decor for your dining room table.
For those who want a larger project, the Pumpkin Quilt Block – Pattern serves as the perfect building block for a full-sized fall quilt. You can use a variety of orange fabrics to create a “pumpkin patch” effect, giving the quilt a scrappy, rustic feel that captures the essence of the autumn harvest.
You might also consider using the Pumpkin Quilt Block – Pattern to make a decorative throw pillow. By adding a wide border around a single large block, you can quickly create a cozy accent piece for your sofa. This is a great way to update your home decor for the season without committing to a massive quilting project.
Wall hangings are another fantastic way to showcase your Pumpkin Quilt Block – Pattern. A small quilt featuring three or four pumpkins can be hung in an entryway or over a fireplace to welcome guests. Adding quilt batting and decorative top-stitching will give the piece texture and depth, making the pumpkins stand out.
Finally, don’t be afraid to experiment with the Pumpkin Quilt Block – Pattern by changing the colors. A “teal pumpkin” is a symbol of food allergy awareness during Halloween, and making one in blue or green shades can be a meaningful variation. No matter how you use it, this quilt pattern is a celebration of creativity and the changing seasons.
What is the best fabric for a Pumpkin Quilt Block – Pattern?
The best fabric is 100% cotton quilter’s weight fabric. It is easy to handle, doesn’t slip during sewing, and holds its shape well. For the pumpkin itself, look for various shades of orange, while “low-volume” white or cream fabrics work best for the background to provide contrast.
Can a beginner sew a Pumpkin Quilt Block – Pattern?
Absolutely! This pattern is considered beginner-friendly because it uses straight lines and the stitch-and-flip technique. It is a great way for new quilters to practice their seam accuracy and learn how to construct a recognizable shape from simple geometric pieces.
How do I make my Pumpkin Quilt Block – Pattern a different size?
To scale the pattern, you must adjust the dimensions of the central rectangle and the corner squares proportionally. Many quilt designers provide charts for different sizes, such as 6-inch, 12-inch, or 18-inch blocks. Just remember to always include the 1/4-inch seam allowance in your calculations.
Do I need a special foot for my sewing machine to quilt this?
While not strictly necessary, using a 1/4-inch quilting foot can be extremely helpful. It provides a guide that helps you maintain a consistent seam width, which is crucial for ensuring all the pieces of your Pumpkin Quilt Block – Pattern fit together perfectly.
What is the “stitch-and-flip” method mentioned in the pattern?
This is a technique where you place a square on the corner of a larger piece of fabric, sew diagonally from corner to corner, and then flip the small square over to cover the corner. It is a common way to create angles in quilt blocks like the Pumpkin Quilt Block – Pattern without cutting triangles.
How should I quilt the finished pumpkin?
You can use free-motion quilting to add “ribs” to the pumpkin for a realistic look, or use simple straight-line quilting to keep it modern. Some quilters like to quilt “in the ditch” (along the seams) to make the pumpkin shape stand out from the background of the quilt block.
In conclusion, the Pumpkin Quilt Block – Pattern is a versatile and joyful project that perfectly captures the spirit of the autumn season. Throughout this article, we have covered the essential components of the design, the tools required to bring it to life, and the step-by-step process of construction.
We also explored various creative applications, from small home accents to full-sized quilts. By focusing on precision, fabric selection, and proper technique, you can create a beautiful piece of textile art that will be cherished for years to come.


