
American-style placemat with a fruit theme - Pattern

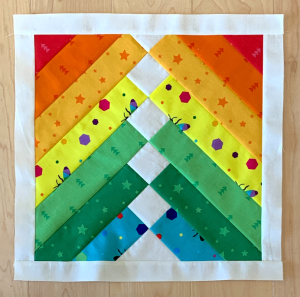
The Puzzle Box Quilt – Pattern is a fascinating and visually captivating project that offers quilters a unique opportunity to play with geometry, color, and optical illusion. At its core, the Puzzle Box Quilt – Pattern is designed to look like a series of interlocking containers or intertwined blocks, creating a sense of depth that makes the fabric appear to move across the surface. This style of quilting has gained immense popularity among those who enjoy “fidget” designs and brain teasers, as the Puzzle Box Quilt – Pattern challenges the viewer to figure out where one block ends and the next begins, making it a true conversation piece in any home.
Whether you are a seasoned quilter looking for a fresh challenge or a confident beginner ready to tackle more complex piecing, the Puzzle Box Quilt – Pattern provides a structured yet flexible framework for your creativity. The beauty of the Puzzle Box Quilt – Pattern lies in its ability to look incredibly intricate while being constructed from basic shapes like squares, rectangles, and triangles. By following a well-organized Puzzle Box Quilt – Pattern, you can master the art of “value” placement, which is the secret to making the 3D effect of the boxes really pop and stand out from the background.
In this comprehensive guide, we will explore the essential steps to successfully completing a Puzzle Box Quilt – Pattern, from the initial fabric selection to the final quilting stitches. Choosing a Puzzle Box Quilt – Pattern is more than just picking a design; it is about embracing a puzzle-solving mindset where every seam counts and every color choice affects the overall illusion. As we delve into the technical aspects of the Puzzle Box Quilt – Pattern, you will discover how to manage your fabric scraps or choose a cohesive collection of fat quarters to bring this architectural marvel to life on your sewing machine.
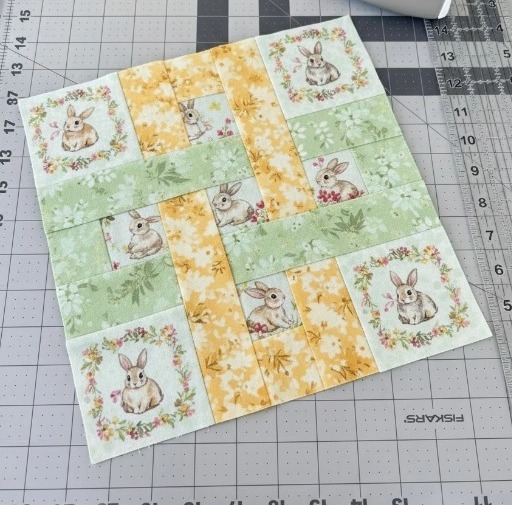
The most critical factor in achieving the stunning visual depth of the Puzzle Box Quilt – Pattern is the careful selection of fabric based on color value. In a Puzzle Box Quilt – Pattern, “value” refers to how light or dark a color is compared to its neighbors, which is what creates the shadow and highlight effects on the “box” edges. Without a strong contrast between your light, medium, and dark fabrics, the Puzzle Box Quilt – Pattern might end up looking flat and losing its magical three-dimensional quality.
When you begin your Puzzle Box Quilt – Pattern, it is often helpful to take a black-and-white photo of your fabric choices to see their true values without the distraction of the hues. A successful Puzzle Box Quilt – Pattern typically requires a very dark “shadow” fabric, a medium “side” fabric, and a light “top” fabric for each box element. This consistent use of value across the Puzzle Box Quilt – Pattern ensures that the “light source” appears to be coming from a single direction, which is vital for the optical illusion.
Texture also plays a significant role in a Puzzle Box Quilt – Pattern, as subtle prints or “reads-like-solid” fabrics can add interest without cluttering the geometric lines. For a modern Puzzle Box Quilt – Pattern, many quilters choose a neutral background like charcoal or soft white to make the colored “boxes” feel like they are floating in space. If you are using a scrappy approach for your Puzzle Box Quilt – Pattern, ensure that each individual box still maintains that light-medium-dark relationship.
Don’t be afraid to use bold, vibrant colors in your Puzzle Box Quilt – Pattern, but remember that the “puzzle” aspect works best when there is a logical flow to the colors. You might organize your Puzzle Box Quilt – Pattern in a rainbow gradient or choose a monochromatic palette with various shades of a single color for a more sophisticated, architectural look. The choice of fabric in the Puzzle Box Quilt – Pattern is your first step in defining the mood and complexity of the finished quilt.
Quality of materials is just as important as color when working on a Puzzle Box Quilt – Pattern, so opting for 100% quilting cotton is recommended to minimize stretching. Since the Puzzle Box Quilt – Pattern involves many intersecting seams, using a high-quality thread will prevent bulk and help the blocks lie flat. Before you cut a single piece of your Puzzle Box Quilt – Pattern, make sure you have enough of each value category to complete the entire design without running out of your “shadow” fabric mid-way.
Finally, consider the scale of the prints you select for the Puzzle Box Quilt – Pattern; large-scale motifs can sometimes break the illusion of the small box segments. Small-scale prints or solids are generally the safest bet for a Puzzle Box Quilt – Pattern, as they keep the focus on the construction and the geometry of the blocks. By taking the time to curate your palette, you set the foundation for a Puzzle Box Quilt – Pattern that will leave everyone wondering how you achieved such amazing depth.
Precision is the heartbeat of a successful Puzzle Box Quilt – Pattern, as the interlocking nature of the design leaves very little room for error in measurement. When you start cutting the pieces for your Puzzle Box Quilt – Pattern, using a sharp rotary cutter and a non-slip quilting ruler is absolutely essential to ensure perfectly straight edges. Each piece of the Puzzle Box Quilt – Pattern must be cut exactly to size to ensure that the “corners” of the boxes meet perfectly at the intersections.
Organization is your best friend when managing the numerous small pieces required for a Puzzle Box Quilt – Pattern. Many quilters use labeled trays or small sandwich bags to keep the components of their Puzzle Box Quilt – Pattern sorted by block type or color value. This prevents the “light” and “medium” pieces of the Puzzle Box Quilt – Pattern from getting mixed up, which could easily ruin the 3D effect if you accidentally swap them during the sewing process.
The Puzzle Box Quilt – Pattern often involves “sub-cutting” or chain-piecing, techniques that can save you a significant amount of time once you have your piles organized. When working on a Puzzle Box Quilt – Pattern, it is wise to cut a few “test” pieces and sew a single block first to check that your seam allowance is accurate. If your test block for the Puzzle Box Quilt – Pattern measures even a tiny bit off, it is much easier to adjust your cutting early on than after you’ve cut the entire quilt.
Maintaining a consistent 1/4-inch seam allowance throughout the Puzzle Box Quilt – Pattern is what separates a good quilt from a professional-looking masterpiece. Because the Puzzle Box Quilt – Pattern relies on the alignment of diagonal lines to create the box shapes, even a slight deviation can make the boxes look warped or disconnected. Many quilters find that using a specialized 1/4-inch sewing machine foot is a lifesaver when piecing a Puzzle Box Quilt – Pattern.
As you move through the cutting phase of the Puzzle Box Quilt – Pattern, pay attention to the grain of the fabric to avoid unnecessary stretching during assembly. Pieces cut on the bias in a Puzzle Box Quilt – Pattern can be particularly fussy, so handle them with care and avoid pulling the fabric as it goes through the machine. Following the grain-line instructions in your Puzzle Box Quilt – Pattern will help the final quilt top stay square and prevent it from “waving” once it’s finished.
Lastly, double-check your counts before you finish the cutting stage of the Puzzle Box Quilt – Pattern to ensure you have all the background pieces ready as well. The background in a Puzzle Box Quilt – Pattern often acts as the “negative space” that allows the boxes to shine, so treating those pieces with the same precision is vital. Once your pieces are cut and sorted, you are ready to enter the most satisfying part of the Puzzle Box Quilt – Pattern: the actual assembly of the blocks.
Assembling the blocks in a Puzzle Box Quilt – Pattern is like putting together a jigsaw puzzle where every piece has its specific place. Most Puzzle Box Quilt – Pattern designs utilize “strip piecing” or “half-square triangles” to create the angled looks that form the box corners. By following the step-by-step assembly order in the Puzzle Box Quilt – Pattern, you will see the individual units transform into recognizable three-dimensional objects right before your eyes.
Pressing your seams is a non-negotiable step in the Puzzle Box Quilt – Pattern if you want your quilt top to look crisp and lie flat. For a Puzzle Box Quilt – Pattern, many designers recommend “pressing seams open” to reduce bulk at the points where multiple corners meet. This technique in the Puzzle Box Quilt – Pattern ensures that your quilting needle won’t have to fight through thick layers of fabric later, and it keeps the points of your boxes sharp.
Pinning at the intersections is another pro-tip for managing a Puzzle Box Quilt – Pattern, as it keeps the points from shifting as you sew. When two “boxes” in the Puzzle Box Quilt – Pattern meet, you want those seams to nest or align perfectly to maintain the illusion of interlocking pieces. While it might take a little longer to pin every junction in your Puzzle Box Quilt – Pattern, the professional results are well worth the extra effort.
The Puzzle Box Quilt – Pattern may also include “fussy cutting” if you want a specific motif from your fabric to appear in the center of a box. This adds a layer of “Easter eggs” for the viewer to find within your Puzzle Box Quilt – Pattern, making the project even more engaging. However, always ensure that fussy-cut pieces in the Puzzle Box Quilt – Pattern still adhere to the necessary seam allowances so you don’t lose your favorite part of the print in the seam.
As you finish each block of the Puzzle Box Quilt – Pattern, it is a good idea to “square up” the blocks using a square ruler. This means trimming any stray threads or slightly uneven edges so that every block in your Puzzle Box Quilt – Pattern is the exact same size. Squaring up ensures that when you go to sew the rows together, the blocks of the Puzzle Box Quilt – Pattern will line up effortlessly, saving you from having to “ease” or stretch the fabric.
Working on the Puzzle Box Quilt – Pattern in sections can make the project feel more manageable and less overwhelming. You might decide to finish all the “light” sections of the Puzzle Box Quilt – Pattern first, or work color by color to see the progress. Seeing a row of finished blocks from your Puzzle Box Quilt – Pattern laid out on a design wall is an incredibly motivating experience that will push you toward the finish line.
The quilting stage of the Puzzle Box Quilt – Pattern is your opportunity to enhance the 3D effect by adding physical texture to the visual lines. Many quilters choose “straight-line quilting” for their Puzzle Box Quilt – Pattern, following the angles of the boxes to reinforce the architectural feel of the design. By quilting inside the “shadow” areas of the Puzzle Box Quilt – Pattern more densely, you can actually make the highlighted sections look like they are popping forward even more.
If you prefer a more organic contrast, “free-motion quilting” with a soft swirl or feather design can look beautiful against the rigid geometry of the Puzzle Box Quilt – Pattern. This “soft vs. hard” aesthetic makes the Puzzle Box Quilt – Pattern look more like a traditional piece of art while keeping the modern edge of the patchwork. Whichever quilting style you choose for your Puzzle Box Quilt – Pattern, make sure it complements the “puzzle” rather than distracting from it.
The choice of batting in your Puzzle Box Quilt – Pattern also affects how the 3D effect is perceived; a high-loft batting can create more “puff” in the box centers. For a flatter, more modern look for your Puzzle Box Quilt – Pattern, a thin cotton or bamboo batting is often the preferred choice. The weight and drape of the finished Puzzle Box Quilt – Pattern will depend largely on this hidden layer, so choose one that fits how you intend to use the quilt.
Binding your Puzzle Box Quilt – Pattern is the final architectural detail that frames your hard work. A solid, dark binding can act like a frame for your Puzzle Box Quilt – Pattern, while a striped “candy cane” binding can add a sense of movement that mirrors the interlocking boxes. Ensure your binding is sewn on securely, as a Puzzle Box Quilt – Pattern is likely to be handled and admired frequently by friends and family.
Don’t forget to add a label to the back of your Puzzle Box Quilt – Pattern, documenting the date, your name, and the inspiration behind the colors. A Puzzle Box Quilt – Pattern is a significant achievement, and future generations will appreciate knowing the story behind the “puzzle.” Your label can even include a small leftover block from the Puzzle Box Quilt – Pattern to tie the front and back of the project together.
Finally, once the Puzzle Box Quilt – Pattern is bound and labeled, give it a gentle wash if you like the “crinkly” traditional quilt look, or a final press if you prefer it crisp. Your Puzzle Box Quilt – Pattern is now ready to be displayed on a wall, draped over a chair, or used as a cozy lap quilt. The journey from a flat piece of fabric to a stunning Puzzle Box Quilt – Pattern is complete, leaving you with a masterpiece of geometry and color.
Is the Puzzle Box Quilt – Pattern suitable for beginners?
While the Puzzle Box Quilt – Pattern looks complex, it is manageable for an adventurous beginner who has a basic understanding of seam allowance and cutting. If you can sew a straight line and follow a map, you can successfully complete this pattern.
How much fabric does a standard Puzzle Box Quilt – Pattern require?
For a throw-sized Puzzle Box Quilt – Pattern (approx. 60″ x 60″), you will typically need about 4 to 6 yards of assorted fabrics, depending on whether you want a scrappy look or a more uniform design. Always check the specific requirements on your Puzzle Box Quilt – Pattern before shopping.
Can I make the Puzzle Box Quilt – Pattern using only two colors?
You can, but the 3D “box” effect will be much harder to achieve. The Puzzle Box Quilt – Pattern thrives on having at least three values (light, medium, and dark) to create the illusion of shadows and highlights.
What is the best way to ensure my points match in this pattern?
The best way to ensure points match in a Puzzle Box Quilt – Pattern is to pin carefully at every intersection and use a “scant” 1/4-inch seam. Pressing your seams open also helps significantly by reducing the bulk that causes the fabric to shift.
Can the Puzzle Box Quilt – Pattern be made with pre-cuts like Jelly Rolls?
Yes, many Puzzle Box Quilt – Pattern designs are adapted for 2.5-inch strips. This can save a lot of cutting time and ensures your “boxes” have a consistent width throughout the project.
The Puzzle Box Quilt – Pattern is a remarkable project that blends mathematical precision with artistic flair. In this article, we’ve explored the vital importance of color value in creating the 3D illusion, the necessity of organized and precise cutting, and the techniques for assembling blocks that align perfectly.
We also discussed how the right quilting choices can further enhance the depth and texture of your Puzzle Box Quilt – Pattern. Completing this quilt is a rewarding process that not only results in a beautiful household item but also sharpens your skills as a quilter. Whether you use a vibrant rainbow of colors or a sleek monochromatic palette, your Puzzle Box Quilt – Pattern will surely be a standout piece that showcases your dedication to the craft.


