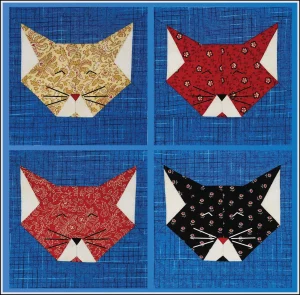
Cheshire cats Quilt- Pattern

The Quilt Cat in the Attic – Pattern is a timeless favorite among quilting enthusiasts who want to blend a touch of mystery with undeniable charm. This design captures the whimsical essence of a feline friend peering out from a cozy nook, making it a perfect project for those who love storytelling through their needlework. Whether you are an experienced quilter or a curious beginner, this specific motif offers a delightful way to play with shadows and light, creating a three-dimensional effect that brings the cat to life on your fabric.
Choosing the Quilt Cat in the Attic – Pattern means you are diving into a project that prioritizes contrast and geometric precision. The “attic window” technique used in this style relies on clever fabric selection to simulate depth, making the viewer feel as though they are looking into a dimly lit room where a cat is peacefully resting. It is more than just a blanket; it is a piece of textile art that evokes feelings of home, comfort, and the quiet companionship of a pet.
As you prepare to start your Quilt Cat in the Attic – Pattern, it is essential to focus on the quality of your materials and the accuracy of your cuts. Because this design often features intricate angles to achieve the “window” look, staying organized is your best strategy for success. In the following sections, we will break down the essential components of this pattern, explore the best fabric choices, and provide tips to ensure your finished quilt looks professional, cozy, and absolutely enchanting.
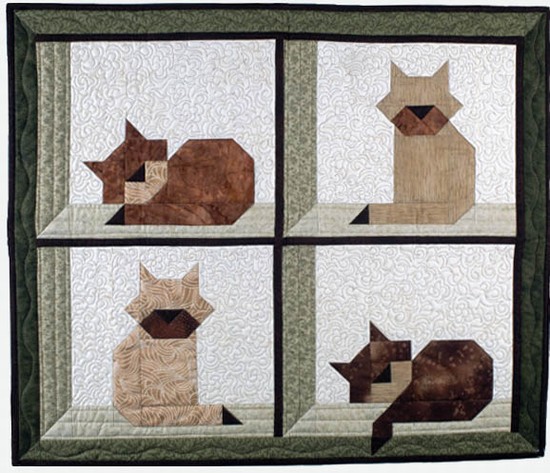
The Quilt Cat in the Attic – Pattern is primarily based on the “Attic Window” block, a classic quilting technique that uses mitered seams to create a 3D frame. By placing a cat silhouette or a printed cat fabric in the center of these windows, the quilter creates a narrative scene. This pattern is highly sought after because it allows for immense creativity in the “view” you choose to display.
To master this pattern, you must first understand the importance of the three-piece block construction. You have the focal point (the cat), the windowsill (the bottom strip), and the side frame (the vertical strip). By using a lighter fabric for the sill and a darker fabric for the side, you simulate sunlight hitting a window frame, which gives the Quilt Cat in the Attic – Pattern its signature depth.
Precision is the most important keyword when dealing with this Quilt Cat in the Attic – Pattern. Since the window frames require 45-degree angles to look realistic, taking your time with a rotary cutter and a reliable ruler is non-negotiable. If your seams don’t align perfectly, the “illusion” of the attic window might look slightly skewed, losing that magical architectural effect.
Many modern versions of the Quilt Cat in the Attic – Pattern utilize fusible applique for the cat figure itself. This allows you to place the cat in various poses—stretching, sleeping, or staring—without having to piece together tiny, complex fabric shards. Applique adds a soft, organic texture to the otherwise sharp, geometric lines of the window blocks.
When searching for the perfect Quilt Cat in the Attic – Pattern, look for instructions that provide clear diagrams for the mitered corners. While it might seem intimidating at first, the process is quite logical once you see how the “Y-seam” or the simplified fold-back method works. A well-written pattern will guide you through this step-by-step to ensure a flat, crisp finish.
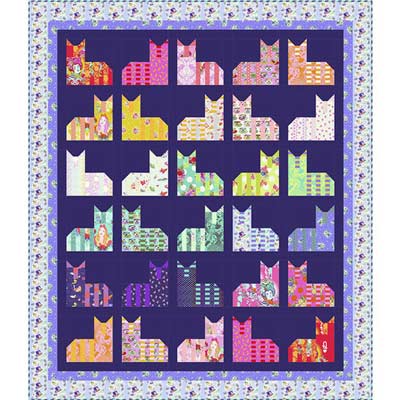
Finally, remember that the Quilt Cat in the Attic – Pattern is highly adaptable in terms of size. You can create a small wall hanging featuring just one large cat in a window, or a full-sized bedspread with a dozen different “rooms” each housing a unique feline. This scalability makes it a versatile choice for gifts, especially for the cat lovers in your life who appreciate handmade decor.
The soul of the Quilt Cat in the Attic – Pattern lies in your color palette and fabric texture. To make the “attic” feel authentic, many quilters opt for vintage-style prints, dusty florals, or “shabby chic” aesthetics. These fabrics suggest an old, cozy house filled with memories, which complements the theme of a cat hiding away in a quiet corner of the home.
For the cat itself, consider using black solid fabrics or dark batiks to create a striking silhouette. If you want a more realistic look, choose a fabric with a “fur” texture print or a subtle mottled gray. The goal is to make the cat stand out against the background of the “room” inside the window of your Quilt Cat in the Attic – Pattern.
The “background” fabric—the part that represents the inside of the attic—should ideally be a contrasting color to the cat. If your cat is dark, use a medium-toned wallpaper print or a soft cream. This contrast ensures that the Quilt Cat in the Attic – Pattern remains the focal point and doesn’t get lost in a muddy sea of similar colors and values.
One of the most critical elements in this pattern is the choice of “frame” fabrics. To achieve the 3D effect, you need a “highlight” fabric and a “shadow” fabric. Usually, a light tan or soft yellow represents the sunlit ledge, while a deep brown or charcoal represents the shaded side of the window. This simple trick is what makes the Quilt Cat in the Attic – Pattern look like a real architectural feature.
Don’t forget the quilt backing and binding! Since the front of the Quilt Cat in the Attic – Pattern is quite detailed, a simple, coordinating solid or a small paw-print motif for the back works beautifully. For the binding, a dark color often acts like a final frame for the entire “house,” neatly tying all the individual attic windows together into a cohesive piece.
High-quality 100% cotton fabric is always recommended for this project. Because the Quilt Cat in the Attic – Pattern involves several layers and sometimes dense applique, using cotton ensures the quilt remains breathable, easy to wash, and durable over time. Avoid stretchy fabrics, as they will make the precise window corners very difficult to manage during the sewing process.
The assembly of the Quilt Cat in the Attic – Pattern begins with the central squares. You will cut your focal fabric (the cat) into uniform squares, usually 6 or 8 inches. If you are using a large-scale print where cats are already depicted, use a fussy cutting technique to center the cat perfectly within each square before moving on to the framing stage.
Next, you will prepare your side and bottom strips. For a standard Quilt Cat in the Attic – Pattern, these strips are usually 2 to 3 inches wide. You will sew the “ledge” (light fabric) to the bottom of your square and the “jamb” (dark fabric) to the side. The magic happens when you join these two strips at a 45-degree angle at the corner.
If you are a beginner, look for a Quilt Cat in the Attic – Pattern that offers a “no-miter” shortcut. This involves using a small square of the shadow fabric at the corner instead of a diagonal seam. While it lacks the sharp “picture frame” look, it is much faster and significantly reduces the frustration for those new to piecing complex blocks.
Once your individual window blocks are complete, it is time to arrange them. You can place them in straight rows for a traditional look, or stagger them to look like the windows of a sprawling mansion. The Quilt Cat in the Attic – Pattern allows for a lot of play here; you can even leave some windows “empty” (just fabric) to represent unoccupied rooms in the attic.
After the top is pieced, it’s time for the quilting process. Many people choose a “stitch in the ditch” method around the windows to emphasize the frames. For the cat areas, you might want to do some free-motion quilting to add whisker details or soft fur textures. This extra step truly elevates the Quilt Cat in the Attic – Pattern from a simple craft to a professional-grade quilt.
Finally, adding a border can help stabilize the edges. A “piano key” border or a simple wide strip of the “attic” fabric works well. Once the top, batting, and back are sandwiched and quilted, finish with a sturdy binding. Your Quilt Cat in the Attic – Pattern is now ready to be labeled, gifted, or displayed proudly on your favorite armchair.
To ensure your Quilt Cat in the Attic – Pattern turns out perfectly, always “press as you go.” This is a golden rule in quilting. Every time you sew a seam, press it flat with an iron (usually toward the darker fabric). This prevents bulk and ensures that the blocks in your pattern lay perfectly flat, which is vital for the 3D window effect to work.
Another tip is to use a walking foot on your sewing machine. The Quilt Cat in the Attic – Pattern can become thick once you add the cat applique and the multiple frame layers. A walking foot helps feed all layers of the fabric through the machine at the same rate, preventing the dreaded “puckering” that can ruin a beautiful quilt top.
Check your seam allowance constantly. Most quilting patterns, including the Quilt Cat in the Attic – Pattern, rely on a precise 1/4 inch seam. Even a tiny deviation can add up over a row of ten windows, resulting in a quilt that is several inches off-size or blocks that simply won’t line up. Use a seam guide if necessary to maintain consistency.
Consider the “lighting” of your quilt. Before sewing, lay your fabrics out and take a black-and-white photo with your phone. This helps you see the value contrast. If the “sunlight” side and the “shadow” side look the same in grayscale, the 3D effect of the Quilt Cat in the Attic – Pattern won’t be as effective. You want a clear distinction between light and dark.
If you are making the Quilt Cat in the Attic – Pattern as a gift for a child, consider using soft flannels. Cats and attics are cozy themes, and a flannel version of this quilt is incredibly snuggly. Just be aware that flannel shreds more easily and may require slightly larger seam allowances or more careful handling than standard quilting cotton.
Lastly, don’t be afraid to personalize. Add a small embroidered name tag for a specific pet, or sew a tiny “mouse” in the corner of one of the windows. The Quilt Cat in the Attic – Pattern is a template for your imagination. The more “hidden” details you add, the more people will want to lean in and examine your hard work, discovering something new with every glance.
Is the Quilt Cat in the Attic – Pattern suitable for beginners?
Yes, it can be! While the mitered corners are a bit intermediate, many versions of the pattern offer simplified methods. If you can sew a straight line and follow a diagram, you can definitely tackle this project.
How much fabric do I need for a lap-sized Quilt Cat in the Attic – Pattern?
Generally, you will need about 3 to 4 yards of a variety of fabrics (including the focal cat fabric, the frames, and the background). It is always a good idea to buy an extra half-yard for mistakes or to use for the binding.
Can I use pre-cut fabric like Fat Quarters for this?
Absolutely! Fat Quarters are perfect for the Quilt Cat in the Attic – Pattern because they provide a variety of prints without requiring you to buy large yardage of each. They are especially great for the different “room” backgrounds inside the windows.
What is the best way to clean a Quilt Cat in the Attic quilt?
If you used high-quality cotton, you can machine wash it on a cold, gentle cycle with a mild detergent. To keep the colors of your Quilt Cat in the Attic – Pattern vibrant, use a “color catcher” sheet in the wash and air dry or tumble dry on low heat.
Do I have to use a cat? Can I put other animals in the attic?
While the Quilt Cat in the Attic – Pattern is designed for felines, the “Attic Window” technique works for anything! You could put birds, dogs, or even flowers in the windows. However, the cat theme is the most traditional and popular version of this specific design.
How long does it take to complete this pattern?
A wall-hanging version can be finished in a weekend. A full-sized bed quilt might take 20 to 40 hours of work, depending on how much intricate quilting or applique you choose to do.
The Quilt Cat in the Attic – Pattern is a wonderful journey into the world of dimensional quilting.
Through this article, we have explored the foundational blocks of the “Attic Window,” the importance of choosing high-contrast fabrics to create a 3D effect, and the step-by-step assembly required to bring your feline friend to life.


