
American-style placemat with a fruit theme - Pattern

The Quilt Half Log Cabin – Pattern is a timeless favorite in the quilting community, offering a modern twist on one of the most iconic and historical designs in textile history. Unlike the traditional full log cabin block that builds around all four sides of a center square, this specific variation focuses on adding “logs” to only two sides, creating a striking L-shaped movement. This unique geometry allows quilters to play with light and shadow in ways that standard blocks simply cannot achieve, making it a go-to choice for both beginners and seasoned artisans looking to create something visually captivating.
Mastering the Quilt Half Log Cabin – Pattern is an essential skill for any quilter because it teaches the fundamental principles of precision cutting and seam allowance while allowing for incredible creative freedom. Whether you are aiming for a classic farmhouse look or a sleek, contemporary aesthetic, this pattern serves as the perfect canvas. By choosing contrasting fabrics—typically dividing the block into a light side and a dark side—you can create secondary patterns like chevrons, diamonds, or zig-zags when the blocks are joined together.
In this comprehensive guide, we will dive deep into everything you need to know about the Quilt Half Log Cabin – Pattern. We will explore the technical aspects of the quilt construction, the importance of fabric selection, and the step-by-step process of assembling your masterpiece. Our goal is to provide you with an SEO-optimized resource that not only inspires your next project but also ensures your technical success. Let’s explore the intricate beauty of this versatile quilting design and discover why it remains a staple in the world of modern sewing.
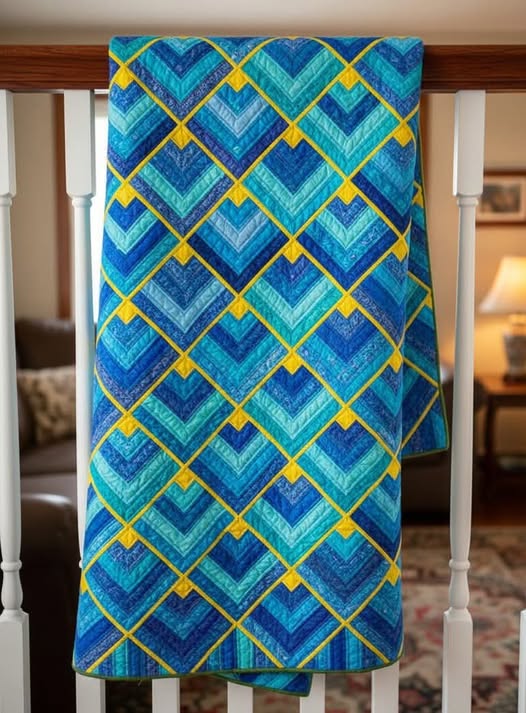
The Quilt Half Log Cabin – Pattern is defined by its asymmetrical growth, which starts with a central square and expands outward by adding strips to only two adjacent sides. This method creates a distinct “L” shape that emphasizes diagonal flow across the quilt top. It is widely considered a faster alternative to the traditional version, making it an excellent beginner-friendly quilt project for those new to the craft.
In terms of geometry, the Quilt Half Log Cabin – Pattern relies heavily on the “log” width and the center square size to determine the final dimensions. Most quilters prefer using 2.5-inch fabric strips, often referred to as Jelly Rolls, to speed up the cutting process and ensure uniformity. The consistency of these strips is vital for maintaining the structural integrity of the block as it grows larger.
One of the most appealing aspects of this pattern is the visual “staircase” effect it produces. Because the strips are only added to two sides, the center square appears to be tucked into a corner rather than sitting in the middle. This shift in perspective is what gives the Quilt Half Log Cabin – Pattern its modern edge and allows for more dynamic layout possibilities during the assembly phase.
To achieve the best results, quilters often use a scant quarter-inch seam when sewing the logs together. This technique accounts for the fold of the fabric and the thread thickness, ensuring that each added strip aligns perfectly with the edge of the previous piece. Precision in this area prevents the block from bowing or becoming distorted, which is crucial for a flat, professional-looking quilt top.
Color theory plays a massive role in the Quilt Half Log Cabin – Pattern. Traditionally, one side of the “L” is kept in light, neutral tones, while the other side features darker, more saturated colors. This high-contrast approach highlights the architectural nature of the quilt design, making the individual “logs” pop and creating a sense of three-dimensional depth within the fabric.
Ultimately, the Quilt Half Log Cabin – Pattern is about balance and repetition. While the individual blocks are simple to construct, the magic happens when you begin rotating them. By flipping and turning the finished blocks, you can create a variety of secondary patterns like “Fields and Furrows” or “Barn Raising,” giving you dozens of different looks from a single, easy-to-sew block design.
Choosing the right materials is the foundation of a successful Quilt Half Log Cabin – Pattern. Since this design relies on repetitive strips, high-quality 100% cotton quilting fabric is highly recommended. Cotton holds its shape well, is easy to press, and offers the durability needed for a functional heirloom. Avoid slippery or overly stretchy fabrics, as they can cause the long strips to warp during the sewing process.
A key component of the Quilt Half Log Cabin – Pattern is the “chimney” or center square. Historically, this square was often red to symbolize the hearth of a home, but in modern interpretations, you can use any color that anchors your design. Selecting a focal point fabric for the center allows you to pull the rest of your color palette from that single piece, creating a cohesive and harmonious look.
For those looking to save time, pre-cut fabric strips are a lifesaver for this specific pattern. Using a “Jelly Roll” or “Design Roll” ensures that all your strips are exactly the same width, which is the most difficult part of the cutting process. If you prefer to cut your own, using a rotary cutter, a self-healing mat, and a non-slip ruler is essential for achieving the straight edges required for this linear design.
Thread selection is another detail that shouldn’t be overlooked when working on a Quilt Half Log Cabin – Pattern. A 50-weight cotton thread in a neutral color like grey, tan, or off-white works best, as it blends into most fabric colors without adding bulk to the seams. Since there are many overlapping seams in a log cabin block, using a fine, strong thread helps keep the block lying as flat as possible.
Interfacing or foundation paper can also be used to improve the accuracy of your Quilt Half Log Cabin – Pattern. Foundation Paper Piecing (FPP) is a popular method for this block because it provides a printed guide to sew directly onto, ensuring every log is perfectly placed. While not strictly necessary, it is a fantastic tool for quilters who struggle with maintaining a consistent seam allowance over long distances.
Lastly, consider the batting and backing to finish your quilt. Since the Half Log Cabin is a geometric and somewhat dense pattern, a low-loft cotton or bamboo batting often looks best, as it emphasizes the stitch-in-the-ditch or decorative quilting lines. Your backing fabric can be a wide-back cotton or a soft flannel, depending on the desired weight and warmth of the final Quilt Half Log Cabin – Pattern project.
The assembly of a Quilt Half Log Cabin – Pattern starts with the center square, which we will call Step 1. You take your center square and align it with your first strip (Log 1). Sew them together along one side, then press the seam toward the darker fabric. This initial pairing is the core of your block, and its squareness will dictate the success of every subsequent layer you add.
Step 2 involves adding the second log to the adjacent side of the center square. In the Quilt Half Log Cabin – Pattern, you only move in one direction—either clockwise or counter-clockwise—adding to the same two sides repeatedly. This is different from the traditional method where you would add four logs per “round.” Ensure your second log covers both the center square and the end of the first log you just attached.
As you move into Step 3, you continue adding logs to the same two sides, gradually increasing the length of the strips. It is helpful to use a chain-piecing technique if you are making multiple blocks at once. This involves sewing the same log onto all your center squares in one continuous string, which saves thread and significantly reduces the time spent at the sewing machine for your Quilt Half Log Cabin – Pattern.
Pressing is a critical phase of the Quilt Half Log Cabin – Pattern construction. To keep the block flat, always press your seams away from the center or toward the newly added log. Avoid “ironing” with a back-and-forth motion, which can stretch the fabric; instead, use a “pressing” motion by lifting the iron and setting it down firmly. This maintains the geometric precision of the strips.
Once you have added the desired number of rounds—usually three to five for a standard block—it is time for trimming and squaring up. Even the most careful quilters may find their blocks are slightly off by the end. Using a large square quilting ruler, trim each block to the exact same size. This step is non-negotiable for a professional result in your Quilt Half Log Cabin – Pattern, as it ensures the blocks will fit together perfectly.
The final stage of assembly is the quilt top layout. Lay your finished blocks out on a flat surface or a design wall. Because the Quilt Half Log Cabin – Pattern is asymmetrical, you can create various designs by rotating the blocks. Take photos of different arrangements before committing to the final sew. Once satisfied, sew the blocks into rows, then sew the rows together to complete your stunning handcrafted quilt top.
To elevate your Quilt Half Log Cabin – Pattern, consider experimenting with “wonky” or “improv” logs. Instead of using perfectly straight strips, you can cut your logs at slight angles. This gives the pattern a modern, artistic feel that breaks away from the rigid lines of traditional quilting. This style is particularly popular in modern quilt guilds and looks fantastic with solid-colored fabrics or bold prints.
Another way to enhance the Quilt Half Log Cabin – Pattern is through the use of color gradients. Instead of just light and dark, try using a spectrum of colors that transition from one hue to another across the block. This “Ombre” effect can make your quilt look like a work of fine art, especially when the blocks are arranged to create a large-scale color bleed across the entire quilt surface.
Pay close attention to the grainline of the fabric when cutting your logs. Fabric has less stretch along the lengthwise grain than the crosswise grain. For the long strips used in the Quilt Half Log Cabin – Pattern, cutting along the lengthwise grain can help prevent the edges of the quilt from becoming wavy. If you must use crosswise grain, handle the strips gently to avoid pulling them out of shape.
The quilting motif you choose to finish the project can drastically change the look of the Quilt Half Log Cabin – Pattern. Straight-line quilting that follows the path of the logs reinforces the geometric nature of the design. Conversely, free-motion quilting with swirls or floral patterns can provide a beautiful contrast to the sharp angles of the log cabin strips, adding a layer of softness to the overall aesthetic.
Don’t be afraid to mix fabric textures within your Quilt Half Log Cabin – Pattern. Adding a few strips of linen, silk, or even upcycled denim can add tactile interest and a unique “scrappy” look. Just be mindful of the laundering requirements for different fibers; if the quilt will be used and washed frequently, it is best to stick to fabrics with similar shrinkage rates to avoid puckering.
Finally, the binding is the frame of your artwork. For a Quilt Half Log Cabin – Pattern, a striped binding cut on the bias can add a playful “barber pole” effect that complements the linear logs. Alternatively, a solid dark binding can provide a strong border that contains the busy energy of the internal patterns. Taking the time to hand-stitch the binding to the back will give your quilt that high-end, gallery-quality finish.
How many strips do I need for a standard Quilt Half Log Cabin – Pattern?
The number of strips depends on the desired size of your block. Usually, a 12-inch block requires about 5 to 7 strips (logs). If you are using a Jelly Roll, one roll is typically enough to make a generous lap-sized quilt top.
Can I make this pattern using scraps?
Absolutely! The Quilt Half Log Cabin – Pattern is one of the best “scrap busters.” You can use various lengths and colors of leftover fabric, as long as you maintain the light/dark contrast to keep the design’s structural integrity visible.
Is this design suitable for hand sewing?
While it is much faster on a machine, the Quilt Half Log Cabin – Pattern is very meditative to sew by hand. Because it uses straight lines, it is a great project for “English Paper Piecing” or traditional hand-running stitches.
What is the best way to press the seams?
In quilting, we generally press seams toward the darker fabric to prevent them from showing through the lighter patches. For this pattern, pressing “away from the center” is the standard rule to keep the block flat and manageable.
Why is it called a “Half” Log Cabin?
It is called “Half” because you only add logs to two sides of the center square (forming an L), whereas the traditional Log Cabin adds logs to all four sides in a square spiral.
What size should the center square be?
A common starting size is 2.5 inches by 2.5 inches, which matches the width of standard pre-cut strips. However, you can make the center larger if you want to feature a specific fabric print or “fussy cut” a design.
In conclusion, the Quilt Half Log Cabin – Pattern is an incredibly versatile and rewarding project that bridges the gap between traditional craftsmanship and modern design. Throughout this article, we have covered the basics of the L-shaped block construction, the importance of high-quality quilting materials, and the step-by-step techniques needed to assemble a beautiful quilt top. By focusing on contrast, precision, and creative layouts, you can transform simple strips of fabric into a complex and stunning piece of textile art.
We hope this guide has provided you with the clarity and inspiration needed to start your own Quilt Half Log Cabin – Pattern journey. Whether you are making a gift for a loved one or a new centerpiece for your home, this pattern is sure to impress.Please leave your sincere opinion and any suggestions in the comments below! We would love to hear about your experience with this pattern or any tips you have for fellow quilters. Your feedback helps us create better content for the quilting community.


