
Horizontal Row Quilt - Pattern

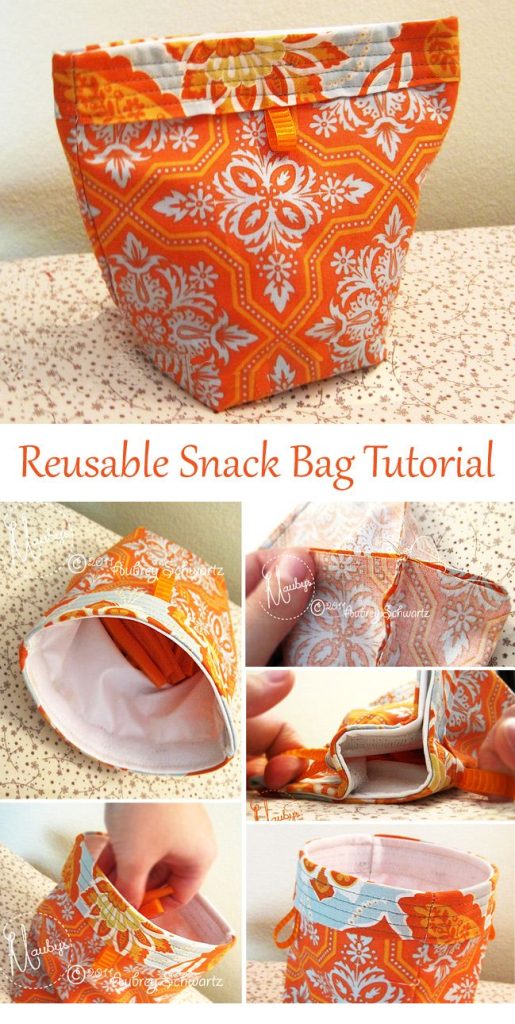
If you’re looking for a practical, eco-friendly way to reduce waste while also adding a personal touch to your everyday items, this Reusable Snack Bag Sewing Tutorial – Pattern is exactly what you need. Sewing your own reusable snack bags is not only fun and easy but also helps you reduce your reliance on single-use plastics. Whether you’re a beginner or a seasoned sewer, this guide will walk you through each step with simplicity and clarity.
In today’s world, where sustainability is more important than ever, creating items like reusable snack bags can make a meaningful impact. Not only are they great for the environment, but they’re also customizable, washable, and perfect for kids’ lunches, travel, or on-the-go snacks. Best of all, with the Reusable Snack Bag Sewing Tutorial – Pattern, you’ll be able to make multiple bags in one sitting.
This tutorial is designed to be beginner-friendly and comes with a straightforward pattern that you can reuse again and again. Let’s dive into the complete guide to crafting your very own reusable snack bags — with love, care, and style!
To get started on your Reusable Snack Bag Sewing Tutorial – Pattern, you’ll need to gather a few basic materials. The great thing is, most of these supplies are either inexpensive or already available at home. This makes the process cost-effective as well as environmentally friendly.
First and foremost, you’ll need two types of fabric — one for the outside and one for the inner lining. The outer fabric can be anything from cotton to canvas. For the inner fabric, it’s best to choose food-safe materials like PUL (polyurethane laminate) or nylon, which are both waterproof and easy to wipe clean.
Next, a good pair of fabric scissors is essential for cutting clean lines. You’ll also need straight pins or clips to hold the fabric together as you sew. Don’t forget a ruler or measuring tape to ensure your cuts are accurate according to the pattern.
You’ll also need a sewing machine — although hand-sewing is possible, a machine will make the process much faster and give cleaner results. Make sure your machine has a universal needle and thread suited for medium-weight fabrics.
A key feature in reusable snack bags is the closure. You can choose from Velcro, zippers, or snaps. Velcro is the easiest to apply, especially for beginners, while zippers provide a more secure seal for moist or oily snacks.
Lastly, don’t forget to download and print your reusable snack bag pattern. This will serve as your guide for cutting and assembling each piece correctly. Many free and paid patterns are available online, or you can create your own using basic dimensions.
Now that you have your materials, let’s jump into the core of the Reusable Snack Bag Sewing Tutorial – Pattern. Follow these easy steps to create your first reusable snack bag from scratch.
Start by cutting out your fabric according to the pattern. You’ll need one outer fabric piece and one lining piece of the same size. Make sure both fabrics are ironed flat to avoid wrinkles or uneven stitching.
Place the two pieces of fabric right sides together and pin them in place. Using a 1/4″ seam allowance, sew around the edges, leaving a 2-inch opening on one side for turning the fabric right side out.
After stitching, trim the corners to reduce bulk and then turn the bag right side out through the opening. Use a blunt tool like a chopstick to push out the corners neatly. Press the seams flat using an iron for a polished finish.
Next, topstitch all the way around the bag, closing the opening in the process. This step not only secures the edges but also gives the bag a more professional look.
To create the closure flap, fold the bottom of the bag up to form a pouch, leaving the top part as a flap. Pin or clip the sides and sew along each edge to secure the pouch shape.
Finally, attach your chosen closure method — Velcro, snaps, or a zipper — to the flap and the body of the bag. Make sure it aligns correctly so your snack bag closes securely. And just like that, you’ve completed your first bag!
One of the best parts of using a Reusable Snack Bag Sewing Tutorial – Pattern is that you can tailor each bag to your specific needs. Customization makes your creations not just functional but also stylish and personal.
You can start by experimenting with fabric prints. Use bold colors or fun patterns for kids, or minimalist designs for adults. Seasonal fabrics can also make these bags perfect for holiday gifts.
Adjusting the size of the pattern is another great customization tip. Make small snack-size bags for nuts or cookies, medium ones for sandwiches, or larger bags for storing full meals or meal-prep ingredients.
Labeling is a unique way to personalize bags, especially for kids or family members. You can sew in name tags or use iron-on labels to prevent mix-ups in lunchboxes or shared kitchens.
Want to go the extra mile? Add an inner pocket to separate dry and wet snacks. This is particularly useful if you’re making larger bags that can carry multiple items at once.
Using double stitching on the seams enhances durability, especially if the bags are frequently washed. Some people even add a layer of insulation for temperature-sensitive snacks, although this step is optional.
Finally, remember that the pattern itself can evolve. Once you get comfortable with the basic design, feel free to experiment with curved flaps, box corners, or even drawstring closures for a different aesthetic and functionality.
After you’ve made your Reusable Snack Bag Sewing Tutorial – Pattern project, it’s important to know how to maintain your snack bags for long-lasting use and food safety. Proper care ensures your bags stay clean, effective, and appealing.
Always wash the fabric before sewing to pre-shrink it and remove any manufacturing chemicals. This makes the finished bag safer for food contact and prevents warping after the first wash.
For day-to-day cleaning, most reusable snack bags can be wiped clean with a damp cloth. This is ideal for dry snacks like crackers or pretzels. For oily or sticky foods, you’ll want to machine wash the bags.
Use mild detergent and cold or warm water, depending on the fabric. Avoid bleach or fabric softeners, as they can break down waterproof linings like PUL or nylon over time.
It’s best to air dry your reusable snack bags by hanging them up or laying them flat. Machine drying can degrade food-safe coatings and reduce the lifespan of closures like Velcro or snaps.
Inspect your bags regularly for signs of wear — especially around seams and closure points. If the lining becomes compromised, it’s best to replace or repair the bag to maintain food safety.
Storing the bags in a clean, dry area when not in use helps prevent mold and mildew. A small basket or drawer in the kitchen works well for easy access and rotation.
Q1: Are reusable snack bags safe for food storage?
Yes, if made with food-safe materials like PUL or BPA-free nylon. Always pre-wash fabrics and avoid harsh detergents to ensure safety.
Q2: Can I wash reusable snack bags in the washing machine?
Absolutely! Most are machine-washable. Use a gentle cycle with cold or warm water, and air dry to preserve waterproof linings.
Q3: What closure type is best for beginners?
Velcro is the easiest to apply and use, especially for beginners. Zippers and snaps work too but require a bit more skill.
Q4: How do I prevent leaks in my snack bag?
Use waterproof fabric for the lining, and double-stitch the seams. Avoid storing very wet foods unless you’ve added extra protection like inner layers.
Q5: Can I make these bags in different sizes?
Yes, the reusable snack bag pattern is highly adaptable. Just adjust the dimensions before cutting your fabric.
Q6: Where can I find a good pattern?
There are many free and paid Reusable Snack Bag Sewing Tutorial – Pattern options available online. Choose one with clear instructions and printable templates.
Making your own snack bags using a Reusable Snack Bag Sewing Tutorial – Pattern is a rewarding and eco-conscious choice. You’ve learned how to gather materials, follow a step-by-step sewing process, customize your designs, and care for your creations. With just a little effort, you can create practical, stylish, and reusable snack bags that make your daily life more sustainable.
If you tried this tutorial, we’d love to hear your honest opinion in the comments below. Did you enjoy the process? What could be improved? And what would you like to see next? Your feedback and suggestions help us continue to provide valuable, user-friendly content. Happy sewing!


