
Bird-shaped Pincushion - Pattern

The Ribbon Dance Quilt Pattern is one of those rare designs that perfectly captures the fluid motion of a gymnast’s silk streamer frozen in time through the art of quilting. If you are looking for a project that combines modern aesthetics with a dynamic sense of energy, this quilt design is an exceptional choice for both beginners and seasoned makers. The beauty of this specific pattern lies in its ability to look incredibly complex while relying on straightforward cutting and piecing techniques that anyone can master with a bit of patience.
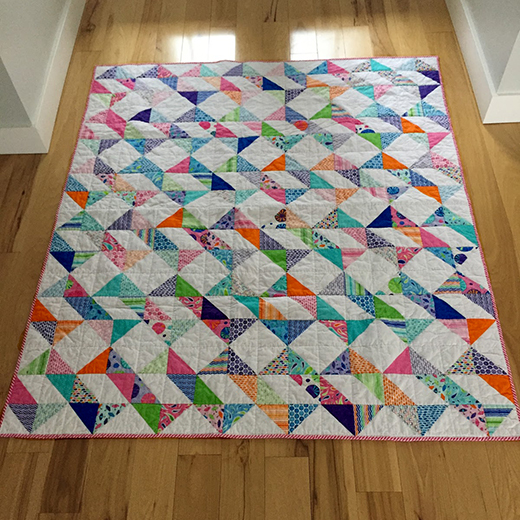
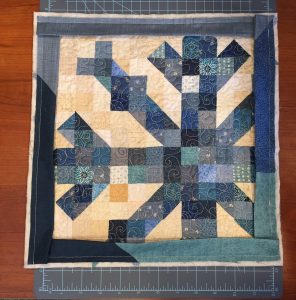
When you first lay eyes on a finished Ribbon Dance Quilt Pattern, the visual impact is immediate; the “ribbons” seem to weave over and under one another, creating a three-dimensional depth that is hard to achieve with more static designs. This geometric quilt relies on clever color placement and the use of negative space to make the primary design pop. It is an ideal way to use up your favorite fabric scraps or to showcase a carefully curated jelly roll of designer fabrics that you’ve been saving for a special occasion.
In this comprehensive guide, we are going to dive deep into everything you need to know about the Ribbon Dance Quilt Pattern, from selecting the right materials to finishing your project with professional flair. Whether you want to create a vibrant rainbow quilt or a subtle, monochromatic home decor piece, the versatility of this sewing project ensures it will fit perfectly into your life. Let’s explore the intricate steps and creative possibilities that make this quilting technique a favorite among the global crafting community.
The foundation of a successful Ribbon Dance Quilt Pattern starts with your choice of textiles. Because the design relies on the illusion of “weaving,” selecting fabrics with high contrast is essential. You want your “ribbons” to stand out clearly against the background fabric, so many quilters opt for a solid white, charcoal, or navy background to let the colorful strips shine.
Using a rotary cutter and a high-quality acrylic ruler is non-negotiable for this project. Since the Ribbon Dance Quilt Pattern involves many long, straight strips, even a slight deviation in your cutting can lead to a warped final result. Accuracy in the initial stages ensures that your seam allowance remains consistent throughout the assembly process, leading to perfectly aligned corners.
If you are a fan of convenience, consider using pre-cut fabrics like 2.5-inch strips (often called Jelly Rolls). These are perfect for the Ribbon Dance Quilt Pattern because they reduce the amount of cutting required and ensure that your ribbons are perfectly uniform in width. Just make sure to press your strips thoroughly with a steam iron before you start sewing to remove any factory folds.
Don’t forget the importance of your thread choice. For a quilt pattern that has a lot of intersections like this one, a fine, strong 50wt cotton thread is ideal. It blends into the fabric without adding bulk to the seams, which helps your quilt top lie completely flat. Choosing a neutral color like grey or tan often works better than trying to match every single ribbon color.
Regarding your sewing machine, ensure it is fitted with a quarter-inch foot. The Ribbon Dance Quilt Pattern is built on the precision of the 1/4″ seam, and having a dedicated foot makes it much easier to maintain accuracy without constant measuring. A fresh 90/14 needle will also help you glide through multiple layers of cotton without skipped stitches.
Lastly, prepare a large design wall or a clear space on the floor. Because the “weaving” effect of the Ribbon Dance Quilt Pattern can be a bit like a puzzle, you will want to lay out your pieces frequently to ensure the colors are flowing in the right direction. This visual check prevents the frustration of having to use a seam ripper later on because a strip was sewn upside down.
The “secret sauce” behind the Ribbon Dance Quilt Pattern is a method known as strip piecing. Instead of cutting hundreds of tiny squares, you sew long strips of fabric together first and then cut them into segments. This time-saving quilting method not only speeds up the process but also increases the accuracy of your quilt blocks, as there is less handling of small individual pieces.
When working on your Ribbon Dance Quilt Pattern, you will create “strip sets” consisting of your ribbon colors and background strips. It is vital to press your seams carefully—most experts recommend pressing toward the darker fabric to prevent the seam allowance from showing through the lighter sections of your quilt. This creates a professional, crisp finish that elevates the overall look.
Once your strip sets are sewn, you will use your ruler to sub-cut them into the specific units required by the Ribbon Dance Quilt Pattern. This is where the magic happens; as you rotate and rearrange these units, the “ribbon” begins to emerge. Always double-check your measurements before making the cut, as precision here is what allows the ribbons to “connect” seamlessly across the quilt top.
To keep everything organized, many quilters use numbered pins or small notes to label their units. In a complex pattern like the Ribbon Dance Quilt Pattern, it is easy to get confused between “Unit A” and “Unit B.” Keeping a tidy workspace and a clear labeling system will make your sewing experience much more relaxing and productive.
Another key tip for the Ribbon Dance Quilt Pattern is to use chain piecing. This involves feeding your fabric units through the sewing machine one after another without cutting the thread in between. It creates a “chain” of pieces that you can snip apart later. This technique is a staple in modern quilting because it saves thread and significant amounts of time.
If you find that your strips are bowing or curving, you might be pulling the fabric too hard as it goes through the feed dogs. Let the machine do the work. In the Ribbon Dance Quilt Pattern, keeping your strips straight is the difference between a quilt that hangs perfectly straight and one that has a “wave” in it. Gentle handling is the hallmark of an expert quilter.
The Ribbon Dance Quilt Pattern is a fantastic canvas for experimenting with color theory. To achieve the best “dance” effect, consider using a gradient or ombre effect. By transitioning from light to dark shades of a single color, you can make the ribbons look like they are moving through light and shadow, adding a sophisticated touch to your handmade quilt.
If you prefer a more eclectic look, the Ribbon Dance Quilt Pattern works beautifully as a scrappy quilt. You can use a wild variety of prints and colors, provided you keep your background fabric consistent. This consistency acts as an anchor for the eye, preventing the busy design from becoming overwhelming. It’s a great way to use your fabric stash and create a memory quilt.
For those who want a minimalist aesthetic, try using just two colors. A black and white Ribbon Dance Quilt Pattern creates a bold, graphic look that fits perfectly in a modern apartment or an office. The negative space becomes just as important as the ribbons themselves, highlighting the architectural nature of the quilt design.
Think about the scale of the prints you choose. In the Ribbon Dance Quilt Pattern, small-scale prints or “read-as-solids” usually work best. Large, busy floral prints can sometimes break the visual line of the “ribbon,” making it harder for the eye to follow the path of the dance. Tone-on-tone fabrics are often the “sweet spot” for adding texture without sacrificing clarity.
Don’t be afraid to play with the orientation of the blocks. While the standard Ribbon Dance Quilt Pattern layout is stunning, you can rotate the blocks to create entirely different secondary patterns. Some quilters have discovered that by flipping certain sections, they can create diamonds, zig-zags, or even star shapes within the same basic pattern structure.
Finally, consider the border and binding. A thin, dark border can “frame” the Ribbon Dance Quilt Pattern, while a scrappy binding made from the leftover ribbon strips can add a playful finishing touch. The binding is like the frame on a painting—it should complement the work without distracting from the main event of the quilt.
Once your quilt top is finished, it’s time to move on to the quilting process. For a Ribbon Dance Quilt Pattern, “quilting in the ditch” (sewing exactly along the seams) is a popular choice because it hides the stitches and lets the design speak for itself. However, if you want to add more movement, free-motion quilting with swirls or “wind” patterns can enhance the feeling of the dancing ribbons.
Choosing the right quilt batting is also crucial. If you want a flat, modern look, a cotton/poly blend or a thin bamboo batting works well. If you prefer a more traditional, “puffy” look that shows off the quilting stitches, a high-loft polyester batting will make the ribbons stand out in relief against the background of your Ribbon Dance Quilt Pattern.
The backing fabric is your chance to be a bit more adventurous. Since the front of the Ribbon Dance Quilt Pattern is often very structured, many makers choose a bold, wide-back fabric for the rear. This creates a “two-in-one” quilt that is just as beautiful on the back as it is on the front. Just ensure the fabric is high-quality quilting cotton to ensure longevity.
Before you start the final quilting, make sure you have “basted” your quilt sandwich (top, batting, and backing) thoroughly. Whether you use curved safety pins or basting spray, keeping the layers from shifting is vital. Because the Ribbon Dance Quilt Pattern has so many straight lines, any shifting during the quilting process will be very noticeable in the final product.
When it comes to binding, a double-fold binding is the most durable method for a quilt that will be used and washed frequently. You can machine-sew it for speed or hand-stitch it for a “show-quality” finish. For the Ribbon Dance Quilt Pattern, a diagonal “bias” binding can also add a subtle professional touch that mirrors the angles found within the quilt itself.
After all that hard work, don’t forget to add a quilt label! Include your name, the date, and the fact that it is a Ribbon Dance Quilt Pattern. Quilts are heirlooms, and future generations will appreciate knowing who made this beautiful piece of art. Washing your finished quilt for the first time with a color catcher will give it that lovely “crinkled” look that every quilter loves.
Is the Ribbon Dance Quilt Pattern suitable for beginners?
Yes! While it looks complex, it uses basic strip piecing and straight seams. If you can sew a consistent quarter-inch seam and follow a diagram, you can successfully create this quilt.
How much fabric do I need for a Throw-sized Ribbon Dance Quilt?
Generally, you will need about 2.5 to 3 yards of background fabric and roughly 20-25 strips (2.5″ wide) for the ribbons. Always check the specific requirements on your pattern instructions as sizes can vary.
Can I make this quilt using scraps?
Absolutely. The Ribbon Dance Quilt Pattern is one of the best “scrap-busters.” As long as your scraps are long enough to be cut into the required segments, you can create a beautiful, multicolored version.
What is the best way to press the seams?
In this pattern, “nesting” your seams is helpful. Press the seams of one row to the left and the next row to the right. This allows the seams to “lock” together, resulting in much sharper corners where the ribbons meet.
Can I resize the Ribbon Dance Quilt Pattern?
Yes, it is very easy to scale. You can add more blocks to make a King-size quilt or use fewer blocks for a baby quilt or a wall hanging. The modular nature of the blocks makes it highly customizable.
Do I need any special rulers for this design?
No specialty rulers are required. A standard 6″ x 24″ acrylic ruler and a square ruler (like a 12.5″ square) are usually all you need to complete the Ribbon Dance Quilt Pattern accurately.
In this article, we have explored the mesmerizing world of the Ribbon Dance Quilt Pattern. We’ve covered everything from the essential tools and fabric selection to the efficient strip piecing techniques that make this design accessible to everyone.
We also discussed how color theory can transform the look of your quilt and provided tips for those final, crucial quilting and binding steps. This pattern is more than just a sewing project; it is an exercise in precision and a celebration of movement through fabric.


