
Horizontal Row Quilt - Pattern

The Sawtooth Star Quilt Pattern is an absolute cornerstone of American quilting history, representing a perfect blend of geometric precision and artistic freedom. Whether you are a beginner looking to master the art of the flying geese or an experienced quilter seeking a timeless design for a gift, this star quilt remains one of the most versatile layouts in the craft. Its sharp, points-out design creates a striking visual impact that can look incredibly traditional in civil war fabrics or ultra-modern in bright, solid colors.
When you decide to embark on a project using the Sawtooth Star Quilt Pattern, you are engaging with a design that dates back several generations, yet it never feels outdated. The “sawtooth” effect is created by the surrounding points that frame a central square, allowing for endless customization. This quilt block is often the first step for many into the world of star patterns because it relies on simple ratios and repeatable units that build confidence and accuracy in sewing.
Mastering the Sawtooth Star Quilt Pattern involves understanding the math behind the squares and triangles to ensure your points remain crisp and don’t get “chopped off” in the seam allowance. In this comprehensive guide, we will explore the technical aspects of the quilt construction, the best fabric choices for quilting projects, and the step-by-step logic required to finish a stunning heirloom piece. By focusing on precision cutting and pressing techniques, you will be able to create a flawless quilt top that looks professional and feels cozy.
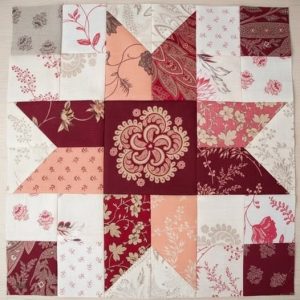
The Sawtooth Star Quilt Pattern is fundamentally a nine-patch grid variation, though it is often constructed using a large center square and smaller side units. The “stars” are formed by a central focal square surrounded by eight points, which are typically created using flying geese units. Understanding this structure is vital because it allows you to scale the block to any size, from a tiny four-inch charm to a massive twenty-four-inch centerpiece.
For a standard quilt block, you will need one large square for the center and four smaller squares for the corners. The “sawtooth” points are made of four flying geese rectangles, each consisting of one larger rectangle and two smaller squares. This star design is celebrated because it has no “Y-seams,” making it a much more accessible project for those who find the Lone Star or LeMoyne Star intimidating.
When selecting fabrics for your Sawtooth Star Quilt Pattern, contrast is your best friend. To make the star points pop, most quilters choose a dark or vibrant fabric for the star and a neutral or light-colored fabric for the background. This creates the “twinkle” effect that makes the star pattern so visually appealing across a large quilt layout.
The quilt math for this pattern is quite forgiving if you follow the “double the size” rule. For example, if your finished center square is 4 inches, your finished flying geese units should be 2 by 4 inches. Keeping these ratios in mind ensures that your quilt blocks align perfectly when you begin joining them into rows, preventing the dreaded “wavy borders” common in beginner projects.
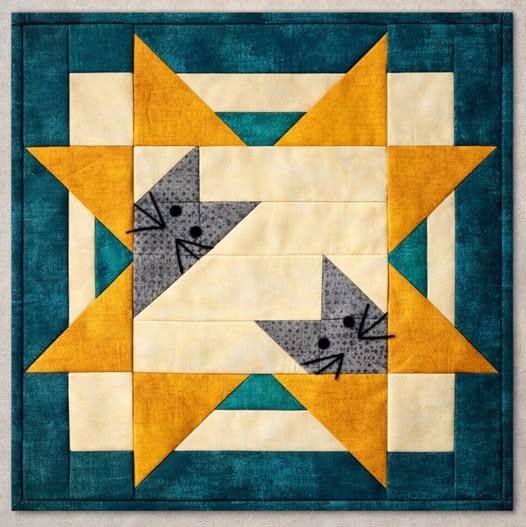
Experienced quilters often use the Sawtooth Star Quilt Pattern as a “frame” for other designs. You can place a fussy-cut fabric in the center square—perhaps a floral motif or a cute animal—to give the quilt a specific theme. This makes the quilt pattern an excellent choice for baby quilts or commemorative memory quilts where the fabric tells a story.
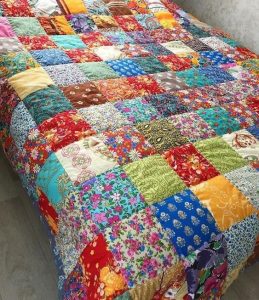
Lastly, the Sawtooth Star Quilt Pattern is highly efficient in terms of fabric usage. Because it uses standard shapes like squares and rectangles, there is very little waste. If you are a scrap quilter, you can easily use your “stash” to create a multi-colored scrappy star quilt that looks organized yet eclectic, proving the enduring utility of this specific quilt design.
To achieve success with the Sawtooth Star Quilt Pattern, having the right quilting tools is non-negotiable. A high-quality rotary cutter, a self-healing cutting mat, and a non-slip acrylic ruler are the trifecta of success. Because the points of the star rely on 45-degree angles, even a slight measurement error can lead to a block that won’t lay flat or points that disappear into the seams.
When cutting your pieces for the Sawtooth Star Quilt Pattern, many modern quilters prefer the “four-at-a-time” flying geese method. This technique involves cutting one large square and four smaller squares to create four star points simultaneously. It significantly reduces the amount of fabric cutting time and minimizes the risk of stretching the bias edges of the triangles, which is a common pitfall in star quilting.
Accurate seam allowance is the “secret sauce” of any Sawtooth Star Quilt Pattern. You must maintain a consistent 1/4-inch seam throughout the assembly. If your seams are too wide, your star will look “choked”; if they are too thin, the block will be too large and unstable. Using a quarter-inch presser foot on your sewing machine is highly recommended for maintaining this precision.
Before you start sewing the star points, it is wise to perform a “test block.” This allows you to check if your cutting instructions and sewing tension are aligned. In the world of DIY quilting, a little bit of preparation prevents a lot of “seam ripping” later on. The Sawtooth Star Quilt Pattern rewards those who take the time to square up their units as they go.
Another pro tip for the Sawtooth Star Quilt Pattern is the use of starch. Spraying your fabric with a bit of sizing or starch before cutting helps the cotton maintain its shape. Since the points involve diagonal seams, the fabric can easily distort; starching keeps the fibers stiff, ensuring that your geometric shapes stay exactly as you intended them to be.
Finally, consider your marking tools. You will need to draw diagonal lines on the back of your background squares to guide your sewing. A fine-point fabric pen or a simple Hera marker works wonders. Clear markings are essential for the Sawtooth Star Quilt Pattern to ensure the points meet perfectly at the corners, creating that sharp, professional look that defines the Sawtooth style.
The assembly of the Sawtooth Star Quilt Pattern begins with the creation of the flying geese units. Once you have your four units ready, you essentially have a “puzzle” ready to be put together. Lay out your pieces on a design wall or a flat table to visualize the color placement. You should see a center square, four geese units for the sides, and four corner squares.
The first row of your Sawtooth Star Quilt Pattern will consist of a corner square, a flying geese unit (pointed inward or outward depending on your preference, though usually outward), and another corner square. The middle row contains a flying geese unit, the large center square, and another flying geese unit. The third row is a mirror image of the first. This modular construction is why the pattern is so popular in quilting classes.
When sewing the rows of the Sawtooth Star Quilt Pattern together, the most critical moment is where the points of the star meet the center square. To keep your points sharp, aim to sew just a hair’s breadth outside the “V” where the threads cross on the back of the flying geese unit. This ensures that when you flip the fabric open, the point of the star sits exactly on the seam line.
Pressing is just as important as sewing in the Sawtooth Star Quilt Pattern. Most experts suggest pressing your seams toward the squares and away from the star points to reduce bulk. However, some quilters prefer pressing seams open to ensure the quilt top is as flat as possible for the longarm quilting process. Whichever method you choose, consistency across all blocks is key.
Once the rows are joined, you have completed a Sawtooth Star block. At this stage, it is crucial to “square up” the block. Use your square acrylic ruler to trim away any excess fabric, ensuring the block is perfectly square. If your Sawtooth Star Quilt Pattern calls for multiple blocks, having them all exactly the same size will make joining them into a full quilt top much easier.
As you repeat this process, you will begin to see the rhythm of the pattern. The Sawtooth Star Quilt Pattern is meditative once you master the initial units. You can experiment with alternating colors or using different fabrics for each star to create a “sampler” feel. The beauty of this traditional quilt is that while the structure stays the same, no two quilts ever look identical.
One of the best things about the Sawtooth Star Quilt Pattern is its adaptability to various quilt layouts. You can set the blocks “side-by-side” for a bold, graphic look, or you can use sashing (strips of fabric between the blocks) to give each star its own space. Adding cornerstones to the sashing can further elevate the design, making the quilt top look intricate and high-end.
Another popular variation is the “Star within a Star.” In this version of the Sawtooth Star Quilt Pattern, you replace the solid center square with another, smaller star block. This adds a layer of complexity and beauty that is perfect for wall hangings or centerpieces. It’s a great way to showcase your advanced quilting skills while sticking to a classic template.
For those who love a modern aesthetic, try an “offset” Sawtooth Star Quilt Pattern. Instead of a grid, place the stars randomly across a large field of negative space. This “minimalist quilting” approach is very popular in modern galleries and allows the star shape to truly become the protagonist of the piece. Using a single, bold color against a white or grey background works beautifully here.
When it comes to quilting the layers (the top, batting, and backing), the Sawtooth Star Quilt Pattern offers many options. You can “stitch in the ditch” to hide the quilting lines, or you can use free-motion quilting to add swirls or feathers that contrast with the sharp geometric points of the star. Straight-line quilting following the angles of the star can also emphasize the “sawtooth” effect.
Choosing the right quilt binding is the final touch. A striped binding cut on the bias can add a “candy cane” effect that complements the energy of the Sawtooth Star. Alternatively, using the same fabric as the star points for the binding creates a cohesive “frame” for your work. Don’t forget to add a quilt label to the back with your name and the date!
Whether you are making a small lap quilt or a king-sized bedspread, the Sawtooth Star Quilt Pattern is a rewarding journey through textile art. It teaches patience, precision, and the joy of creating something beautiful from simple scraps of cloth. As you fold your finished quilt, you are holding a piece of quilting tradition that will provide warmth and beauty for many years to come.
1. Is the Sawtooth Star Quilt Pattern suitable for absolute beginners?
Yes! While it requires careful cutting and sewing, it is considered one of the best “intermediate-beginner” patterns. If you can sew a straight line and understand basic quarter-inch seams, you can successfully complete this pattern.
2. How much fabric do I need for a standard Sawtooth Star quilt?
The amount depends on the size of the quilt. For a throw-sized quilt, you typically need about 3 to 4 yards of background fabric and a variety of fat quarters or scrap pieces for the stars themselves. Always buy a little extra for mistakes!
3. What is the difference between a Sawtooth Star and an Ohio Star?
The main difference lies in the side units. The Sawtooth Star Quilt Pattern uses flying geese (one large triangle), while the Ohio Star uses quarter-square triangles (two triangles forming a side). This gives the Ohio Star a more “crossed” appearance.
4. Can I make this quilt using a Jelly Roll?
While you can use 2.5-inch strips from a Jelly Roll to make small Sawtooth Stars, this pattern is generally better suited for Fat Quarters or yardage because of the specific square sizes needed for the star points and centers.
5. How do I prevent the points of my star from being cut off?
The key is the seam allowance. When you sew your units together, ensure your needle passes exactly through the “intersection” of the fabrics. If you sew too deep into the point, it will disappear when the quilt is finished.
6. What is the best batting to use for a star quilt?
For a crisp look that shows off the star pattern, a cotton or cotton-blend batting is best. If you want a more “puffy” or “crinkly” vintage look, a high-loft polyester or wool batting works wonders.
In this article, we have explored the rich world of the Sawtooth Star Quilt Pattern, covering everything from its historical roots to the technical nuances of flying geese construction. We discussed the importance of fabric contrast, the necessity of precise cutting, and the various ways you can personalize this classic quilt design to fit your own style.
Whether you choose a traditional or modern approach, the Sawtooth Star remains a symbol of craftsmanship and creativity in the sewing community. We hope this guide inspires you to pick up your rotary cutter and start your next quilting masterpiece.


