
American-style placemat with a fruit theme - Pattern

The Scrap Jar Stars Quilt – Pattern is a magnificent way to breathe new life into your fabric remnants while creating a vibrant, celestial-themed masterpiece that celebrates the beauty of organized chaos. For any passionate quilter, the accumulation of fabric scraps is an inevitable part of the creative process, often filling jars and bins with colorful bits of history from past projects. Embracing a Scrap Jar Stars Quilt – Pattern allows you to transform these forgotten treasures into a cohesive design where every star tells a different story, making it one of the most personal and sustainable projects you can undertake in your sewing room.
The allure of the Scrap Jar Stars Quilt – Pattern lies in its ability to look complex while remaining accessible to quilters of varying skill levels, from adventurous beginners to seasoned professionals. By utilizing a “controlled scrappy” approach, you can ensure that the individual star blocks pop against a background fabric, creating a visual rhythm that guides the eye across the quilt top. This specific patchwork technique is not just about clearing out your stash; it is about mastering the art of color value and placement, ensuring that even the smallest strip of fabric finds its perfect place within the stellar geometry of the quilt.
As we dive into the details of the Scrap Jar Stars Quilt – Pattern, we will explore how to sort your materials, master the technical construction of the star points, and design a layout that feels balanced and intentional. Whether you are aiming for a rainbow of colors or a more muted, monochromatic palette, this guide will provide the structural framework and creative inspiration needed to succeed. Through the following sections, you will discover why the Scrap Jar Stars Quilt – Pattern remains a timeless favorite in the quilting community, offering a perfect blend of tradition, thriftiness, and modern artistic expression.
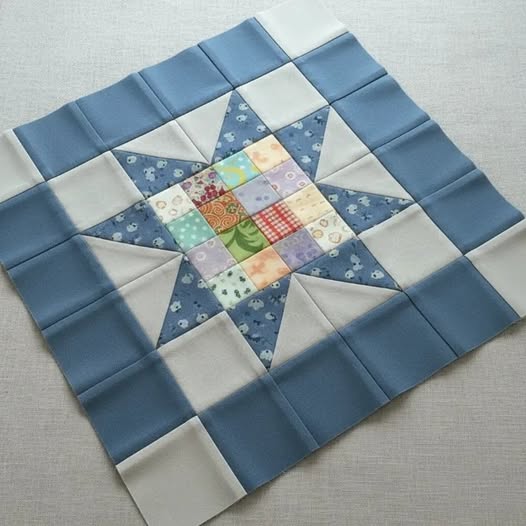
The first step in tackling a Scrap Jar Stars Quilt – Pattern is the sorting process, which many find to be a therapeutic way to reconnect with their fabric collection. To ensure the stars stand out, it is helpful to categorize your scraps by color and, more importantly, by color value (light, medium, and dark). A successful Scrap Jar Stars Quilt – Pattern often relies on high contrast, where the “points” of the stars are significantly darker or more saturated than the background fabric, allowing the iconic shape to be recognizable from a distance.
When selecting fabrics for your Scrap Jar Stars Quilt – Pattern, don’t be afraid to mix different types of prints, such as florals, geometrics, and solids. The “scrappy” nature of this design thrives on variety, but a common thread—like a consistent background fabric—can tie the whole piece together. Many quilters choose a solid white, cream, or even a deep navy as the “sky” for their stars, providing a neutral stage that allows the multi-colored scraps to shine without overwhelming the viewer’s eye.
Preparation also involves the “cutting phase,” which is crucial for the precision required in any Scrap Jar Stars Quilt – Pattern. Using a rotary cutter and an acrylic ruler, you should aim to cut your scraps into uniform shapes, such as 2.5-inch squares or strips, depending on the specific star variation you choose. Having a “pre-cut” pile of scraps makes the actual sewing process much faster and more enjoyable, as you can simply reach into your jar and pull out the next piece without stopping to measure.
Another tip for a professional-looking Scrap Jar Stars Quilt – Pattern is to consider the “scale” of the prints within your scraps. If all your fabrics have large, bold patterns, the individual points of the stars might look muddled. By mixing in some “low-volume” prints or tiny “ditsy” florals, you add textural depth to the quilt. This variety ensures that when the blocks are joined, each star maintains its individual identity while contributing to the overall “galaxy” effect of the finished quilt top.
Fabric quality is just as important in a Scrap Jar Stars Quilt – Pattern as it is in a quilt made from new yardage. Ensure that your scraps are mostly 100% quilting cotton to avoid issues with uneven shrinking or fraying over time. If you are using scraps from older projects, give them a quick press with a bit of starch to stabilize the grain. Starch is a secret weapon in the Scrap Jar Stars Quilt – Pattern, as it prevents the small pieces from stretching while you sew those tricky diagonal seams.
Lastly, think about the “story” you want your Scrap Jar Stars Quilt – Pattern to tell. Some people like to include “fussy cut” elements in the center of their stars—perhaps a tiny animal or a special flower from a sentimental fabric. This level of detail turns your scrap project into a memory quilt, making the Scrap Jar Stars Quilt – Pattern not just a functional blanket, but a physical archive of your quilting journey and the various milestones you have celebrated through your craft.
Mastering the Scrap Jar Stars Quilt – Pattern usually involves creating “Flying Geese” units or “Half-Square Triangles” (HSTs) to form the star points. The Sawtooth Star is a classic choice for this pattern because it offers a large center square for showcasing bigger scraps and eight crisp points. Precision in your quarter-inch seam allowance is the most critical factor here; if your seams are inconsistent, your star points may get “chopped off” when you join the blocks together, losing the sharp celestial look.
To ensure your Scrap Jar Stars Quilt – Pattern has perfect points, many quilters use the “No-Waste Flying Geese” method. This technique allows you to create four star-point units at once from a few squares of fabric, minimizing the amount of tiny off-cuts that end up back in the scrap jar. By following a structured piecing guide, you can maintain the geometric integrity of the stars while maximizing your fabric usage, which is the core philosophy behind a successful scrappy project.
Pressing is another vital component of the Scrap Jar Stars Quilt – Pattern construction. It is generally recommended to press your seams “toward the dark side” or toward the star points to prevent the seam allowance from showing through a lighter background. However, in areas where many points meet in the center, you might choose to “spin the seams” to reduce bulk. A flat, well-pressed block is much easier to quilt later and ensures that your Scrap Jar Stars Quilt – Pattern lies perfectly flat on a bed.
Chain piecing is a time-saving technique that works exceptionally well with a Scrap Jar Stars Quilt – Pattern. This involves sewing one unit after another without cutting the thread in between, creating a long “chain” of fabric. Because a star quilt requires many repetitive units, chain piecing allows you to stay in the “flow” of the work. This method also helps maintain consistent tension in your sewing machine, resulting in uniform stitches across all the blocks in your Scrap Jar Stars Quilt – Pattern.
As you assemble the blocks for your Scrap Jar Stars Quilt – Pattern, you may encounter “wonky” blocks that aren’t perfectly square. This is common when working with various scraps that might have different weights or grains. To fix this, always “square up” your blocks using a square acrylic ruler before joining them into rows. Trimming away even an eighth of an inch of excess fabric can be the difference between a quilt that ripples and one that is perfectly square and professional.
For those who want a more modern look, you can experiment with “Improv Stars” within your Scrap Jar Stars Quilt – Pattern. This involves sewing points at irregular angles rather than following a strict geometric grid. While this requires less measuring, it still demands an eye for balance. The Scrap Jar Stars Quilt – Pattern is incredibly forgiving in this regard, as the overall density of the scraps creates a cohesive look even if the individual stars have a bit of “personality” and variation in their shapes.
The layout of a Scrap Jar Stars Quilt – Pattern can range from a structured grid to a “randomized” explosion of stars. If you want a more traditional look, use sashing (strips of fabric between blocks) to separate the stars. This provides “breathing room” for the eye and prevents the scrap fabrics from looking too cluttered. Sashing in a contrasting color can also act as a secondary pattern, creating a “secondary grid” that adds a layer of sophistication to your Scrap Jar Stars Quilt – Pattern.
If you prefer a more contemporary aesthetic, try a “gravity-defying” layout where the stars appear to be falling or floating. In this version of the Scrap Jar Stars Quilt – Pattern, you use large blocks of background fabric (negative space) and cluster your stars in one corner or across a diagonal line. This technique highlights the individual beauty of your scraps while making a bold artistic statement. It turns the traditional Scrap Jar Stars Quilt – Pattern into a modern wall hanging or a “focal point” bedspread.
Color “flow” is an advanced technique used in the Scrap Jar Stars Quilt – Pattern to create a sense of order. You can arrange your star blocks in a “color wash” or rainbow gradient, moving from reds in one corner to purples in the other. This requires careful planning during the sorting phase but results in a stunning visual impact. Even though the fabrics are scraps, the intentional color placement makes the Scrap Jar Stars Quilt – Pattern look expensive and meticulously planned rather than just a collection of leftovers.
Don’t forget the “Secondary Patterns” that can emerge when you join star blocks together. In some variations of the Scrap Jar Stars Quilt – Pattern, the corners of the star blocks meet to form a new shape, like a diamond or a small square. This “pattern within a pattern” is one of the joys of quilting. By being mindful of the fabric you place in the corners of your blocks, you can create a secondary lattice effect that makes the finished quilt look much more intricate than it actually was to sew.
Borders are the final framing element for your Scrap Jar Stars Quilt – Pattern. You can choose a simple solid border to contain the energy of the scraps, or a “piano key” border made from the remaining strips in your scrap jar. A piano key border is a great way to use up the last bits of fabric and echoes the scrappy theme of the stars. This finishing touch ensures that your Scrap Jar Stars Quilt – Pattern feels complete and has a polished, “wrapped” appearance from edge to edge.
Lastly, consider the “Scale of the Stars.” A Scrap Jar Stars Quilt – Pattern can feature stars of all different sizes—some large focal points and some tiny “accent” stars. This “starry sky” approach mimics the natural night sky and is a fantastic way to use even the tiniest 1-inch scraps. By mixing the sizes, you create a dynamic and energetic composition that keeps the viewer’s eye moving and discovering new details throughout the quilt surface, making it a truly engaging piece of textile art.
Once your top is assembled, it is time to choose a quilting motif that complements your Scrap Jar Stars Quilt – Pattern. For a scrappy quilt, a “meandering” or “stipple” design is often best because it adds texture without competing with the busy fabric patterns. However, if you want to emphasize the star theme, you can quilt “stars and swirls” or use a ruler to quilt straight lines that radiate from the center of each star, giving the Scrap Jar Stars Quilt – Pattern a sense of motion and energy.
The choice of thread color for quilting can also change the look of your Scrap Jar Stars Quilt – Pattern. A neutral grey or tan thread tends to blend in across many different colors, which is helpful in a scrappy project. If you want the quilting to be a visible design element, you could use a variegated thread that changes color every few inches. This mimics the scrappy nature of the fabric and adds an extra layer of “whimsy” to the finished Scrap Jar Stars Quilt – Pattern, making the stitching as much of a feature as the patchwork.
The “Quilt Sandwich”—the top, the batting, and the backing—must be basted securely before you begin the final stitching. For a Scrap Jar Stars Quilt – Pattern, a cotton batting is often preferred because it allows the quilt to have a “crinkly,” vintage look after its first wash. The backing fabric is another opportunity to use up larger pieces from your stash. You can even make a “scrappy back” by sewing together large rectangles, making your Scrap Jar Stars Quilt – Pattern completely reversible and twice as colorful.
Binding is the final step in the Scrap Jar Stars Quilt – Pattern process. A “scrappy binding,” made by joining leftover strips from your stars, is a popular choice for this project. It provides a colorful frame that ties all the individual stars together. If you prefer a cleaner look, a solid binding in a color that matches your background fabric can make the stars appear to “float” all the way to the edge of the quilt. Regardless of your choice, ensure the binding is double-folded for durability.
Labeling your quilt is a vital but often forgotten step. Since a Scrap Jar Stars Quilt – Pattern is often made of fabrics from many different years and projects, it is a piece of your personal history. Sew a small fabric label onto the back corner with your name, the date, and a title. This ensures that future generations who inherit your Scrap Jar Stars Quilt – Pattern will know the story of the maker and the “scraps” that went into creating this beautiful heirloom.
Finally, the first wash of your Scrap Jar Stars Quilt – Pattern is a magical moment. As the cotton batting shrinks slightly and the fabrics soften, the quilt takes on its final “puffy” texture. This is when the Scrap Jar Stars Quilt – Pattern truly becomes a home; it becomes a soft, warm, and inviting object ready for snuggling on the sofa. The transition from a pile of scraps in a jar to a finished, laundered quilt is a testament to the power of the creative process and the enduring beauty of traditional quilting.
How many scraps do I need for a Scrap Jar Stars Quilt – Pattern?
The beauty of this pattern is its flexibility! For a throw-sized quilt, you’ll typically need enough scraps to make about 12 to 20 star blocks. If your jar is overflowing, you can make more blocks; if it’s nearly empty, you can use larger pieces of background fabric to fill the space.
Is this pattern suitable for beginners?
Yes! While star points require a bit of attention to detail, the “scrappy” nature is very forgiving. Even if your points aren’t perfect, the busy patterns and colors of a Scrap Jar Stars Quilt – Pattern tend to hide small imperfections, making it a great “learning” project.
What is the best way to organize scraps for this quilt?
Many quilters find that sorting by color family (all the blues in one jar, all the greens in another) is the most efficient way. This allows you to quickly grab “coordinate” scraps when building a specific star block in your Scrap Jar Stars Quilt – Pattern.
Can I use non-cotton fabrics in my scrap quilt?
It is possible, but not recommended for beginners. Fabrics like silk, flannel, or linen have different shrink rates and “stretchiness.” For a durable and flat Scrap Jar Stars Quilt – Pattern, sticking to 100% quilting cotton will give you the most consistent and long-lasting results.
How do I prevent my star points from being “cut off”?
The secret is the “quarter-inch” rule. When you sew your blocks together, make sure your seam line is exactly 1/4 inch from the edge. If you see a “V” where two points meet, aim to sew just a hair’s breadth above the point of the “V” to keep it sharp in your Scrap Jar Stars Quilt – Pattern.
What size should my star blocks be?
A standard and easy size is a 12-inch block. This fits nicely into most bed layouts and is large enough that the construction doesn’t feel too “fiddly” or tiny. However, the Scrap Jar Stars Quilt – Pattern can be adapted to any size from 6 inches to 24 inches depending on your preference.
In this exploration of the Scrap Jar Stars Quilt – Pattern, we have journeyed through the entire creative process, from the initial sorting of your fabric remnants to the technical mastery of star points and the final quilting touches. We learned that this pattern is much more than a way to clear out a stash; it is a thoughtful exercise in color value, geometry, and sustainable crafting.
By following the steps of preparing your scraps, chain piecing your units, and designing a balanced layout, you can create a stunning heirloom that captures the vibrant history of your past sewing projects in a single, cohesive design.


