
American-style placemat with a fruit theme - Pattern

Scrunchie with hair elastic – Pattern is the ultimate creative project for those looking to blend functionality with a touch of personalized fashion. There is something deeply satisfying about taking a simple, utilitarian item and transforming it into a stylish accessory that not only looks great but is also much gentler on your hair than traditional bands. By following a well-designed Scrunchie with hair elastic – Pattern, you can utilize fabric scraps from previous projects, making this an eco-friendly and cost-effective way to expand your accessory collection or create thoughtful, handmade gifts for friends and family.
The beauty of the Scrunchie with hair elastic – Pattern lies in its absolute simplicity and versatility, as it serves as an ideal entry point for beginners who are just learning to sew or crochet. This specific project bridges the gap between basic construction and artistic flair, allowing you to experiment with different textures—such as silk, velvet, or cotton—without the intimidation of a large-scale garment. When you use a Scrunchie with hair elastic – Pattern, you are essentially creating a protective fabric “sleeve” that houses the elastic, providing a soft barrier that prevents hair breakage and those annoying ponytail creases.
In this comprehensive guide, we will explore every facet of the Scrunchie with hair elastic – Pattern, ensuring you have the technical knowledge to produce professional-grade results every time. We will dive into the best materials to use, the step-by-step logic of the assembly process, and how to customize the “fullness” of your ruffles to suit different hair types and styles. By mastering the Scrunchie with hair elastic – Pattern, you gain a versatile skill that can be adapted for any season, trend, or occasion, turning a basic hair necessity into a statement piece of wearable art.
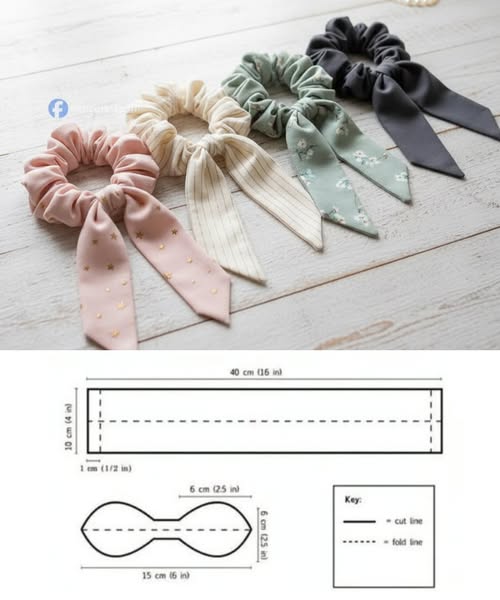
The foundational concept of a Scrunchie with hair elastic – Pattern involves creating a fabric tube that is significantly longer than the elastic itself. This extra length is what creates the iconic “scrunched” or ruffled appearance once the elastic is inserted and the ends are joined. A standard pattern typically suggests a fabric strip between 18 and 22 inches long, which provides the perfect amount of volume for a classic look without being too heavy or bulky on the wrist or in the hair.
The “hair elastic” chosen for the Scrunchie with hair elastic – Pattern is just as important as the fabric itself. It is highly recommended to use a high-quality, seamless elastic that hasn’t been stretched out, as this forms the “engine” of your accessory. If you use a weak or low-quality band within your pattern, the scrunchie will lose its tension quickly, making the time you spent sewing or crocheting less rewarding in the long run.
In a sewing-based Scrunchie with hair elastic – Pattern, the “burrito method” or the “tube method” are the two most common techniques used to join the pieces. The tube method is often favored by beginners because it involves sewing a long rectangle into a cylinder, turning it right-side out, and then threading the elastic through. This logic is clearly outlined in most pattern instructions to ensure that the raw edges are hidden internally, resulting in a clean and polished finish.
For those who prefer a yarn-based approach, the Scrunchie with hair elastic – Pattern can be executed using a crochet hook. In this version, the “pattern” involves working stitches directly around the hair elastic until it is completely covered by a dense layer of yarn. This method is particularly popular because it allows the elastic to move freely inside the stitches, ensuring that the scrunchie remains flexible and durable even after hundreds of uses.
Width is another variable addressed in the Scrunchie with hair elastic – Pattern. A wider fabric strip (about 4 to 5 inches) will result in a “jumbo” scrunchie that is very visible in the hair, while a narrower strip (about 2 to 3 inches) creates a more subtle, minimalist accessory. The pattern serves as your guide to these proportions, helping you decide whether you want a bold 90s-style statement or a modern, sleek look for professional settings.
Finally, the Scrunchie with hair elastic – Pattern usually concludes with the “closure,” which is the most visible seam on the finished product. Many patterns suggest using an “invisible” or “ladder stitch” if you are sewing by hand, or a very narrow topstitch if you are using a machine. Mastering this final step within the Scrunchie with hair elastic – Pattern is what separates a homemade-looking item from a boutique-quality accessory that you could easily sell or gift.
Choosing the right fabric for your Scrunchie with hair elastic – Pattern is the most exciting part of the creative process. Silk and satin are top-tier choices because they are “friction-less,” meaning they don’t tug on hair cuticles, making the scrunchie a favorite for people with curly or fragile hair. If you follow a pattern using these slippery fabrics, you may need to use more pins than usual to keep the edges aligned during the sewing process.
Cotton and linen are also excellent for a Scrunchie with hair elastic – Pattern, especially for casual, everyday wear. These materials are much easier to handle for beginners and come in an endless array of prints and colors. When using a cotton fabric print with your pattern, make sure to pre-wash the fabric to prevent any shrinkage that might cause the scrunchie to warp or become misshapen after its first wash.
The “hair elastic” you pick should ideally be about 7 to 9 inches long if you are using a flat elastic cord, or a standard 2-inch diameter circular band. In the Scrunchie with hair elastic – Pattern, the length of the elastic determines how many times you can wrap it around your hair. If you have very thick hair, you might want to slightly increase the length specified in the pattern to ensure a comfortable and secure fit that won’t cause tension headaches.
Essential tools for executing the Scrunchie with hair elastic – Pattern include a safety pin or a “bodkin.” This tool is used to thread the elastic through the fabric tube once it has been sewn and turned. Without this simple but vital tool, the pattern becomes much harder to complete, as trying to push a flexible elastic through a long tube of fabric by hand can be a frustrating and time-consuming experience.
High-quality thread or yarn is a must for the Scrunchie with hair elastic – Pattern. Since the scrunchie will be stretched and pulled daily, the seams need to be incredibly strong. If you are crocheting your pattern, choose a mercerized cotton or a soft acrylic that won’t pill over time. For sewers, a polyester thread is usually better than 100% cotton because it has a slight “give” that prevents the stitches from snapping under tension.
Lastly, having a good steam iron nearby will elevate your Scrunchie with hair elastic – Pattern significantly. Pressing the fabric strip before you start sewing and again once the tube is formed ensures that the edges are crisp and the finished ruffles lay beautifully. Professional crafters know that the difference between a “good” and a “great” handmade scrunchie often comes down to the quality of the materials and the precision of the pressing.
The first step in the Scrunchie with hair elastic – Pattern is the “Right Sides Together” (RST) alignment. You will fold your fabric strip in half lengthwise and sew along the long edge. This creates the basic tube structure. It is important to leave an inch or two open at both ends of the tube in your pattern; this “open end” technique makes it much easier to join the two ends of the fabric later, creating a continuous loop of ruffles.
Turning the tube right-side out is the next phase of the Scrunchie with hair elastic – Pattern. Many people find this part meditative, using a safety pin or a specialized turning tool to pull the fabric through itself. Once the tube is right-side out, give it a quick press with the iron. This step in the pattern ensures that your final accessory doesn’t look lumpy and that the seam is tucked neatly to the inside or the edge of the ruffle.
Now comes the “elastic insertion” phase of the Scrunchie with hair elastic – Pattern. Attach a safety pin to one end of your hair elastic and thread it through the tube, being very careful not to let the “tail” end of the elastic slip inside. A pro tip from many scrunchie patterns is to pin the tail end to the fabric opening so it stays put while you navigate the other end through the length of the fabric sleeve.
Joining the elastic is a critical junction in the Scrunchie with hair elastic – Pattern. You can either tie the ends of the elastic in a secure knot or, for a flatter and more professional look, overlap them by half an inch and sew them together with a “zigzag” stitch. This ensures that there isn’t a bulky “bump” inside your scrunchie, which can sometimes be uncomfortable if it sits directly against your head.
The “fabric closure” is the final structural step in the Scrunchie with hair elastic – Pattern. You will tuck the raw edges of the fabric openings inside and nest one end of the tube slightly into the other. Then, you will sew across the join. If you are following a high-end pattern, you might choose to do this by hand using a “ladder stitch” so the seam is completely invisible, making the scrunchie look seamless and store-bought.
Once the sewing is finished, the last step in the Scrunchie with hair elastic – Pattern is the “distribution” of the ruffles. Give the scrunchie a few good stretches to allow the fabric to slide along the elastic and settle into its natural folds. This final adjustment ensures that the volume is even all the way around, completing your Scrunchie with hair elastic – Pattern project and leaving you with a beautiful, functional hair accessory.
One of the best things about the Scrunchie with hair elastic – Pattern is how easily it can be adapted for “seasonal” looks. In the autumn, you might use flannel or corduroy fabrics to match cozy sweaters, while in the summer, a light chiffon or organza can create a “dreamy” and airy vibe. By simply changing the textile while keeping the pattern the same, you can have a rotating collection of accessories that perfectly complement the weather and your wardrobe.
You can also “level up” your Scrunchie with hair elastic – Pattern by adding “bunny ears” or “bows.” This involves sewing a separate, smaller piece of fabric into a bow shape and tying it around the main scrunchie join. Many scrunchie patterns include a separate template for these ears, allowing you to add a playful, feminine touch to a standard design. This is a very popular style for children’s accessories and festive holiday-themed gifts.
Embellishments like embroidery or beads can also be integrated into the Scrunchie with hair elastic – Pattern. If you are using a solid-colored fabric, adding a few hand-stitched flowers or some “seed beads” along the edge of the ruffles can make the item look incredibly high-end. This transformation of the pattern from a basic utility item to a piece of jewelry for the hair is a great way to practice your detail work on a small, manageable canvas.
For those who want to go even bigger, the “Jumbo” variation of the Scrunchie with hair elastic – Pattern is a major fashion trend. By doubling the width of the fabric strip in the pattern, you create a massive, cloud-like accessory that is perfect for top-knots and buns. These oversized scrunchies work best with lightweight fabrics like silk or tulle so that they don’t become too heavy for the hair elastic to hold up throughout the day.
If you are a knitter or a crocheter, the Scrunchie with hair elastic – Pattern can be customized with different stitch textures. A “ribbed” crochet look can mimic the texture of expensive store-bought versions, while a “puff stitch” can add 3D depth to the ruffles. The flexibility of the pattern means that you can use almost any stitch you enjoy, as long as the total number of stitches is sufficient to cover the elastic when it is fully stretched out.
Finally, consider the “matching set” potential of the Scrunchie with hair elastic – Pattern. You can make a scrunchie that perfectly matches a face mask, a tote bag, or even a simple dress you’ve sewn. This level of coordination is something you can rarely find in stores, and it’s the primary reason many crafters keep a copy of their favorite Scrunchie with hair elastic – Pattern handy at all times. It’s the ultimate “finishing touch” for any handmade outfit.
1. Is the Scrunchie with hair elastic – Pattern good for beginners?
Absolutely! It is often the very first project taught in sewing and crochet classes. It requires only straight lines (if sewing) or basic stitches (if crocheting), and the pattern is very forgiving if your measurements aren’t 100% perfect.
2. What is the best fabric for a hair-healthy scrunchie?
Silk or satin are the best choices to include in your pattern if hair health is your priority. These fabrics prevent the “pulling” and “friction” that can lead to split ends, which is why they are so popular in the Scrunchie with hair elastic – Pattern community.
3. Can I wash my handmade scrunchies?
Yes, most scrunchies made with a standard pattern are machine washable! If you used cotton or polyester, just toss them in a mesh laundry bag. If you used silk or velvet, it’s better to hand-wash them and lay them flat to dry to preserve the fabric’s luster.
4. Why is my scrunchie not “scrunched” enough?
This usually happens if the fabric strip in your pattern was too short. To get those beautiful ruffles, the fabric needs to be at least double (ideally 2.5 times) the length of the elastic. If it’s too short, the fabric will just lay flat against the band.
5. How much fabric do I need for one scrunchie?
Very little! Most patterns require a strip that is about 4×20 inches. This means you can often get several scrunchies out of a single “fat quarter” of fabric, making it a very efficient and low-cost sewing pattern.
6. Can I make this without a sewing machine?
Yes! The Scrunchie with hair elastic – Pattern is small enough that it can be sewn by hand using a simple “backstitch” for the main tube and a “ladder stitch” for the closure. It takes a little longer, but the result is just as beautiful and durable.
In summary, the Scrunchie with hair elastic – Pattern is a versatile, enjoyable, and highly practical project that every crafter should try at least once. Throughout this article, we have explored the foundational anatomy of the design, the importance of selecting high-quality hair elastics and silk or cotton fabrics, and the technical steps required to create a clean, professional finish. We also discussed how the pattern can be customized with bows, different sizes, and even different crafts like crochet.
By following a structured Scrunchie with hair elastic – Pattern, you can turn simple remnants of fabric or yarn into a stylish accessory that protects your hair and showcases your unique creative personality.


