
American-style placemat with a fruit theme - Pattern

The Sew Loving Quilt Block – Pattern is a delightful way to express your passion for quilting through intricate designs and heartfelt craftsmanship. Whether you are a seasoned quilter or a newcomer to the craft, this specific Sew Loving Quilt Block – Pattern offers a versatile foundation for creating beautiful quilts, pillows, and wall hangings. By focusing on precision and color harmony, this quilting project becomes more than just a hobby; it turns into a timeless piece of art that can be passed down through generations.
Creating a project with the Sew Loving Quilt Block – Pattern allows you to explore various fabric choices and stitching techniques that define the modern quilting era. Many enthusiasts find that this quilt design strikes the perfect balance between traditional aesthetics and contemporary flair. Because the Sew Loving Quilt Block – Pattern is so adaptable, it serves as an excellent canvas for experimenting with color palettes, ranging from soft pastels to bold, vibrant hues that make the heart motifs or geometric shapes truly pop.
In the world of textile arts, having a reliable and well-structured Sew Loving Quilt Block – Pattern is essential for achieving a professional finish. It provides the necessary cutting instructions and assembly guides to ensure that every corner aligns perfectly and every seam lies flat. As we dive deeper into this guide, we will explore the nuances of this quilt block, helping you master the sewing skills required to bring your vision to life. Let’s look at the essential elements that make this pattern a favorite among the global quilting community.
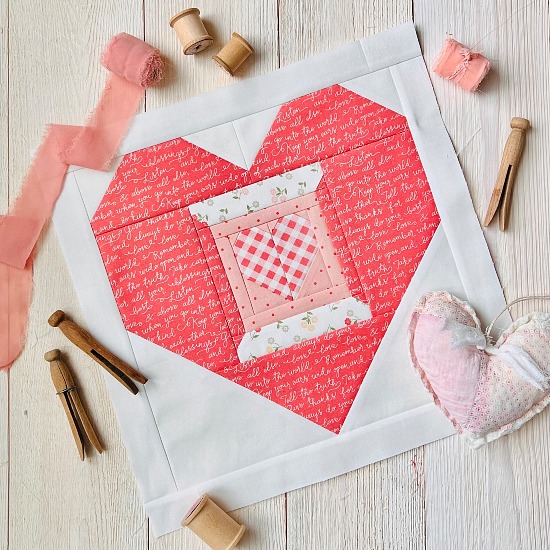
The Sew Loving Quilt Block – Pattern is primarily celebrated for its symbolic representation of love and dedication within the sewing community. At its core, this quilt block often features a central motif that draws the eye, making it the focal point of any quilt top. Beginners will find that the Sew Loving Quilt Block – Pattern is an approachable entry point into the world of patchwork, offering clear steps that build confidence.
To start your journey with the Sew Loving Quilt Block – Pattern, you must first gather high-quality cotton fabrics. Selecting the right fabric weight is crucial for ensuring that your quilt block remains durable and easy to handle during the sewing process. Most quilters prefer using quilter’s cotton because it holds its shape well and comes in an endless variety of prints and solids.
The Sew Loving Quilt Block – Pattern typically relies on standard seam allowances, usually 1/4 inch, which is the gold standard in quilting. Consistency is the most important factor here; even a slight deviation can throw off the entire block alignment. Using a specialized quilting foot on your sewing machine can help maintain this precision throughout the project.
Preparation is key when working with the Sew Loving Quilt Block – Pattern. This includes pre-washing fabrics to prevent shrinkage and bleeding, as well as pressing your fabric with a hot iron before you even begin cutting. A crisp piece of fabric is much easier to measure and cut, leading to a much more accurate quilt block in the end.
The Sew Loving Quilt Block – Pattern instructions usually detail the unit construction, such as Half-Square Triangles (HSTs) or Flying Geese. These sub-units are the building blocks of many complex-looking patterns. Mastering these small components is the secret to successfully completing a Sew Loving Quilt Block – Pattern without feeling overwhelmed by the complexity.
Finally, the Sew Loving Quilt Block – Pattern is designed to be scalable. You can easily adjust the template sizes to create a miniature quilt block for a coaster or enlarge it for a massive king-size quilt. This flexibility is why the Sew Loving Quilt Block – Pattern remains a staple in the digital libraries of modern makers and traditionalists alike.
Selecting your materials for the Sew Loving Quilt Block – Pattern is perhaps the most exciting part of the creative process. You will need a variety of fabric scraps or fat quarters that complement each other. Look for high-contrast colors to ensure that the intricate details of the Sew Loving Quilt Block – Pattern are visible from a distance once the quilt is assembled.
A sharp rotary cutter and a self-healing cutting mat are non-negotiable tools for the Sew Loving Quilt Block – Pattern. Accuracy in your initial cuts determines how well the pieces will fit together during the piecing stage. Many quilters also recommend using acrylic rulers with clear markings to ensure every strip and square is cut to the exact dimensions required by the pattern.
Thread choice also plays a significant role in the success of your Sew Loving Quilt Block – Pattern. A high-quality 50wt cotton thread is ideal because it is thin enough to reduce bulk in the seams but strong enough to hold the quilt layers together. Choosing a neutral color like grey or tan allows the thread to blend in with most fabric designs seamlessly.
Marking tools, such as water-soluble pens or tailor’s chalk, are vital for the Sew Loving Quilt Block – Pattern. You may need to mark diagonal lines for HST construction or indicate where to stop and start your stitching. Having clear, removable marks ensures that your Sew Loving Quilt Block – Pattern maintains its professional look without any permanent ink stains.
Don’t forget the importance of straight pins or wonder clips when assembling your Sew Loving Quilt Block – Pattern. Pinning at every intersection prevents the fabric from shifting as it passes under the needle. This step is especially important for the Sew Loving Quilt Block – Pattern because of the multiple points where different fabric pieces meet.
Lastly, a reliable steam iron is your best friend when working on the Sew Loving Quilt Block – Pattern. Pressing each seam as you go—often called pressing to the dark side—is a fundamental quilting technique. This practice reduces bulk and helps the Sew Loving Quilt Block – Pattern lie perfectly flat, which is essential for the final quilting and binding stages.
The first step in assembling the Sew Loving Quilt Block – Pattern is to lay out all your cut pieces on a design board. This allows you to visualize the final look and ensure that your color placement is balanced. By seeing the Sew Loving Quilt Block – Pattern in its “exploded” view, you can catch any mistakes in fabric orientation before you start sewing.
Begin by sewing the smallest units of the Sew Loving Quilt Block – Pattern together. Often, this involves creating Half-Square Triangles or sewing small squares into rows. Following the Sew Loving Quilt Block – Pattern diagrams carefully will ensure that you are joining the correct edges. Slow and steady wins the race when it comes to precision piecing.
Once the sub-units are ready, you will move on to joining them into larger sections of the Sew Loving Quilt Block – Pattern. This is where the quilt design starts to take shape. Pay close attention to the pinning instructions in your Sew Loving Quilt Block – Pattern to make sure that your “points” aren’t cut off by the seam line, a common challenge for many.
As you progress through the Sew Loving Quilt Block – Pattern, remember to check the size of your block periodically. Use a square-up ruler to trim any excess fabric and keep the block at its intended finished size. Trimming as you go ensures that when you join multiple Sew Loving Quilt Block – Patterns together, they will line up perfectly without any puckering.
The final stage of the Sew Loving Quilt Block – Pattern assembly involves joining the rows together to complete the square. Use a nesting seams technique where the seam allowances of adjacent rows point in opposite directions. This allows the seams to “lock” together, resulting in perfectly matched corners within your Sew Loving Quilt Block – Pattern.
After the final seam is sewn, give your Sew Loving Quilt Block – Pattern a final, thorough press. Use a bit of fabric starch if you want the block to be extra crisp and stable. Your completed Sew Loving Quilt Block – Pattern is now ready to be incorporated into a larger quilt project or finished as a standalone piece of handmade decor.
To truly master the Sew Loving Quilt Block – Pattern, you should focus on your 1/4 inch seam accuracy. Many quilters use a “scant” quarter-inch, which is just a thread’s width narrower than a true quarter-inch. This accounts for the space the fabric takes up when it is folded over the seam, ensuring your Sew Loving Quilt Block – Pattern stays the correct size.
Experimenting with fabric textures can add a unique dimension to your Sew Loving Quilt Block – Pattern. While standard cotton is traditional, incorporating small amounts of linen or silk can create a beautiful tactile experience. Just be sure to stabilize these fabrics so they don’t stretch and distort the Sew Loving Quilt Block – Pattern geometry.
If you find that your corners are not matching up in the Sew Loving Quilt Block – Pattern, try using the glue-basting technique. A small dab of water-soluble glue in the seam allowance can hold the fabric pieces exactly where they need to be. This is a game-changer for complex quilt patterns like the Sew Loving Quilt Block – Pattern, where precision is paramount.
Another tip for the Sew Loving Quilt Block – Pattern is to use a walking foot if you are sewing through multiple thick layers. This ensures that the top and bottom layers of fabric move through the machine at the same speed. It prevents the “creeping” of fabric that can cause the Sew Loving Quilt Block – Pattern to become skewed or distorted.
Consider the quilting motif you will use once the Sew Loving Quilt Block – Pattern is finished. Whether you choose free-motion quilting, straight-line stitching, or stitch-in-the-ditch, the quilting should enhance the design of the block. Choose a pattern that follows the lines of the Sew Loving Quilt Block – Pattern to highlight your hard work and careful piecing.
Lastly, don’t be afraid to make the Sew Loving Quilt Block – Pattern your own by adding embellishments. Hand embroidery, beads, or applique details can be added to the finished block to give it a personal touch. The Sew Loving Quilt Block – Pattern is a versatile foundation that encourages creativity, so let your imagination guide your sewing journey.
What is the best fabric for the Sew Loving Quilt Block – Pattern?
The most recommended fabric is 100% quilter’s cotton. It is easy to cut, does not stretch excessively, and comes in a wide variety of colors that make the Sew Loving Quilt Block – Pattern stand out.
Can a beginner successfully sew the Sew Loving Quilt Block – Pattern?
Yes! While it looks intricate, the Sew Loving Quilt Block – Pattern is usually broken down into simple geometric shapes. If you can sew a straight line and maintain a consistent seam allowance, you can complete this block.
How long does it take to finish one Sew Loving Quilt Block – Pattern?
Depending on your skill level, a single Sew Loving Quilt Block – Pattern can take anywhere from one to three hours. This includes cutting, piecing, and pressing the fabric.
What size is the finished Sew Loving Quilt Block – Pattern?
Most standard patterns for this block result in a 12-inch or 10-inch square, but the Sew Loving Quilt Block – Pattern can easily be scaled up or down depending on your specific project needs.
Do I need any special tools for this pattern?
While a standard sewing machine works, a quarter-inch foot, a rotary cutter, and a cutting mat will significantly improve your accuracy when working on the Sew Loving Quilt Block – Pattern.
How do I wash a quilt made with the Sew Loving Quilt Block – Pattern?
It is best to wash your finished quilt on a gentle cycle with cold water and use a “color catcher” sheet to prevent dyes from running. Air drying or tumble drying on low heat is recommended to preserve the stitch integrity.
Throughout this article, we have explored the beautiful world of the Sew Loving Quilt Block – Pattern, covering everything from the essential materials and tools to the step-by-step assembly process. We discussed how choosing high-quality cotton fabrics, maintaining a precise 1/4 inch seam, and using the right quilting techniques can transform a simple set of fabric pieces into a stunning work of art.
The Sew Loving Quilt Block – Pattern is not just a set of instructions; it is an opportunity to express your creativity and love for the craft of quilting. By mastering the sub-units and focusing on accuracy, you can create heirloom-quality pieces that will be cherished for years to come.


