
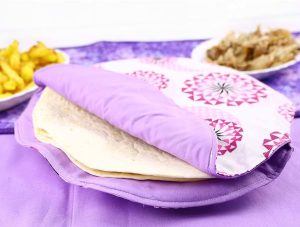
American-style placemat with a fruit theme - Pattern

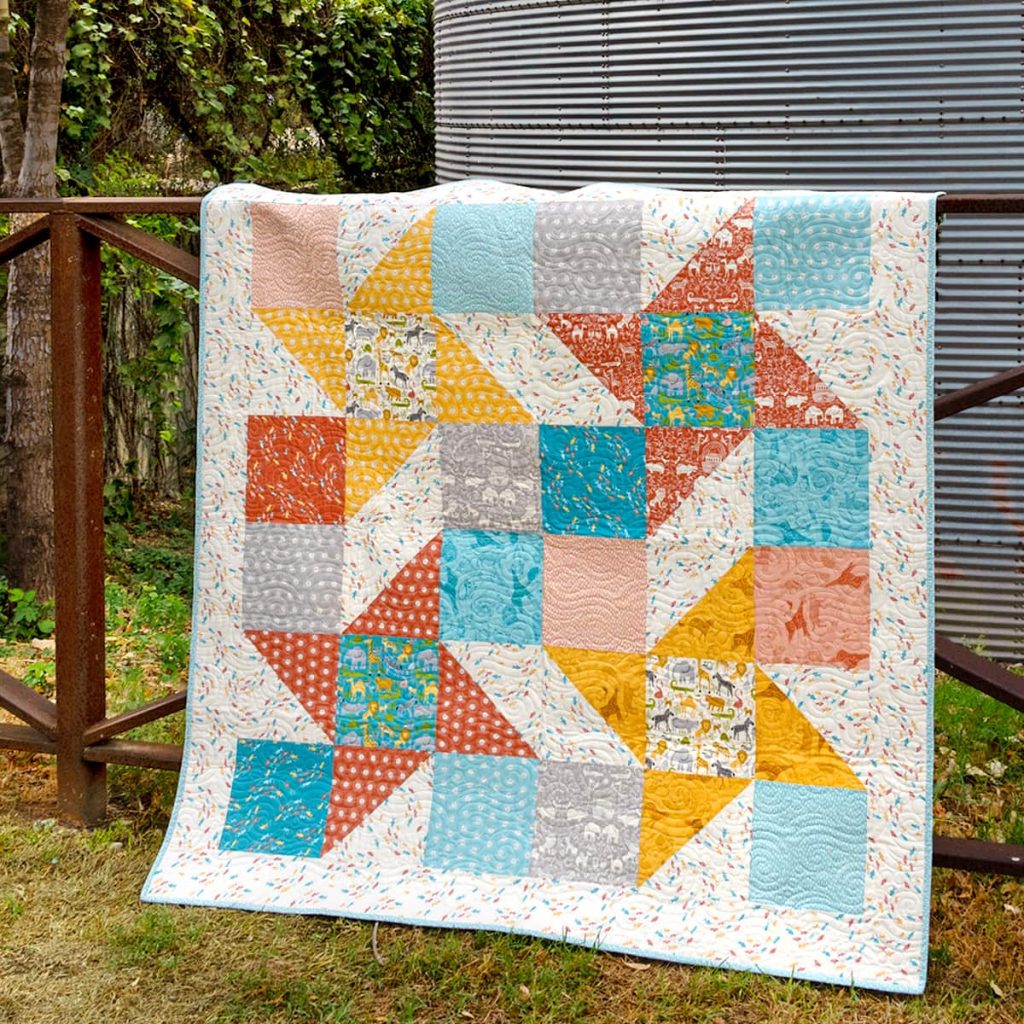
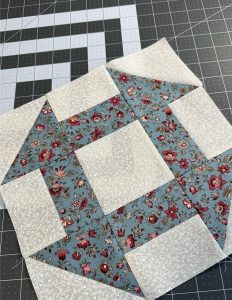
The Shortcut Quilt – Pattern is a revolutionary approach for modern makers who want to create stunning, high-quality quilts without spending months at the sewing machine. In the fast-paced world of contemporary crafting, many enthusiasts struggle to find the time for traditional, complex piecing methods that require intricate calculations and endless hours of manual cutting. This specific design bridges the gap between traditional artistry and modern efficiency, offering a streamlined workflow that yields a professional-looking result in a fraction of the time usually required for a full-sized heirloom project.
By utilizing a Shortcut Quilt – Pattern, quilters can focus on the joy of fabric selection and the rhythmic motion of sewing rather than the stress of overwhelming technical requirements. These patterns are specifically engineered to maximize the use of pre-cut fabrics, such as jelly rolls or layer cakes, which significantly reduces the preparation phase of your project. Whether you are a beginner looking for your first successful finish or a seasoned quilter needing a quick gift for a baby shower or a holiday, this method provides a reliable roadmap to a beautiful, cozy, and structurally sound finished product.
In this comprehensive guide, we will dive deep into the mechanics of the Shortcut Quilt – Pattern, explaining the essential terminology and techniques that make this style of quilting so effective. We will discuss everything from fabric coordination and precision cutting to the final assembly and quilting motifs that complement a fast-paced design. Our goal is to empower you with a humanized, step-by-step masterclass that respects your time while honoring the rich tradition of quilting, ensuring that your DIY quilt project is both a therapeutic experience and a resounding success.
The fundamental concept behind a Shortcut Quilt – Pattern is the optimization of the sewing sequence to minimize “dead time” and fabric waste. Instead of cutting hundreds of individual small squares, these patterns often utilize strip piecing, a technique where long strips of fabric are sewn together first and then cut into units. This ensures that your seams are perfectly aligned and reduces the number of times you have to stop and start your machine, making the assembly process incredibly fluid and satisfying.
When you begin looking for a Shortcut Quilt – Pattern, you will notice that they often highlight the use of pre-cuts. The term “pre-cut” refers to fabric that has been professionally cut into specific shapes by the manufacturer, such as 2.5-inch strips (Jelly Rolls) or 10-inch squares (Layer Cakes). Using these in your shortcut pattern eliminates the most tedious part of quilting—measuring and cutting—while ensuring that your starting pieces are perfectly square and accurate to the millimeter.
Another essential term in the world of the Shortcut Quilt – Pattern is the quarter-inch seam allowance. Because these patterns are designed for speed, there is less room for cumulative error. Maintaining a consistent distance from the needle to the edge of the fabric is what allows all your blocks to fit together like a perfect puzzle at the end. Many modern quilters use a specialized patchwork foot on their sewing machine to guarantee this precision without having to think twice about it.
The “Shortcut” in Shortcut Quilt – Pattern also refers to the clever use of sub-cutting. This is the process where you take a larger sewn unit—like a four-patch or a row of strips—and cut it down into smaller, more complex-looking components. It creates the illusion of intricate, difficult handiwork, but since the initial pieces were sewn in long, continuous lines, the actual physical labor is drastically reduced. It is a smart way to achieve a “boutique” look with half the effort.
Chain piecing is a vital technique used within any Shortcut Quilt – Pattern to maintain momentum. Instead of cutting your thread after every two pieces of fabric, you feed them through the machine one after another in a long “chain.” This not only saves thread but also keeps your pieces organized in the correct order for assembly. It is a rhythmic, almost meditative process that turns the construction of a large quilt top into a manageable and highly productive afternoon task.
Finally, a well-designed Shortcut Quilt – Pattern will always include a “pressing plan.” Pressing is different from ironing; it involves lifting and placing the iron to flatten seams without stretching the fabric. In these fast-track designs, pressing seams to one side allows them to “nest” together, which creates flat, bulk-free intersections. This small but crucial step ensures that your shortcut quilt looks as if it was made by a professional longarm quilter, with no lumps or mismatched corners.
Choosing the right fabric for your Shortcut Quilt – Pattern is perhaps the most creative part of the entire journey. Since the construction moves quickly, you want fabrics that have a strong visual impact. The term fabric pull describes the process of gathering various prints and solids to see how they interact. For a shortcut design, using a “coordinated collection” from a single designer is a great way to ensure that your colors won’t clash, as the manufacturer has already balanced the tones for you.
Contrast is a key word when working with a Shortcut Quilt – Pattern. If all your fabrics are the same “value” (the lightness or darkness of a color), the pattern of the quilt will get lost, and the design will look muddy from a distance. To make the shortcut blocks pop, you should aim for a mix of “lights,” “mediums,” and “darks.” A high-contrast fabric pull ensures that the geometric beauty of the quilt pattern is the first thing people notice when they walk into the room.
The “Scale” of the print is another important consideration for your Shortcut Quilt – Pattern. Scale refers to the size of the patterns on the fabric itself. If you are using small blocks, large floral prints might get cut up so much that they become unrecognizable. Conversely, if your shortcut design uses large, bold blocks, small “ditsy” prints might disappear. A balanced mix of large-scale motifs and small-scale “blenders” (fabrics that look almost solid) provides a professional, curated aesthetic.
When following a Shortcut Quilt – Pattern, the “Background Fabric” plays a massive role in the final look. Many quilters choose a crisp white, a soft grey, or a deep navy to act as a “neutral” that lets the patterned fabrics shine. This background fabric is often what ties the whole quilt project together. It provides a place for the eye to rest and highlights the clever shortcuts you’ve used to create the central motifs of the quilt top.
Don’t forget about fabric grain when you are cutting into your scraps or yardage for a Shortcut Quilt – Pattern. Fabric has a “lengthwise grain” (parallel to the selvage) and a “crosswise grain.” Cutting with the grain ensures that your fabric doesn’t stretch out of shape while you are sewing fast. This is particularly important for shortcut methods because we often handle the fabric more during the sub-cutting and chain-piecing phases, and stability is key to a flat quilt.
Lastly, consider the “Hand” or the feel of the fabric you are using for your Shortcut Quilt – Pattern. High-quality quilting cotton is the best choice because it holds a crease well and is easy to handle. If you mix cotton with more slippery fabrics like polyester or silk, the shortcut techniques might become more difficult to manage. Sticking to a consistent fiber content throughout your DIY quilt ensures that the project ages gracefully and washes evenly over the years.
Once your fabric is cut, the assembly of the Shortcut Quilt – Pattern begins in earnest. The goal is to move from “units” to “blocks” and finally to “rows.” This hierarchical approach keeps your workspace organized and prevents you from feeling overwhelmed. The term nesting seams is vital here; it means aligning the seam allowances of two different pieces in opposite directions so they lock together, resulting in perfectly matched points every single time you join a new block.
In a Shortcut Quilt – Pattern, the “Webbing” technique is often used to join blocks into rows. Instead of sewing two blocks, then another two, you sew the first two of every row, then add the third of every row without cutting the threads between them. This creates a “web” of blocks that stays perfectly in order, making it impossible to accidentally flip a block upside down—a common frustration in more traditional, slower quilt patterns.
Accuracy in your seam allowance is most tested when you are joining long rows. Even a tiny deviation can lead to a “wavy” border or a quilt that doesn’t lay flat. To avoid this in your Shortcut Quilt – Pattern, use pins at every intersection. While it might seem like a step that slows you down, pinning ensures that the shortcuts you’ve taken actually lead to a high-quality finish, preventing the need for the dreaded “seam ripper” later on.
The term squaring up is a vital part of the assembly phase of a Shortcut Quilt – Pattern. After you finish a block, you should use a square ruler to trim away any excess fabric and ensure the block is exactly the size it’s supposed to be. If your blocks are even 1/8 inch off, that error will multiply across the width of the quilt. Squaring up is the “secret sauce” that makes a fast quilt look like it took months of meticulous labor.
As you finish the center of your Shortcut Quilt – Pattern, you might decide to add borders. Borders act like a frame for your hard work and can help “save” a quilt that isn’t quite the right size. However, you must measure your quilt through the center to determine the length of your border strips, rather than measuring the edges. This technique prevents the “ruffled” look that occurs when borders are longer than the quilt body itself.
The final step of the assembly is the stay-stitching. This is a row of long stitches sewn 1/8 inch from the edge of the entire quilt top. Because a Shortcut Quilt – Pattern often involves many seams at the edges, stay-stitching prevents those seams from popping open while you are handling the quilt during the actual quilting and binding process. It provides a finished, secure edge that makes the final stages of the project much easier to navigate.
After the top is complete, your Shortcut Quilt – Pattern needs to be “sandwiched.” This means layering the quilt top, the batting (the middle fluffy layer), and the backing fabric. For a fast project, spray basting is a popular shortcut. Instead of using hundreds of safety pins, you use a temporary adhesive spray to hold the layers together. This saves hours of time and prevents the fabric from shifting while you are sewing the three layers together.
The actual “Quilting” can be as simple or as complex as you like. For a Shortcut Quilt – Pattern, “straight line quilting” or “matchstick quilting” is often the best choice. It complements the modern, geometric lines of the pattern and can be done easily on a home sewing machine with a walking foot. A walking foot ensures that all layers of the “sandwich” move through the machine at the same speed, preventing puckers and bunches.
Choosing the right quilting thread is just as important as the fabric. If you want the stitches to be the star, choose a contrasting color. However, if you want the focus to remain on the Shortcut Quilt – Pattern itself, a “blending” thread in a neutral grey or tan is the way to go. High-quality polyester-wrapped cotton thread is a great choice because it is strong enough to handle the tension of a home machine while maintaining a traditional look.
The “Binding” is the final frame of your Shortcut Quilt – Pattern. The most efficient way to bind a quilt is to sew it to the back by machine and then flip it to the front and top-stitch it down. This “machine binding” is much faster than traditional hand-sewing and is incredibly durable for quilts that will be used and washed frequently. Using a decorative stitch for the binding can also add a unique, personalized touch to your handmade quilt.
Before you call it finished, you must add a quilt label. Even for a fast project like a Shortcut Quilt – Pattern, a label is essential. It should include your name, the date, and the occasion. You can use a permanent fabric pen or embroider it. This small detail turns a “project” into an “heirloom,” ensuring that future generations know who put the love and effort into creating this beautiful piece of functional art.
Finally, give your completed Shortcut Quilt – Pattern a final wash. Many quilters love the “crinkle” that happens when the cotton fabric and batting shrink slightly in the dryer. This crinkle hides any minor imperfections in your stitching and gives the quilt that classic, cozy, lived-in feel. Your shortcut project is now ready to be cuddled under, gifted to a loved one, or displayed proudly on a quilt rack in your home.
1. Is the Shortcut Quilt – Pattern suitable for absolute beginners?
Yes! Because these patterns focus on pre-cut fabrics and simplified sewing techniques like chain piecing, they are perfect for beginners. They provide a high success rate and help new quilters build confidence without getting bogged down in overly complex math or difficult curves.
2. Can I make a Shortcut Quilt – Pattern using only my fabric scraps?
Absolutely. While many people use pre-cuts for speed, you can easily cut your own strips or squares from your scrap bin to follow the pattern. It is a fantastic way to clear out your stash while creating a cohesive and “scrappy” look that feels very traditional yet modern.
3. Do I need a special sewing machine for this pattern?
No, a standard home sewing machine is perfectly fine. The only highly recommended accessory is a walking foot for the final quilting stage, as it helps feed the thick layers through the machine evenly. For the piecing of the Shortcut Quilt – Pattern, a regular straight stitch is all you need.
4. How long does it actually take to finish a Shortcut Quilt – Pattern?
While it depends on the size (baby vs. king), many quilters can finish the quilt top of a lap-sized shortcut design in a single weekend. The total time, including basting, quilting, and binding, usually ranges from 10 to 15 hours for an experienced maker, and slightly longer for a novice.
5. What is the best batting to use for a fast quilt?
For most Shortcut Quilt – Pattern projects, a 80/20 cotton-polyester blend is ideal. It provides the softness of cotton with the stability and “loft” of polyester. It is also very easy to quilt on a home machine and doesn’t require as much dense stitching as 100% cotton batting might.
6. Why is my quilt top “wonky” after using a shortcut method?
Wonkiness usually comes from skipping the squaring up step or using an inconsistent seam allowance. Even when sewing fast, it is important to check your measurements every few blocks to ensure everything is staying on track. A little bit of “slow” precision during the “fast” sewing makes a huge difference.
In this exploration of the Shortcut Quilt – Pattern, we have covered the essential strategies for creating a beautiful quilt with maximum efficiency. We’ve learned how to leverage pre-cut fabrics, the importance of nesting seams and chain piecing, and the final steps of machine binding and labeling. This approach to quilting proves that you don’t need a lifetime of experience or months of free time to create something truly special and high-quality.
The Shortcut Quilt – Pattern is more than just a time-saver; it is a way to keep the passion for quilting alive in our busy modern lives. It allows us to experiment with color and design without the fear of a massive time commitment. By focusing on the core techniques and using the right tools, you can produce professional results that will bring warmth and comfort to your home for many years to come.


