
American-style placemat with a fruit theme - Pattern

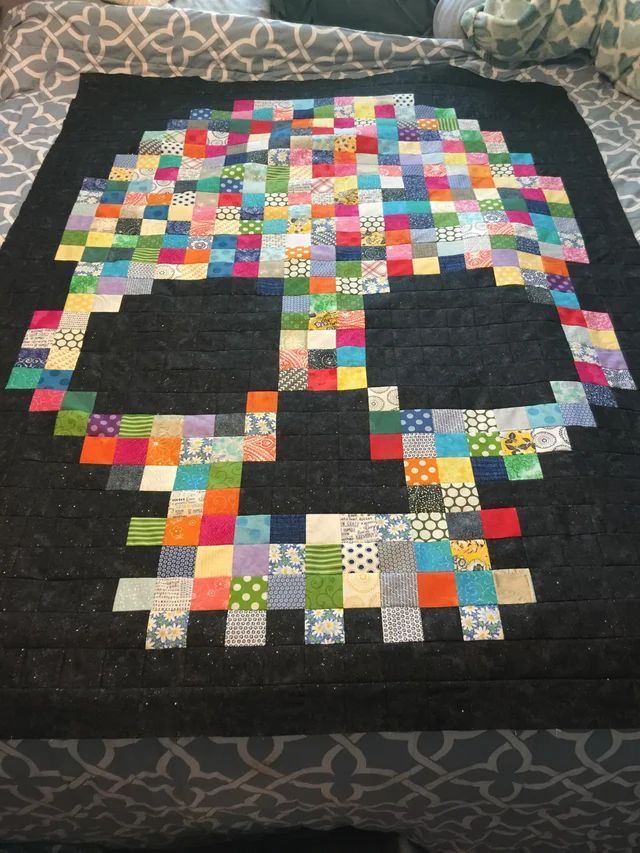
Skull quilt – Pattern has emerged as a bold and fascinating trend in the modern quilting community, offering a unique blend of edgy aesthetics and traditional craftsmanship that appeals to a wide range of makers. Whether you are inspired by the vibrant traditions of the Day of the Dead, the rebellious spirit of rock and roll, or simply a love for anatomical art, embarking on a Skull quilt – Pattern project allows you to showcase your technical skills in a way that feels fresh and contemporary. The geometric nature of a skull’s silhouette makes it a perfect candidate for diverse quilting styles, ranging from intricate paper piecing to bold, graphic appliqués.
Deciding to work with a Skull quilt – Pattern is an invitation to explore high-contrast color palettes and creative fabric choices that go beyond the typical floral and pastel designs often associated with quilting. While the term “skull” might sound intimidating to some, the right quilt pattern breaks down these complex shapes into manageable sections, making the process accessible for intermediate quilters and a rewarding challenge for experts. By focusing on the structural details of the Skull quilt – Pattern, you can create a piece of textile art that serves as a stunning wall hanging, a conversation-starting throw, or a personalized gift for someone who appreciates the “memento mori” lifestyle.
In this comprehensive guide, we will dive deep into the world of the Skull quilt – Pattern, providing you with the knowledge and inspiration needed to complete your own masterpiece from start to finish. We will discuss the essential materials required, the technical nuances of achieving a clean silhouette, and how to customize your design to make it truly one-of-a-kind. By understanding the underlying logic of the Skull quilt – Pattern, you will be able to navigate the assembly process with confidence, ensuring that every “bone” and “socket” in your quilt is perfectly aligned for a professional and striking result.
A high-quality Skull quilt – Pattern serves as more than just a set of instructions; it is a structural blueprint that dictates the visual impact of your finished project. Most patterns in this category fall into two main types: traditional piecing and foundation paper piecing (FPP). In a Skull quilt – Pattern utilizing FPP, you achieve extreme precision with sharp angles and tiny details, such as the nasal cavity or individual teeth, which might be difficult to manage with standard sewing methods. This technical accuracy is what gives a skull-themed quilt its professional, high-definition appearance.
Fabric selection is arguably the most critical step when preparing your Skull quilt – Pattern, as it defines the mood of the piece. For a classic look, many quilters choose a stark white or ivory for the skull against a deep charcoal or black background to emphasize the negative space. However, a modern Skull quilt – Pattern often encourages the use of “scrappy” fabrics or even “low-volume” prints to add texture and depth to the bone structure. Choosing fabrics with subtle variations in tone can make the skull motif look three-dimensional rather than flat.
Scale is another important consideration when looking at a Skull quilt – Pattern. Some designs feature a single, giant skull that takes up the entire quilt top, while others repeat smaller skull blocks in a grid-like neighborhood. The “pattern” you choose will provide specific measurements for each block, and understanding how these units scale up or down is vital if you plan to adjust the quilt’s final dimensions. A well-designed Skull quilt – Pattern will include a fabric requirement chart that helps you calculate exactly how much yardage you need for both the skull and the “ground” fabric.
Color theory plays a massive role in the success of a Skull quilt – Pattern. If you are aiming for a “Sugar Skull” or “Calavera” style, you will want to incorporate bright pinks, turquoises, and yellows into the pattern to mimic traditional Mexican folk art. In these cases, the Skull quilt – Pattern might include decorative elements like flowers or hearts around the eyes. On the other hand, if you prefer a realistic anatomical look, the pattern will guide you in using greys and sepias to create “shadows” in the hollows of the cheeks and forehead.
One technical aspect often highlighted in a Skull quilt – Pattern is the importance of seam allowance, especially when dealing with the intricate parts of the jaw. Since a skull design involves many small pieces meeting at various angles, even a slight deviation from the standard quarter-inch seam can cause the block to become distorted. Most professional Skull quilt – Pattern guides recommend using a specialty presser foot and starching your fabrics heavily to prevent the “bias” edges from stretching during the assembly of these complex curves and points.
Finally, the Skull quilt – Pattern provides a unique opportunity to practice “negative space” quilting. The large areas of background fabric surrounding the skull are the perfect canvas for elaborate “free-motion” quilting. You might choose to quilt swirling smoke, thorny vines, or geometric webs to complement the skull motif. By integrating the Skull quilt – Pattern with creative quilting stitches, you add a layer of texture that enhances the overall theme and makes the finished product feel like a truly luxurious, handmade piece of art.
To begin your journey with the Skull quilt – Pattern, you need to gather a toolkit that supports high-precision work. A high-quality rotary cutter with a sharp blade is essential for getting the crisp edges required by the pattern, especially if you are working with small geometric units. Since the Skull quilt – Pattern often involves high-contrast fabrics, you must also ensure your cutting mat is clean to avoid transferring lint or stray threads from one fabric to another, which can be very visible on dark backgrounds.
The choice of batting, or wadding, is particularly important when executing a Skull quilt – Pattern. If your design is meant to be a wall hanging, a “low-loft” cotton batting is best, as it keeps the quilt flat and makes the intricate skull silhouette stand out clearly. If you are making a bed quilt using the Skull quilt – Pattern, a wool or cotton-poly blend can provide more warmth and “puff,” which can make the quilted shadows around the eyes and jawline look even deeper and more dramatic once the project is washed.
Thread choice is an often-overlooked but vital component of the Skull quilt – Pattern process. For the piecing phase, a thin, strong 50-weight cotton thread in a neutral color is ideal, as it allows the seams to lay flat without adding bulk. However, for the actual quilting phase, you might choose a “monofilament” thread to hide the stitches or a high-sheen polyester thread in a contrasting color to highlight the skull design. The pattern usually offers suggestions for thread colors that won’t distract from the main visual elements.
Markers and pins are your best friends when following a Skull quilt – Pattern. Because the skull is a symmetrical object, any misalignment will be immediately apparent to the eye. Using “fine” glass-head pins allows you to secure the small pieces of the pattern without adding bulk, and a water-soluble fabric marker can help you trace the placement of the “teeth” or “eye sockets” if your pattern uses appliqué. These tools ensure that the “human” element of the work doesn’t result in unintentional errors.
If your Skull quilt – Pattern involves paper piecing, you will also need “foundation paper” or a lightweight vellum that can be easily torn away. This specialized material is what allows you to sew the incredibly sharp points required for a realistic skull. Some quilters also use “add-a-quarter” rulers to make the trimming process faster. Investing in these specific supplies before you start the Skull quilt – Pattern will save you a significant amount of frustration and ensure that your points are always “on the money.”
Lastly, consider the “backing” fabric as part of your overall Skull quilt – Pattern strategy. Many modern makers love to use a bold, themed print for the back—perhaps a fabric covered in small bones or apothecary jars—to complement the large skull on the front. By thinking about the materials as a cohesive package, you ensure that your Skull quilt – Pattern project is as beautiful on the inside as it is on the outside, creating a professional and polished heirloom.
The construction of a Skull quilt – Pattern usually begins with the “eye sockets,” which are often the most recognizable part of the face. In many patterns, these are created using a “square-in-a-square” or a “snowball” technique to soften the corners. Following the Skull quilt – Pattern instructions carefully at this stage is crucial, as the distance between the eyes determines the “expression” of the skull. If the eyes are too far apart or too close, the quilt block may look more like a cartoon than a sophisticated piece of art.
Next, you move on to the “nasal cavity” and the “forehead” sections of the Skull quilt – Pattern. The forehead is usually a large, solid piece of fabric that provides a visual “rest” for the eye, while the nose involves several tiny triangles. This is where the Skull quilt – Pattern really tests your patience and precision. Many quilters find it helpful to “chain piece” these sections—sewing multiple units in a row—to maintain a steady rhythm and ensure all the “bone” pieces are consistent in color and size.
The “jaw and teeth” section is often the most time-consuming part of the Skull quilt – Pattern. Depending on the complexity of the pattern, the teeth might be represented by simple strips of white fabric or intricate individual squares. Achieving the “aligned” look of a jawline requires careful pinning and frequent pressing. As the Skull quilt – Pattern progresses, you will see the individual components start to form a recognizable face, which is one of the most rewarding moments in the entire sewing process.
Joining the “skull” to its “background” is the next major phase of the Skull quilt – Pattern. If your design uses appliqué, you will sew the finished skull onto a large square of fabric; if it is pieced, you will join the skull units to background strips. The Skull quilt – Pattern will guide you on how to handle the “inset” seams or “Y-seams” if they are present. Keeping your background fabric flat and un-stretched is vital here to ensure the skull motif doesn’t look “squashed” or “pulled” once the block is finished.
Once the blocks are assembled, the Skull quilt – Pattern will instruct you on how to join them to form the quilt top. If you are making a “medallion” style quilt, you will be adding borders around the central skull. If you are making a “repeat” style quilt, you will be sewing rows of skulls together. Following the pattern‘s layout guide ensures that the “neighborhood” of skulls is balanced and that the “flow” of the colors across the quilt top is aesthetically pleasing and harmonious.
The final construction step in the Skull quilt – Pattern is the “sandwiching” and “basting” of the quilt layers. This is where you combine the finished top, the batting, and the backing. Most Skull quilt – Pattern designers recommend using a “spray baste” or a high density of safety pins to prevent the layers from shifting. Because the skull design has so many seams, any shifting during the quilting process can cause the fabric to bunch, which could ruin the clean lines of your carefully pieced skull blocks.
Once you have mastered the basic Skull quilt – Pattern, the world of customization opens up to you. You can alter the “look” of the skull by changing the “mouth” section of the pattern to make it look like the skull is “smiling” or “screaming.” By simply substituting a few fabric strips in the Skull quilt – Pattern, you can give your quilt a distinct personality, turning a standard anatomical design into a piece of expressive, personalized character art that tells a story.
“Sugar Skull” embellishments are a popular way to customize a Skull quilt – Pattern. You can use your sewing machine’s decorative stitches or hand embroidery to add “floral” designs to the forehead or “swirls” around the eyes. This transformation of the Skull quilt – Pattern into a vibrant “Calavera” is a great way to celebrate heritage or simply to use up colorful scraps of thread and fabric. Adding beads or sequins can also give your handmade skull a festive, jewelry-like quality that catches the light.
For those who enjoy a more “gothic” or “macabre” style, you can use the Skull quilt – Pattern to experiment with “distressed” fabrics. Using “tea-dyed” muslin or fabrics with a “crackled” print can make the skull look like an ancient artifact. Some quilters even use “fabric paint” to add realistic weathering or “cracks” to the bone sections of the pattern once the piecing is done. This “mixed media” approach to the Skull quilt – Pattern is very popular in the art-quilt community and results in a truly unique piece.
Quilting “motifs” within the skull itself is another way to elevate the Skull quilt – Pattern. Instead of just quilting “in the ditch,” you can quilt realistic bone textures, sutures, and “cracks” directly into the fabric. This adds a level of detail that isn’t present in the pieced pattern alone. If you have a long-arm quilting machine, you can even download digital “skull quilting designs” that are specifically calibrated to fit the dimensions of your Skull quilt – Pattern blocks.
You can also adapt the Skull quilt – Pattern to different seasons or holidays. A “Santa Skull” for Christmas, a “Vampire Skull” for Halloween, or a “Floral Skull” for Spring—the possibilities are endless. By swapping the background fabric or the “accessories” around the skull in the pattern, you can create a rotating collection of themed quilts that keep your home decor feeling fresh, edgy, and exciting throughout the entire year.
Finally, consider the “binding” as the final frame for your Skull quilt – Pattern. A striped “bias binding” can add a sense of movement, while a solid black binding provides a clean, modern finish. Some makers even use “piping” or “lace” edges to give the skull quilt a vintage, Victorian-mourning feel. No matter how you choose to finish it, the Skull quilt – Pattern provides a rock-solid foundation for your most adventurous creative ideas, ensuring your work is both technically sound and visually stunning.
1. Is the Skull quilt – Pattern suitable for beginners?
It depends on the specific pattern. Some “simplified” appliqué versions are great for beginners, while “foundation paper piecing” (FPP) patterns are better suited for intermediate quilters. Always check the “skill level” rating on the Skull quilt – Pattern before purchasing.
2. How much fabric do I need for a standard-sized Skull quilt?
A typical lap-sized Skull quilt – Pattern usually requires about 3-4 yards of background fabric and 1-2 yards of “bone” fabric. If you are doing a “Sugar Skull” version with many colors, you can use “Fat Quarters” for the colorful details.
3. What is the best way to handle the small pieces in the jaw?
Starch is your best friend! Spraying your fabric with a “stiffening starch” before cutting makes the small units of the Skull quilt – Pattern much easier to handle and prevents the seams from “fraying” or “stretching” as you sew.
4. Can I use this pattern for a “Day of the Dead” celebration?
Absolutely! The Skull quilt – Pattern is the perfect base for a “Dia de los Muertos” altar cloth or wall hanging. Just add bright floral appliqués and embroidery to the basic skull block to create a traditional Calavera look.
5. Why are my skull’s eyes looking asymmetrical?
This is usually a result of “seam allowance creep.” If your seams are slightly off-center in the early stages of the Skull quilt – Pattern, the error will multiply. Using “pins” at every intersection is the best way to keep the skull motif symmetrical.
6. Where can I find variations of the Skull quilt – Pattern?
Many independent designers sell Skull quilt – Pattern PDFs on platforms like Etsy or their own websites. You can find everything from “minimalist” modern skulls to “realistic” anatomical designs to “pixel art” versions.
In conclusion, the Skull quilt – Pattern is a versatile and deeply rewarding project that allows you to bridge the gap between traditional craft and modern, edgy design. Throughout this article, we have explored the technical foundations of the pattern, the essential tools like rotary cutters and low-loft batting needed for success, and the step-by-step methods for building a clean, striking skull motif.
We also delved into the world of customization, showing how a simple quilt pattern can be transformed into a “Sugar Skull,” a “Gothic artifact,” or a “Holiday-themed” masterpiece. By focusing on precision, color contrast, and creative quilting, you can turn a collection of fabric scraps into a powerful piece of textile art that reflects your unique personality.


