
American-style placemat with a fruit theme - Pattern

The Snowman Block – Pattern is one of the most heartwarming projects you can undertake during the colder months, offering a delightful way to bring the spirit of winter into your home through the art of quilting. Whether you are a seasoned quilter or a beginner looking for a festive challenge, this specific Snowman Block – Pattern provides a versatile foundation for wall hangings, table runners, or even full-sized heirloom quilts. The beauty of this design lies in its simplicity and the room it allows for personalization, making every quilt block a unique piece of textile art.
Crafting a Snowman Block – Pattern allows you to experiment with various textures and shades of white, ivory, and cream to give your frosty friend a multidimensional look. Many enthusiasts find that using a low-volume fabric for the background helps the Snowman Block – Pattern truly pop, while vibrant scraps of fabric can be repurposed for the snowman’s iconic scarf and hat. As the winter season approaches, having a go-to quilt pattern like this one ensures you always have a thoughtful, handmade gift idea ready for friends and family who appreciate the “hygge” lifestyle.
In the world of modern quilting, the Snowman Block – Pattern has seen a resurgence thanks to the popularity of foundation paper piecing and applique techniques. This article will dive deep into the essential components of creating this charming block, ensuring your quilting project is a success from the first cut to the final stitch. By focusing on high-quality quilting cotton and precise measurements, you can ensure that your Snowman Block – Pattern remains a durable and cherished part of your holiday decor for years to come.
Selecting high-quality quilting fabric is the first step to ensuring your Snowman Block – Pattern looks professional and lasts for generations. You will want to look for 100% cotton fabric with a high thread count to prevent fraying during the assembly process. For the snowman’s body, consider using tone-on-tone white prints or subtle snowflakes to add visual interest without being distracting.
The background of your Snowman Block – Pattern serves as the “sky” or the environment where your character lives, so choosing a contrasting fabric is vital. Deep blues, frosty greys, or even a whimsical polka dot can provide the perfect backdrop for your quilt design. Remember that the Snowman Block – Pattern relies on the contrast between the figure and the background to maintain its iconic silhouette.
Don’t forget the importance of your notions when working on a Snowman Block – Pattern. Using a rotary cutter, a fresh sewing machine needle, and high-quality Aurifil thread will make the construction much smoother. Precision is key in patchwork quilting, and having the right tools ensures that every corner of your Snowman Block – Pattern aligns perfectly.
For the smaller details like the carrot nose and coal eyes, you might want to use fusible web for applique. This technique allows you to bond small pieces of fabric to the Snowman Block – Pattern without the need for complex stitching. It is a fantastic way to add character to your quilt block without increasing the difficulty level significantly.
Batting is another consideration if you are turning your Snowman Block – Pattern into a standalone potholder or a small wall hanging. A cotton-poly blend batting offers a bit of loft, which can give your snowman a slightly “puffy” and realistic look. The way you layer your Snowman Block – Pattern will ultimately determine the weight and warmth of the finished piece.
Finally, consider your color palette carefully before you begin cutting. While traditional colors are always a hit, a modern Snowman Block – Pattern might feature “boho” colors like terracotta, sage green, and mustard yellow for the accessories. This creative freedom is what makes the Snowman Block – Pattern a favorite among creative quilters worldwide.
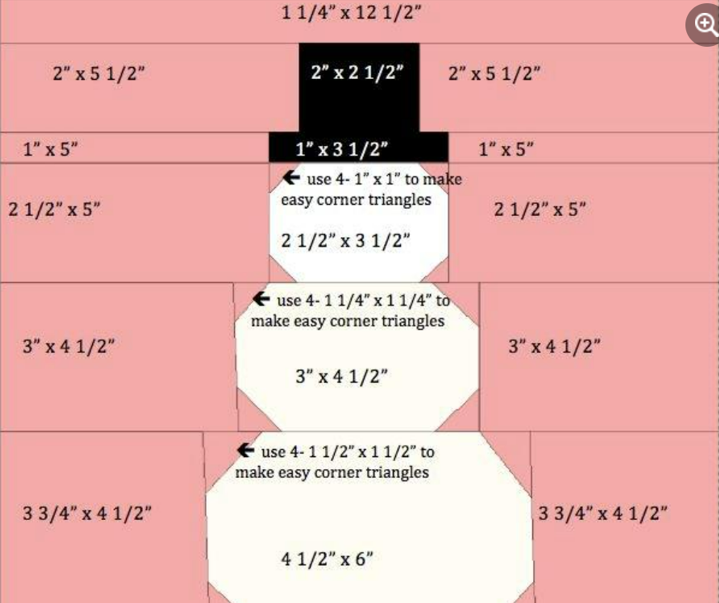
The Snowman Block – Pattern is typically constructed using a series of squares and rectangles, often utilizing the snowballing technique to create rounded corners. By sewing smaller squares onto the corners of larger blocks and trimming the excess, you can transform a sharp-edged square into the rounded segments of a Snowman Block – Pattern. This method is much easier for beginners than sewing actual curves.
When following a Snowman Block – Pattern, it is crucial to maintain a consistent 1/4 inch seam allowance. This is the standard in the quilting world, and even a slight deviation can cause the pieces of your Snowman Block – Pattern to misalign. Using a quarter-inch foot on your sewing machine can help you maintain accuracy throughout the entire project.
The assembly usually happens in rows, starting from the top of the hat down to the base of the snowman. In a standard Snowman Block – Pattern, the head is the smallest circle, followed by a medium-sized middle section and a large base. Each section of the Snowman Block – Pattern is pieced individually before being joined together to create the full figure.
Pressing your seams is a step you cannot skip when working on a Snowman Block – Pattern. For a flatter finish, many quilters prefer to press seams open, though pressing to the dark side is also common to prevent the seam allowance from showing through light-colored fabrics. Properly pressed seams ensure that your Snowman Block – Pattern lies flat and is easy to quilt over later.
If your Snowman Block – Pattern includes intricate elements like arms made of “twigs,” these are often added using embroidery stitches or thin strips of fabric. Adding these details transforms a simple geometric shape into a recognizable character. The Snowman Block – Pattern thrives on these small, thoughtful additions that bring the “frosty” personality to life.
As you finish each stage of the Snowman Block – Pattern, it is helpful to square up your block. Using a large square quilting ruler, trim the edges to ensure the block is perfectly square. This step is vital if you plan on joining multiple Snowman Block – Pattern units together into a larger quilt top or a decorative border.
One of the most exciting aspects of the Snowman Block – Pattern is the ability to “dress up” your snowman. You can use scrap fabrics to create a variety of hats, from classic top hats to colorful beanies with pom-poms. Customizing the accessories in your Snowman Block – Pattern allows you to match the quilt to a specific room’s decor or a person’s favorite colors.
Embellishments can take your Snowman Block – Pattern to the next level. Consider using buttons for the snowman’s coat or even tiny beads for the eyes. While these aren’t always practical for a baby quilt, they add wonderful texture and charm to a decorative wall hanging based on the Snowman Block – Pattern.
You can also vary the size of your Snowman Block – Pattern by scaling the measurements up or down. A tiny Snowman Block – Pattern can be turned into a festive ornament or a pocket on a Christmas stocking. Conversely, a large-scale Snowman Block – Pattern can serve as the central medallion for a holiday-themed bedspread.
The choice of quilting design—the stitching that holds the layers together—also impacts the look of your Snowman Block – Pattern. Swirly quilting lines can mimic the look of wind and blowing snow, while pebble quilting can look like falling snow. These details enhance the winter theme inherent in every Snowman Block – Pattern.
Incorporating different fabric types, such as flannel or minky, for the snowman’s body can provide a soft, tactile experience. This is especially popular when the Snowman Block – Pattern is used for children’s items. The contrast between the fuzzy snowman and the crisp cotton background makes the Snowman Block – Pattern visually and physically interesting.
Finally, don’t be afraid to add a “signature” to your Snowman Block – Pattern. Whether it’s a small embroidered year in the corner or a specific fabric you use in all your projects, personalization makes the Snowman Block – Pattern more than just a craft—it makes it a piece of your personal history as a maker.
One common issue quilters face with the Snowman Block – Pattern is the “stretching” of pieces, especially when working with small triangles. To avoid this, try using fabric starch to stiffen the fabric before cutting. This keeps the grain of the fabric stable while you piece together the various components of your Snowman Block – Pattern.
If you find that the corners of your Snowman Block – Pattern aren’t matching up, it may be due to inaccurate cutting. Always “measure twice and cut once.” Even a 1/8 inch error can snowball (pun intended!) into a significant misalignment by the time you reach the final row of your Snowman Block – Pattern.
Sometimes the white fabric of the snowman can be slightly transparent, allowing the darker seam allowances behind it to show through. To fix this in your Snowman Block – Pattern, you can use a double layer of white fabric or choose a slightly thicker white-on-white print that offers more opacity.
When adding the face to your Snowman Block – Pattern, placement is everything. If the eyes are too high or the nose is too low, the snowman can look a bit “off.” It is often helpful to print out a template of the Snowman Block – Pattern and play with the placement of the facial features before stitching them down permanently.
If you are struggling with the snowballing corners of the Snowman Block – Pattern, consider drawing a diagonal line on the back of your small corner squares. Sewing exactly on this line ensures that when you fold the triangle over, it matches the edge of the larger block perfectly. This is a classic quilting hack for a perfect Snowman Block – Pattern.
Lastly, if your Snowman Block – Pattern looks a bit wavy or distorted after sewing, a good steam pressing can often work wonders. However, be careful not to “push” the iron, as this can stretch the fabric. Instead, lift and press the iron down firmly on the Snowman Block – Pattern to set the stitches and flatten the block.
Can a beginner make a Snowman Block – Pattern?
Yes! Most Snowman Block – Pattern designs are created using basic shapes like squares and rectangles. If you can sew a straight line and follow a basic diagram, you can successfully complete this project.
What is the best size for a Snowman Block – Pattern?
While sizes vary, a 12-inch finished block is the most common. This size is standard in the quilting world and makes it easy to incorporate the Snowman Block – Pattern into most existing quilt layouts.
How do I wash a quilt made with the Snowman Block – Pattern?
It is recommended to wash your quilt on a gentle cycle with cold water. Using a color catcher is a great idea, especially if you used bright red or green fabrics for the snowman’s scarf, to prevent bleeding onto the white Snowman Block – Pattern.
Can I use the Snowman Block – Pattern for embroidery?
Absolutely. Many people use the basic outline of a Snowman Block – Pattern as a guide for hand embroidery or machine embroidery, rather than traditional piecing.
What fabrics are best for the “carrot” nose in the pattern?
A bright orange solid cotton or a small orange print works best. Since it is such a small piece, you can even use a scrap of felt for added texture.
Do I need special rulers for the Snowman Block – Pattern?
No special rulers are strictly required, but a clear acrylic quilting ruler with 45-degree markings is very helpful for ensuring your angles are correct.
The Snowman Block – Pattern is a timeless design that captures the joy and whimsy of the winter season. Throughout this article, we have explored the essential materials, the construction techniques, and the endless ways you can customize this pattern to make it your own.
From choosing the perfect quilting cotton to troubleshooting common sewing errors, you now have the knowledge to create a beautiful Snowman Block – Pattern that will brighten up any home. Whether you are making a single block or a whole flurry of them, the process of piecing together this chilly character is sure to bring a smile to your face.


