
American-style placemat with a fruit theme - Pattern

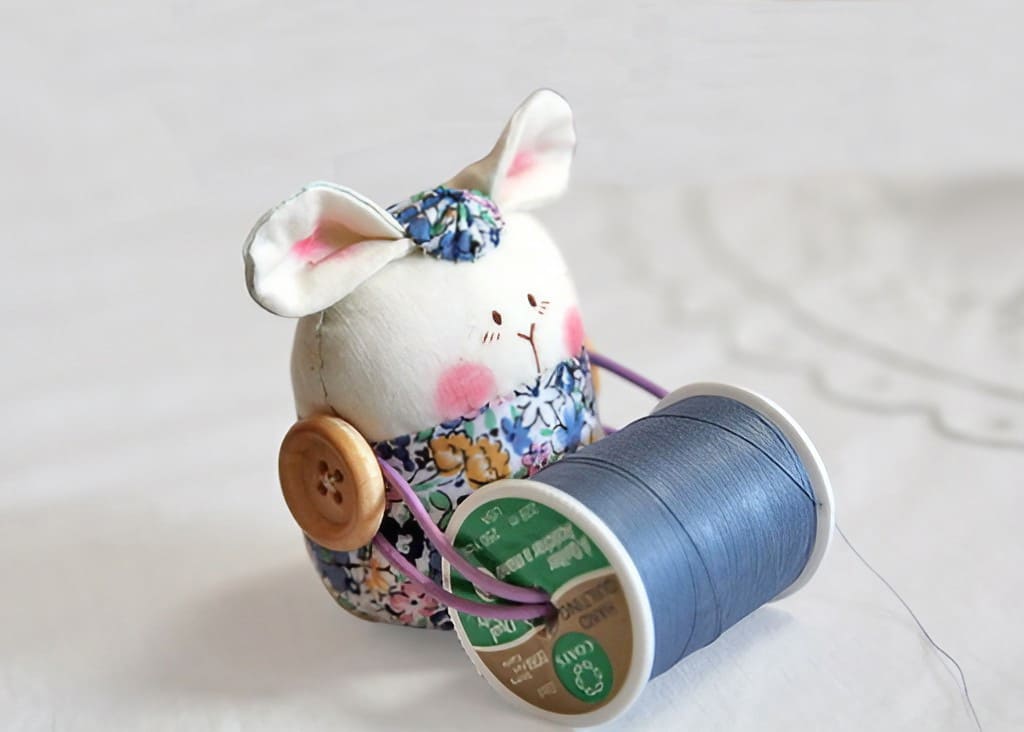
This Spool holder – Pin cushion Tutorial – Pattern is the ultimate guide for any sewing enthusiast looking to combine functionality with a touch of handmade charm. If you have ever struggled with stray threads or misplaced needles while working on a project, creating your own spool holder integrated with a pin cushion is a game-changer for your workspace organization. By following a simple pattern, you can transform scrap fabric into a professional-grade tool that keeps your most essential supplies right where you need them.
In the world of sewing and crafting, efficiency is just as important as creativity, and that is where the Spool holder – Pin cushion concept shines. Instead of reaching across your table for different notions, this DIY project allows you to anchor your thread and store your pins in one compact, aesthetically pleasing unit. Using a well-drafted pattern ensures that your finished product is balanced, durable, and perfectly sized for standard thread spools, making it a staple in your sewing kit for years to come.
Setting up your sewing room should be an enjoyable process, and there is nothing more satisfying than using equipment you made yourself. This Spool holder – Pin cushion Tutorial – Pattern focuses on accessible techniques that beginners and experts alike can master. Throughout this article, we will dive deep into the specific materials required, the step-by-step construction process, and how to customize your pattern to match your personal style while adhering to the best practices for sewing room ergonomics.
A spool holder is a fundamental device designed to keep your thread organized and prevent it from tangling or rolling off the table during a project. In this specific Spool holder – Pin cushion design, the holder acts as a weighted base or a vertical peg that allows the thread to unwind smoothly. It is essential for maintaining consistent tension as you sew, whether you are working by hand or using a machine.
When we talk about a high-quality spool holder, we are looking for stability and ease of use. If the base is too light, the tension of the thread can cause it to tip over, which is why many DIY pattern options suggest adding a weighted element at the bottom. This ensures that your workspace remains tidy and your workflow stays uninterrupted.
The beauty of making your own spool holder is the ability to customize the dimensions. Some threads come on oversized cones, while others are on small vintage wooden spools. By adjusting your pattern, you can create a bespoke solution that fits your specific inventory perfectly. It is all about tailoring the tool to the artist’s unique needs.
Beyond the mechanical function, a spool holder serves as a decorative element in your craft room. Choosing fabrics that complement your decor makes the tool feel like a part of the room rather than just a piece of plastic hardware. It turns a mundane task—holding thread—into a moment of visual inspiration every time you sit down to create.
In this Spool holder – Pin cushion Tutorial – Pattern, we emphasize the dual-purpose nature of the build. By integrating the holder with a cushion, you maximize your desk’s “real estate.” This is particularly helpful for those working in smaller studios or at kitchen tables where space is at a premium and every inch counts.
Ultimately, the spool holder is about control. It controls the thread, it controls the mess, and it helps you control the quality of your stitching. When you follow a precise pattern, you ensure that the geometry of the holder facilitates a snag-free experience, which is the hallmark of a well-organized sewing station.
A pin cushion is more than just a stuffed bit of fabric; it is a safety essential and an organizational pillar in any sewing project. Its primary job is to provide a soft, accessible place to store needles and pins so they aren’t lost in the carpet or, worse, left in your fabric. Integrating it into our Spool holder – Pin cushion design adds a layer of convenience that most commercial products lack.
The internal filling of a pin cushion is a crucial part of the pattern. Traditionalists often use crushed walnut shells or emery sand, which help to keep the pins sharp and clean over time. For our tutorial, we recommend a dense polyester batting or wool roving, which provides a firm grip on the pins while remaining easy to sew through during the assembly phase.
Design-wise, a pin cushion allows for incredible creative expression. Since it is a small surface area, you can use luxury fabric scraps, intricate embroidery, or even “fussy cut” your favorite prints to make the Spool holder – Pin cushion pop. It is the perfect canvas for practicing small-scale quilting or appliqué techniques before moving on to larger projects.
In the context of this Spool holder – Pin cushion Tutorial – Pattern, the cushion sits atop or alongside the thread stand. This positioning is strategic; as you finish a seam and need to pin the next section, your hand naturally moves toward the thread area. Having the pin cushion right there reduces repetitive motion and speeds up your assembly time significantly.
Durability is a key factor when selecting a pattern for your pin cushion. You want a fabric that can withstand hundreds of punctures without fraying or losing its shape. Tightly woven cottons, linens, or felt are the preferred choices because they “heal” well after the pin is removed, ensuring your project looks great even after years of heavy use.
Safety should never be overlooked in the craft room. A dedicated pin cushion prevents the dangerous habit of holding pins in your mouth—a common but risky practice among sewists. By creating a beautiful, specialized Spool holder – Pin cushion, you give yourself a visual reminder to stay organized and keep your workspace safe for yourself and others.
Selecting the right pattern is the most important step in the preparation phase of this project. A pattern acts as your blueprint, providing the exact shapes and seam allowances needed to ensure the Spool holder – Pin cushion fits together perfectly. Without a clear guide, you might find that the base is too small for the spool or the cushion is too loose to hold pins.
When looking at a pattern for a Spool holder – Pin cushion, pay attention to the construction of the base. It usually involves a circular or square bottom piece, a side panel, and a top “lid” that houses the cushion. Our recommended pattern uses a reinforced bottom to prevent sagging, which is a common issue with purely fabric-based organizers.
Otimização de SEO dictates that a good pattern should be easy to read and scale. If you prefer a larger pin cushion because you work with long quilting pins, you can simply enlarge the template by a certain percentage. The flexibility of a digital or paper pattern is what makes DIY projects so much more rewarding than buying mass-produced items.
Before cutting your expensive fabric, it is always a good idea to do a “test run” of the pattern using muslin or old bedsheets. This allows you to understand the 3D construction of the Spool holder – Pin cushion and see how the pieces interact. It is much easier to make adjustments to the pattern at this stage than after you have already started sewing.
The pattern also dictates the “filling” strategy. Some designs require you to leave a small opening for stuffing, which is later closed with a ladder stitch. Understanding where these openings are located in the pattern will help you achieve a professional, invisible finish that makes your Spool holder – Pin cushion look like a high-end boutique find.
Finally, remember that the pattern is a starting point, not a cage. Once you are comfortable with the basic Spool holder – Pin cushion Tutorial – Pattern, you can add pockets for measuring tapes, loops for scissors, or even a small magnetic strip. Innovation in sewing often comes from taking a standard pattern and tweaking it to solve a specific problem.
The first step in our Spool holder – Pin cushion Tutorial – Pattern is the preparation of the fabric pieces. Once you have traced your pattern onto your chosen material, cut them out with sharp fabric shears, ensuring you stay exactly on the lines. Precision at this stage is what leads to a symmetrical spool holder that functions as intended without wobbling.
Next, we focus on the pin cushion section. You will sew the top fabric pieces together, leaving the designated gap from the pattern open for the stuffing. Turn the fabric right-side out and firmly pack it with your chosen filler. A well-stuffed pin cushion should be firm to the touch; if it feels squishy, add more filling to ensure it can support the weight of multiple pins.
To create the spool holder portion, you will need to prepare the central peg or the “seat” where the thread will rest. Many makers use a wooden dowel or a reinforced fabric tube. If using fabric, follow the pattern to create a narrow cylinder, turn it, and stuff it very tightly so it stays upright. This is the “spine” of your project.
Assembling the base of the Spool holder – Pin cushion requires joining the weighted bottom to the side walls. If you are adding a weight—like a large washer or a bag of poly-pellets—place it in the bottom before closing the final seam. This weight is what gives your spool holder the professional feel and prevents it from sliding across your table while you sew.
Now it is time to join the two main components. Secure the pin cushion to the base using a strong topstitch or a hidden hand stitch. Ensure the alignment matches your pattern perfectly. At this point, your Spool holder – Pin cushion should start taking its final shape, looking like a cohesive tool rather than just separate pieces of cloth.
The final touch in our Spool holder – Pin cushion Tutorial – Pattern involves a thorough quality check. Trim any loose threads, press the seams with an iron to give them a crisp look, and test the spool holder with a real thread spool. Congratulations! You have successfully combined three essential elements—a spool holder, a pin cushion, and a custom pattern—into one beautiful craft room accessory.
What is the best fabric to use for a Spool holder – Pin cushion?
The best fabric for this project is a high-quality, 100% cotton quilting fabric. It is easy to handle, comes in endless designs, and the weave is tight enough to hold the stuffing of the pin cushion securely without leaking.
How do I make my Spool holder – Pin cushion heavy enough?
To add weight to your spool holder, you can place a small bag of dried beans, clean sand, or metal washers at the very bottom of the base. This ensures that the pattern remains stable when you are pulling thread from the spool.
Can I wash my pin cushion?
It is generally not recommended to wash a pin cushion if it is filled with organic materials like walnut shells or sawdust, as they can mold. If you use polyester stuffing, you can spot clean the surface with a damp cloth, but avoid soaking the entire Spool holder – Pin cushion.
Why do I need a specific pattern for this?
A pattern ensures that the proportions are correct. Without a pattern, the hole for the thread spool might be too wide, or the pin cushion might be too heavy for the base, causing the whole unit to tip over.
What is the best filler for sharpening pins?
If you want your pin cushion to sharpen your needles, use emery sand or very fine steel wool. Most people use a mix of standard polyester fiberfill for volume and a small packet of emery for the sharpening benefit.
Is this project suitable for absolute beginners?
Yes! This Spool holder – Pin cushion Tutorial – Pattern is designed to be a “confident beginner” project. It involves basic straight seams, some curved sewing, and a small amount of hand-finishing, making it a great way to build your skills.
In this guide, we have explored the essential steps to creating a functional and beautiful sewing accessory using our Spool holder – Pin cushion Tutorial – Pattern.
We discussed the mechanical importance of a sturdy spool holder, the safety and organizational benefits of a well-made pin cushion, and the technical necessity of following a precise pattern. By combining these elements, you not only save space but also add a personalized touch to your creative environment.


