
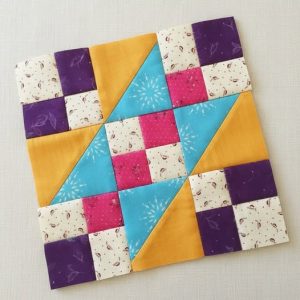
Horizontal Row Quilt - Pattern

The Stained Glass Quilt – Pattern is a visually captivating and rewarding quilting technique that brings the beauty of stained glass windows into the world of fabric. Combining vivid colors with bold outlines, this style of quilt makes every block look like a miniature masterpiece. It’s the perfect project for quilters who love dramatic contrast, vibrant design, and a touch of elegance in their handmade creations.
Inspired by the intricate work found in traditional stained glass artwork, this quilting style uses dark sashing or bias tape to mimic the lead outlines between panes of glass. The result is a quilt that’s not only colorful and lively but also structured and visually striking. While it may look complex at first glance, the Stained Glass Quilt – Pattern is surprisingly approachable for quilters of all levels, especially with the right techniques and guidance.
In this article, we’ll explore the essentials of working with the Stained Glass Quilt – Pattern, from choosing fabrics and planning your design to step-by-step construction and creative customization ideas. Whether you’re making a full-sized quilt or a small wall hanging, this pattern is sure to impress and inspire.
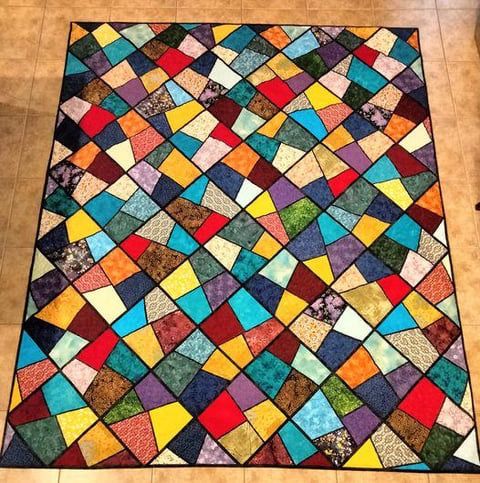
The Stained Glass Quilt – Pattern is a quilting technique designed to replicate the look of stained glass windows using fabric. It combines vibrant quilt blocks with bold black (or dark-colored) outlines, creating a dramatic effect that emphasizes both color and structure.
At the heart of the design is contrast. Quilters typically use bright, jewel-toned fabrics for the “glass” sections, set against a solid black or dark background to simulate the lead lines found in traditional stained glass. The juxtaposition of color and dark sashing gives each block a striking, dimensional quality.
The most common way to achieve this stained glass effect is by using narrow strips of fabric, fusible bias tape, or even hand-stitched piping to create the outlines. These “leading” lines separate sections within each block and give the piece its signature look.
There are several layout options available with the Stained Glass Quilt – Pattern. Some quilters prefer abstract designs with flowing curves, while others opt for more geometric or floral patterns. The style is flexible and works well for a variety of themes and aesthetics.
One of the best things about this pattern is its artistic freedom. Quilters can use fabric like painters use a palette, blending shades and textures to bring depth and life to each block. This is why stained glass quilting is often considered a form of textile art.
Despite its sophisticated appearance, many stained glass quilt designs are beginner-friendly, especially when using pre-made fusible bias tape and printable templates. With patience and attention to detail, anyone can bring this stunning pattern to life.
To get started on your own Stained Glass Quilt – Pattern, you’ll need a few specific materials and tools that will help you create the clean, bold lines that define this quilting style. Having the right supplies will make your process smoother and more enjoyable.
First, gather your fabrics. Choose vibrant solids or batiks for the stained glass “panes.” Rich jewel tones like sapphire, ruby, emerald, and amethyst work beautifully. For contrast, you’ll need black or very dark fabric to serve as the outlining sashing.
Next, decide on your method for creating the outlines. Fusible bias tape is a popular choice because it’s easy to apply and ensures clean, even lines. Alternatively, you can make your own bias strips using black fabric cut on the bias, or use satin ribbon for a different texture.
You’ll also need fusible web or interfacing, especially if you’re working with raw-edge appliqué techniques. This helps hold your fabric pieces in place while you assemble your blocks.
Basic quilting supplies like a rotary cutter, cutting mat, quilting ruler, and iron are essential. You’ll also need a sewing machine capable of straight and zigzag stitches—or a willingness to hand stitch for a more traditional approach.
If you’re following a printed or downloadable Stained Glass Quilt – Pattern, make sure to print the templates at the correct size. Clear plastic templates or pattern transfer paper can also be helpful for tracing shapes onto your fabric.
Optional tools include a light box for tracing designs, fine-tip fabric markers for marking cutting lines, and quilting gloves for added control when stitching layers together.
Once you’ve gathered your materials, it’s time to bring your Stained Glass Quilt – Pattern to life. Though the visual result is complex, the process is quite manageable when broken down into clear steps.
Start by selecting your pattern. Many quilters begin with a floral or geometric design to get used to the stained glass effect. Print or trace the design onto your background fabric or stabilizer, depending on your chosen method.
Cut your colored fabrics into the shapes needed for your quilt design. If you’re using raw-edge appliqué, fuse the shapes to the background using fusible web. Be careful to arrange them accurately before pressing.
Once your colorful fabric pieces are in place, it’s time to apply the “leading.” Lay your fusible bias tape or pre-cut black strips along the edges of each shape. Use a hot iron to press them down securely, following manufacturer instructions.
Secure the outlines with stitching. A narrow zigzag stitch along both edges of the tape ensures durability and adds dimension. Alternatively, you can use a decorative stitch or even hand embroidery for a more textured finish.
Join your blocks together, making sure the outlines line up neatly between blocks. Use sashing or borders as needed to keep the stained glass effect consistent across your quilt top.
Finally, layer your quilt with batting and backing, then quilt as desired. Many quilters choose minimal quilting for stained glass designs to let the pattern shine. Binding in black or dark fabric completes the effect and gives the quilt a polished edge.
One of the best things about working with a Stained Glass Quilt – Pattern is the room for creativity. You can make each project your own by experimenting with color, texture, and layout.
Try using ombré or gradient fabrics for a modern twist. The gradual color changes mimic the look of light filtering through stained glass and add an extra layer of visual interest to your design.
Change up the “lead” color. While black is traditional, you can try dark gray, navy, or even metallic gold bias tape for a different look. Just be sure the color you choose contrasts enough with your fabric panes to maintain the stained glass effect.
Incorporate mixed media. Some quilters add metallic threads, beading, or embroidery to mimic the sparkle of real glass and give their quilts a three-dimensional feel.
You can also experiment with different shapes. Abstract art, landscapes, animal portraits, and even seasonal themes work beautifully in stained glass style. Don’t be afraid to sketch your own patterns or modify existing ones.
For a modern aesthetic, use minimalistic blocks with lots of negative space and sharp angles. For something more traditional, opt for floral or Celtic-inspired motifs.
Finally, consider the final use of your quilt. Smaller blocks make great wall hangings, table runners, or even decorative pillows. Larger projects can be lap quilts or full bed-sized quilts, depending on how many blocks you assemble.
Q1: Is the stained glass quilting technique difficult for beginners?
A: Not at all! While it looks complex, many stained glass quilt patterns are beginner-friendly, especially when using fusible bias tape and clear templates.
Q2: What kind of fabric works best for the colored sections?
A: Vibrant solid cottons or batiks are ideal. They provide strong visual impact and are easy to work with. Avoid overly busy prints, as they can distract from the stained glass effect.
Q3: Do I have to use black for the outlines?
A: Black is traditional, but you can experiment with navy, charcoal, or even metallic bias tape for a different effect. Just ensure it contrasts well with your other fabrics.
Q4: Can I make my own bias tape instead of buying it?
A: Yes! You can cut strips of fabric on the bias and fold them using a bias tape maker. This gives you more control over the width, fabric, and texture of your leading lines.
Q5: What kind of quilting works best for a stained glass quilt?
A: Minimal quilting is usually best to let the design shine. Straight lines, echo quilting, or stitching in the ditch around your blocks can enhance the stained glass effect.
Q6: Is it possible to make stained glass quilts by hand?
A: Absolutely. While machine stitching is faster, many quilters enjoy hand-stitching their bias tape and outlines for a more traditional and detailed finish.
The Stained Glass Quilt – Pattern offers a visually stunning and creatively fulfilling quilting experience. With its bold outlines, vivid colors, and artistic flair, it allows you to turn fabric into works of art that truly resemble stained glass windows.
In this article, we covered what makes the pattern special, what tools and materials you need, step-by-step instructions, and ideas for taking your design further with personal touches. Whether you’re crafting a gift, a showpiece, or simply exploring a new technique, stained glass quilting brings beauty, color, and inspiration into every stitch.
Have you tried the Stained Glass Quilt – Pattern yet? We’d love
to hear your thoughts! Leave a sincere opinion in the comments and feel free to share your experiences, tips, or ideas with other quilters. Let’s continue to inspire each other in this vibrant and ever-evolving quilting journey!


