
Horizontal Row Quilt - Pattern

The Star Block – Quilt Pattern is one of the most beloved and timeless designs in the world of quilting. Known for its crisp lines and eye-catching symmetry, the star block has appeared in traditional and modern quilts alike for generations. Whether you’re an experienced quilter or a beginner looking to learn the basics, this pattern offers versatility, beauty, and creativity in every stitch.
What makes the Star Block – Quilt Pattern so appealing is its ability to be both simple and complex. Depending on how it’s constructed, it can range from basic star shapes to intricate, multi-fabric designs that showcase a quilter’s true artistry. Because of this flexibility, it has become a go-to design for many quilting projects—from small wall hangings to full-sized bed quilts.
In this article, we’ll explore everything you need to know about working with the Star Block – Quilt Pattern: the tools and materials required, how to piece your blocks together, design variations to consider, and expert tips for creating clean, striking results. Plus, a detailed FAQ at the end will answer common questions from quilters around the world.
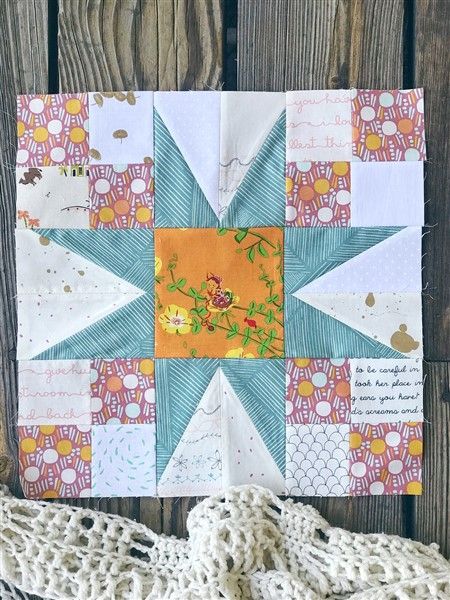
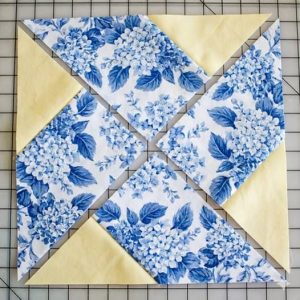
The Star Block – Quilt Pattern is characterized by its pointed shapes radiating from a central point, creating the illusion of a star on fabric. This iconic motif dates back to early American quilting and has since evolved into various interpretations, such as the Ohio Star, Sawtooth Star, and Lemoyne Star.
At its core, a star block is usually made up of squares and triangles arranged symmetrically. This makes it ideal for teaching foundational quilting skills, like half-square triangles (HSTs), flying geese units, and precise seam alignment. The clear geometric layout helps quilters improve their piecing accuracy.
Quilters love the Star Block – Quilt Pattern for its balance between structure and freedom. Once you understand the core layout, it’s easy to experiment with fabric placement, color contrast, and secondary designs that emerge when multiple blocks are joined together in a quilt top.
Most commonly, star blocks are created in 6”, 9”, or 12” finished sizes, but you can scale them up or down depending on your project. Some quilters even use oversized star blocks for bold, modern quilts with minimal piecing required.
The pattern also allows for scrap-friendly construction. You can use a variety of prints, solids, or leftover fabric pieces for the star points, creating a dynamic and textured look without needing to buy new material.
Whether you’re making one block for a sampler quilt or repeating it across an entire layout, the Star Block – Quilt Pattern is adaptable, beginner-friendly, and endlessly charming.
Before beginning your Star Block – Quilt Pattern project, it’s essential to gather your materials and prepare your workspace. Having everything ready will make your sewing experience more enjoyable and efficient.
Start with high-quality 100% cotton fabric, which is ideal for quilting due to its durability and ease of handling. You’ll typically need a light background fabric, one or two contrasting colors for the star points, and perhaps a third color for the center square.
Accurate cutting is key, so use a rotary cutter, cutting mat, and quilting rulers to ensure your fabric pieces are uniform. Consistency in size will help your blocks line up neatly and prevent frustrating mismatches.
A sewing machine with a 1/4″ foot is highly recommended for maintaining accurate seam allowances. You can also hand-piece star blocks if you prefer a slower, more meditative sewing process.
Pressing tools are vital in creating crisp, flat seams. A steam iron or mini iron works well, and using a wool pressing mat can help retain heat and improve precision during pressing.
Other helpful tools include fabric marking pens, straight pins or sewing clips, a seam ripper (for inevitable mistakes), and starch spray for stabilizing lightweight fabrics.
Lastly, keep your Star Block – Quilt Pattern instructions close by. Whether you’re following a printed guide, a digital download, or your own sketch, having clear visuals will make block construction more intuitive.
Building a Star Block – Quilt Pattern typically starts with understanding its structure. Let’s walk through the process of making a simple 12-inch finished Sawtooth Star block—an ideal choice for both beginners and seasoned quilters.
Begin by cutting your fabric. For one 12” block, you’ll usually need:
Construct the flying geese units by placing a small square on one end of the rectangle, drawing a diagonal line, stitching on that line, and trimming away the excess. Repeat on the other side to form a triangle that represents one star point.
Once your flying geese units are ready, lay out the block in a 3×3 grid: corner squares in the corners, flying geese on each side pointing toward the center, and the large square in the middle.
Sew the rows together—first joining pieces in each row, then sewing the rows to each other. Be sure to press your seams flat after each step, alternating directions to nest seams neatly.
Check your finished block size. It should measure 12.5” before being sewn into a quilt. If it’s off by more than 1/8”, remeasure your components or double-check your seam allowances.
Repeat this process for however many blocks your quilt requires. As you gain confidence, consider experimenting with different fabric combinations or trying alternative star block variations.
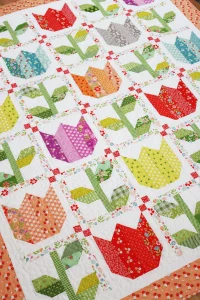
The Star Block – Quilt Pattern is far from limited to one style. It offers endless opportunities to explore color, layout, and creativity. Once you master the basics, you can truly make this design your own.
Try using low-volume backgrounds and bright or bold star points to make your stars pop. This approach is popular in modern quilting and adds a fresh, clean look to your design.
You can alternate star blocks with solid squares or sashing for a less busy layout. This technique gives your stars room to shine and makes the quilt top come together faster.
Mix different star block styles in one quilt for a stunning sampler. Include Ohio Stars, Eight-Point Stars, Friendship Stars, and Variable Stars to show off your skills and create a dynamic look.
Another idea is to use negative space creatively. Oversized stars placed against a solid background create a bold, minimalist aesthetic that works well for wall hangings or baby quilts.
Play with symmetry and rotation by placing stars in diagonal layouts, alternating directions, or staggering block positions. Small changes in layout can completely transform the look of your quilt.
Finally, consider making a memory quilt by using meaningful fabrics—like old shirts or baby clothes—as the fabric for your star blocks. This adds sentimental value and turns your quilt into a treasured heirloom.
Q1: What is the easiest star block for beginners?
The Sawtooth Star is one of the easiest and most popular star blocks. It involves basic flying geese units and squares, making it manageable for beginners.
Q2: How big should my star blocks be?
Common sizes include 6”, 9”, and 12” finished blocks. You can scale up or down depending on your quilt size and desired block layout.
Q3: Can I use scraps for a Star Block – Quilt Pattern?
Absolutely! This pattern is very scrap-friendly, especially if you use a consistent background fabric to tie everything together.
Q4: How do I get my star points to align perfectly?
Accurate cutting and consistent 1/4” seam allowances are key. Press carefully and use pins or clips to help align seams during assembly.
Q5: What’s the difference between an Ohio Star and a Sawtooth Star?
The Ohio Star uses quarter-square triangles for the star points, while the Sawtooth Star uses flying geese units. Both are traditional and beautiful.
Q6: Can I make a star block quilt without a pattern?
Yes! Once you understand the block’s structure, you can draft your own versions on graph paper or use quilt design software to plan your layout.
The Star Block – Quilt Pattern is a timeless favorite for a reason. It combines beauty, symmetry, and creative freedom all in one. Whether you’re just starting out or have been quilting for years, there’s always something new to discover with this versatile pattern.
We’ve covered the basics of the star block, the tools you’ll need, how to construct your blocks step-by-step, and inspiring ways to customize your quilt. With a little patience and practice, you’ll soon be stitching your own starry masterpieces.
We’d love to hear from you! If you’ve tried the Star Block – Quilt Pattern or plan to start, please leave a sincere comment below with your thoughts, experiences, or suggestions for future tutorials. Happy quilting! ✂️🧵🌟


