
Horizontal Row Quilt - Pattern

The Star Glow Quilt – Pattern is one of the most visually captivating quilting designs, admired for its radiant starburst layout and glowing effect created through thoughtful color placement. Whether you are new to quilting or a seasoned maker, working with a Star Glow pattern is both rewarding and creatively fulfilling. It allows you to play with symmetry, fabric tones, and light vs. dark contrasts to create a quilt that truly shines.
This quilting pattern is especially popular among modern and traditional quilters alike because it bridges both aesthetics. The star motifs evoke a classic, timeless feel, while the glowing layout gives it a contemporary edge. Whether you’re making a wall hanging, a baby quilt, or a full-sized bedspread, a Star Glow Quilt – Pattern is versatile enough to suit any purpose or style.
In this article, we’ll dive into every essential aspect of the Star Glow Quilt – Pattern, from choosing fabrics and understanding color gradation to sewing techniques and finishing touches. We’ll also provide tips for beginners and creative ideas for advanced quilters who want to take their Star Glow quilt to the next level.
When working with the Star Glow Quilt – Pattern, your fabric and color choices are what bring the design to life. Since the magic of the “glow” lies in the contrast, selecting the right palette is crucial.
Start by deciding on a color theme. Many quilters choose a monochromatic scheme (like shades of blue) to give a subtle, glowing effect. Others prefer a bold, high-contrast look using complementary colors such as purple and yellow or navy and coral.
To create the glow effect, select fabrics in graduated shades. You’ll want at least four or five tones of the same color, from very light (almost white) to very dark (near black). These will form the radiating rings of the star, giving it depth and movement.
Use solid fabrics or tone-on-tone prints for best results. Busy prints may distract from the star shape and make the glow less visible. That said, subtle batiks or ombre fabrics can add beautiful texture and nuance.
For the background, choose a neutral or dark color that allows the glowing star to pop. Black, charcoal, deep navy, or even dark green are great options for contrast and drama.
Always test your fabric layout before cutting by arranging the fabrics in the star pattern. This helps you visualize the transition from light to dark and adjust placements as needed.
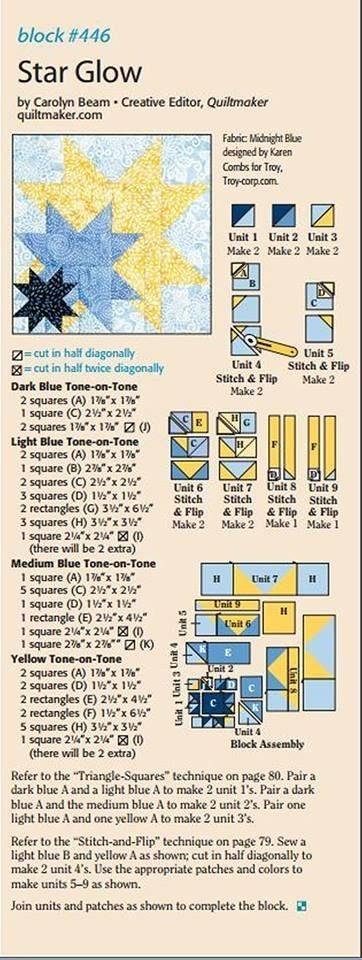
The Star Glow Quilt – Pattern is typically made using half-square triangles (HSTs) and flying geese blocks, which form the points and layers of the glowing star. Understanding the block structure is essential for accuracy and alignment.
Begin by studying the pattern diagram. The central star usually starts with a small block in the center, then expands outward through repeating star points and rows of triangles or diamonds.
Each layer of the star should transition gradually in tone. The innermost points are the lightest, with each round becoming slightly darker. This gradation is what creates the glowing illusion at the heart of the design.
You’ll need to be precise with cutting and piecing. Use a rotary cutter, cutting mat, and quilting ruler to ensure all triangles and strips are accurate. A 1/4-inch seam allowance is standard in quilting and must be consistent throughout the project.
For beginners, consider chain piecing your HSTs to save time. Sew the diagonal seams of all triangles in one go, then trim and press before assembling them into blocks.
Pay close attention to block orientation. Because the pattern relies on symmetry, even a single rotated block can disrupt the entire star’s balance. Always refer back to your pattern or a photo layout to double-check placement.
Once all the blocks are ready, assemble the quilt top row by row or section by section, pressing seams carefully and using pins or clips to maintain alignment.
Finishing your Star Glow Quilt – Pattern properly is just as important as piecing. The way you quilt, back, and bind your quilt can elevate the entire project and make the star truly shine.
Start by choosing your batting. A lightweight cotton or cotton/poly blend batting will give the quilt a soft drape while still providing enough structure to highlight the design. Thicker batting can make the star puffier, which some quilters prefer for visual impact.
Next, pick your backing fabric. You can go with a solid color, a subtle print, or even piece together leftover fabric from the quilt top. Make sure the backing complements the front without overpowering it.
For quilting, decide whether to machine quilt, hand quilt, or send it to a long-arm quilter. Many quilters opt for echo quilting, which follows the outline of the star to emphasize its shape. Straight-line quilting or gentle curves also work beautifully.
Consider using thread colors that blend or contrast with the fabrics. A light thread on dark fabric can highlight design lines, while a matching thread creates a seamless, smooth look.
Once quilted, trim the edges evenly and add a binding. Binding can match your background or provide a bold frame. Use double-fold binding for durability, and machine or hand-stitch it to secure.
Finally, don’t forget to label your quilt with the name, date, and your signature. It’s a piece of art and history, and your Star Glow quilt deserves that finishing touch.
While the traditional Star Glow Quilt – Pattern is stunning, there’s always room for creativity. You can customize your quilt in many ways to make it uniquely yours.
One fun variation is to change the shape of the star. Try a diamond-center star, or extend the star points to the edges for a more dramatic look. Some quilters also like to add secondary stars in the corners or borders.
You can also experiment with fabric textures. Mix in some metallic fabrics, velvets, or even hand-dyed fabrics to give your quilt extra depth and interest. This adds a tactile element to the glow effect.
Another idea is to make a mini quilt version of the pattern. Mini quilts are perfect for practicing new techniques or gifting to friends and family. They’re quick to make and easy to display.
Use embroidery or applique to add names, dates, or meaningful symbols to your quilt. This is especially beautiful for memory quilts, wedding gifts, or heirloom pieces.
Don’t be afraid to incorporate scraps or upcycled fabric. Not only is it sustainable, but it also adds character. Mixing vintage and modern fabrics can create a star that tells a story.
Lastly, consider making a seasonal Star Glow quilt. Use fall colors like rust and gold, winter tones like icy blue and silver, or spring pastels. You’ll love how different the same pattern looks with a new palette.
Q1: Is the Star Glow Quilt – Pattern suitable for beginners?
A: Yes, especially if you choose a simplified version with fewer blocks. The key is accurate cutting and careful block placement.
Q2: How much fabric do I need for a Star Glow Quilt?
A: It depends on the size of the quilt, but generally, you’ll need fat quarters or 1/4-yard cuts in 4–6 gradient shades, plus background, backing, and binding fabric.
Q3: Can I use printed fabrics for this pattern?
A: Yes, but solid or tone-on-tone prints work best. Busy patterns can distract from the glowing star effect.
Q4: What size is a standard Star Glow Quilt?
A: There’s no standard size—it can be as small as a wall hanging or as large as a queen-size bed quilt. Choose the size based on your purpose and available time.
Q5: What quilting design works best with this pattern?
A: Echo quilting enhances the star shape, while straight-line or gentle curve quilting keeps the focus on the pattern. Free-motion quilting can also add artistic flair.
Q6: How do I keep my fabric colors from bleeding?
A: Pre-wash your fabrics, especially darks and reds. Use a color catcher in your first wash after finishing the quilt to trap loose dyes.
The Star Glow Quilt – Pattern is more than just a quilt—it’s a celebration of color, symmetry, and creativity. Whether you’re drawn to its timeless star motif or the glowing effect created through thoughtful fabric placement, this pattern offers endless possibilities for quilters of all skill levels.
Throughout this guide, we’ve explored everything from choosing fabrics and piecing blocks to quilting techniques and creative variations. Whether you’re making your first Star Glow or your fifth, each quilt becomes a reflection of your style and love for the craft.
We’d love to hear your thoughts! If you’ve made a Star Glow quilt or plan to try this pattern, please leave a sincere opinion and suggestions in the comments. Your experiences and ideas help inspire others in the quilting community.


