
Bird-shaped Pincushion - Pattern

The Star Quilt – Pattern remains one of the most iconic and beloved designs in the history of American quilting, representing a perfect blend of celestial beauty and geometric precision. Whether you are walking through a museum of historic textiles or browsing a modern home decor shop, the striking points of a star-themed quilt are almost certain to catch your eye. This pattern is not just a layout of fabric; it is a symbol of guidance, hope, and expert craftsmanship that has been passed down through generations of makers who find joy in the rhythmic process of piecing together the night sky.
Choosing to start a Star Quilt – Pattern is an exciting milestone for any quilter, as it offers a vast array of variations ranging from the simple four-pointed star to the breathtakingly complex Lone Star or Bethlehem Star designs. The versatility of this specific style allows you to play with high-contrast colors, subtle gradients, and various fabric textures to create a piece that feels either vintage or cutting-edge. It serves as a fantastic canvas for storytelling, where each fabric scrap can represent a memory or a specific artistic choice made by the creator.
In this comprehensive guide, we are going to explore the fundamental elements that make the Star Quilt – Pattern so enduringly popular among enthusiasts worldwide. We will dive into the technical aspects of cutting “diamond” shapes, the secrets to achieving perfect “points” without losing them in your seams, and how to choose a color palette that makes your celestial design truly shine. By the time you reach the end of this article, you will have a deep understanding of how to navigate this quilt design with confidence and artistic flair.
The mathematical logic behind a Star Quilt – Pattern is what gives the finished product its sense of balance and harmony. Most star designs are built upon a grid system, often utilizing a “nine-patch” or “four-patch” foundation to organize the points around a central square. This structural clarity is what makes the pattern so adaptable; by simply changing the size of your base units, you can transform a small wall hanging into a massive king-sized bedspread while maintaining the same classic star silhouette.
One of the most famous variations of the Star Quilt – Pattern is the Sawtooth Star, which features a solid center square surrounded by eight triangles that form the “teeth” or points. This version is particularly favored by beginners because it avoids the difficult “Y-seams” often found in more complex designs. It relies heavily on the flying geese unit, a staple in quilting that consists of a large triangle flanked by two smaller ones, creating a sense of movement and directionality.
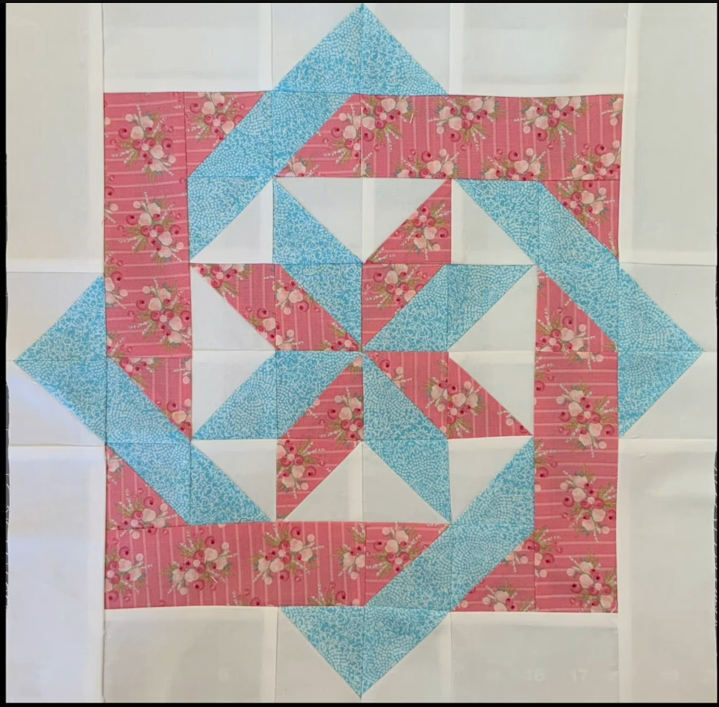
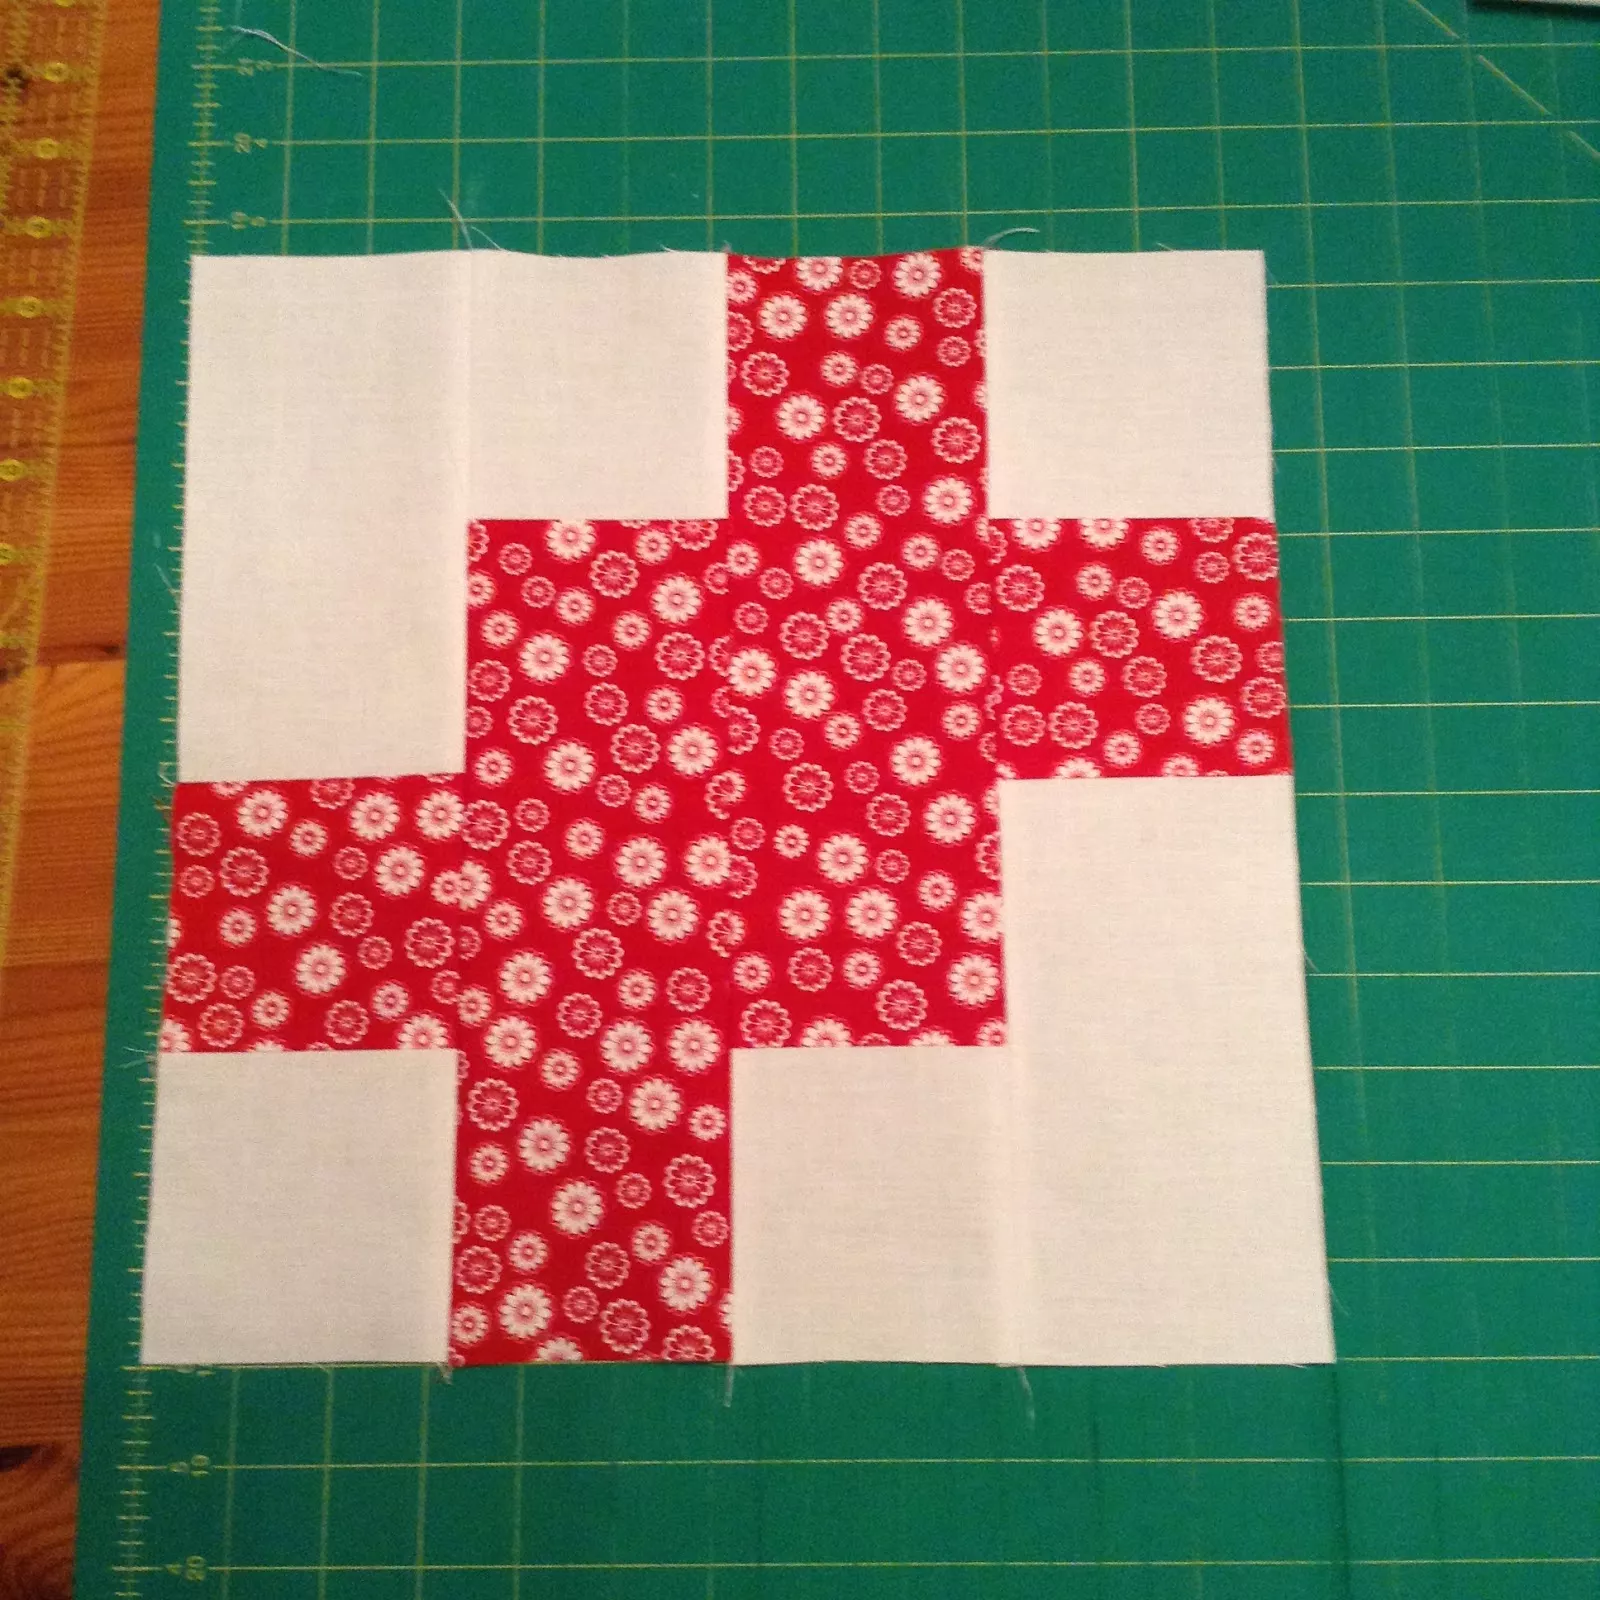
When working on a Star Quilt – Pattern, the concept of “fussy cutting” can be used to elevate the central motif. Fussy cutting involves selecting a specific detail from your fabric—such as a flower, a bird, or a geometric shape—and centering it perfectly within the middle square of the star. This technique turns the quilt into a series of framed portraits, giving the eye a place to land and adding a layer of narrative depth to your handmade textile.
The Lone Star variation is perhaps the most visually stunning version of the Star Quilt – Pattern, radiating from the center of the quilt in a massive explosion of color. This design is created by sewing long strips of fabric together, cutting them at an angle to create diamonds, and then joining those diamonds into larger sections. Because of the bias edges involved, this specific star layout requires a gentle hand and precise pinning to prevent the fabric from stretching out of shape.
For those who prefer a more modern look, the “Wonky Star” is a popular twist on the traditional Star Quilt – Pattern. In this style, the points are purposefully asymmetrical and irregular, removing the pressure of achieving perfect geometric precision. This improvisational approach is perfect for “scrappy” quilts where you are using up various leftovers from your stash, resulting in a vibrant and energetic quilt top that feels fresh and contemporary.
Regardless of the specific variation you choose, the primary goal of the Star Quilt – Pattern is to create contrast between the star and the background fabric. Dark stars on a light background tend to look traditional and crisp, while light-colored stars on a dark navy or charcoal background create a “glowing” effect that mimics the real night sky. This interplay of light and shadow is the secret ingredient that makes a star quilt feel truly magical.
The biggest challenge when tackling a Star Quilt – Pattern is ensuring that the tips of your stars do not disappear into the seam allowance. This common frustration, known as “cutting off your points,” usually happens when the quarter-inch seam is slightly too wide. To master this, many experts recommend using a “scant” quarter-inch seam, which is just a thread or two narrower than a standard measurement. This tiny adjustment provides the necessary “turn-of-cloth” space when you press your seams open.
Accuracy begins at the cutting mat, especially for a Star Quilt – Pattern involving diamonds or triangles. Using a high-quality rotary cutter with a fresh, sharp blade is essential for preventing the fabric from shifting as you cut. For complex star designs, specialized rulers like a 60-degree or 45-degree diamond ruler can save you a significant amount of time and reduce the likelihood of mathematical errors during the fabric preparation phase.
Pressing is the silent partner of sewing in a Star Quilt – Pattern. Many quilters prefer to press their seams open to reduce bulk at the intersections where multiple points meet. However, “nesting” seams—where you press adjacent seams in opposite directions—can also be very effective for ensuring that the points lock together perfectly. Using a tailor’s clapper can help flatten those thick intersections, ensuring your quilt top stays as flat as a pancake before it goes to the longarm.
Starch is a secret weapon for many fans of the Star Quilt – Pattern. Because star points often involve “bias” edges (diagonal cuts that are prone to stretching), applying a generous amount of fabric starch before cutting makes the fabric behave more like paper. This extra stiffness prevents the points from distorting as they move through the sewing machine, which is crucial for maintaining the sharp, needle-like tips that define a high-quality star block.
Pinning might seem tedious, but it is non-negotiable for a professional-looking Star Quilt – Pattern. When you are joining two sections where star points meet, you should place a pin exactly through the “point” of the triangle on both layers of fabric. By checking the alignment before you sew, you can ensure that the needle passes exactly through the intersection, resulting in a perfect “X” where the fabrics meet. This level of detail is what sets a masterpiece quilt apart from a casual project.
If you find that your Star Quilt – Pattern is starting to “pucker” or look wavy, it may be a sign that your tension is too high or that you are pulling the fabric as you sew. Always let the machine’s feed dogs do the work, simply guiding the fabric with your fingertips. Maintaining a relaxed but controlled pace will result in a much more uniform block construction, which is vital when you begin to join multiple stars into a single, cohesive quilt top.
The choice of fabric can completely redefine the character of your Star Quilt – Pattern. Traditional quilts often use small-scale floral prints or “civil war” reproduction fabrics to create a sense of history and heritage. These fabrics have a muted, earthy palette that lends itself to a cozy, farmhouse aesthetic. In this context, the star motif acts as a nostalgic anchor, reminding the viewer of the long history of domestic artistry.
On the other end of the spectrum, using solid fabrics or bold, geometric prints can turn a Star Quilt – Pattern into a piece of modern abstract art. Solids allow the focus to remain entirely on the lines and shapes of the star, highlighting the skill of the piecer. Using a monochromatic color scheme—for example, several shades of the same teal or orange—can create a sophisticated, architectural look that fits perfectly in a minimalist home.
Value contrast is the most important element of color theory in a Star Quilt – Pattern. “Value” refers to how light or dark a color is, regardless of the actual hue. To ensure your stars don’t disappear into the background, you should always check your fabrics using the “grayscale test.” By taking a black-and-white photo of your fabric pile, you can easily see if there is enough contrast to make the star points stand out clearly.
Don’t be afraid to experiment with “glow” effects in your Star Quilt – Pattern. By using a lighter fabric in the center of the star and gradually moving to darker shades toward the tips, you create an optical illusion of depth and luminosity. This technique is often used in the “Radiant Star” pattern and can make the quilt look as if it is illuminated from within, adding a stunning three-dimensional quality to your work.
Texture can also play a role in a Star Quilt – Pattern. While 100% cotton is the standard, incorporating small amounts of linen, silk, or even velvet can add a luxurious feel to the project. However, keep in mind that mixing different types of fabric requires extra care during the washing and quilting process, as different fibers shrink and react to heat at different rates. Most beginners should stick to high-quality “quilter’s weight” cotton for the best results.
Finally, consider the “negative space” surrounding your stars. In a Star Quilt – Pattern, the background is just as important as the stars themselves. Some modern quilters use the background to create “secondary patterns”—shapes that emerge only when the blocks are joined together. By carefully choosing a background color that interacts with the star points, you can create a complex visual puzzle that keeps the viewer engaged and highlights your design expertise.
Once you have completed your Star Quilt – Pattern blocks, you must decide how to join them. “Sashing”—the strips of fabric that separate the blocks—can act as a frame for each individual star. Using a contrasting sashing can help the stars pop, while using the same fabric as the block background can make the stars appear to “float” across the quilt. This decision significantly impacts the final visual flow of the quilt top.
Borders are the final architectural element of the Star Quilt – Pattern. A simple solid border can contain the energy of the stars, while a “pieced border” featuring smaller stars or triangles can extend the theme right to the edge of the binding. When calculating your borders, always measure through the center of the quilt to ensure they are the correct length; this prevents the “wavy border” syndrome that can plague an otherwise perfect star project.
The quilting itself—the stitching that holds the three layers together—should complement the Star Quilt – Pattern. For a traditional look, “stitch in the ditch” or a simple diagonal grid emphasizes the geometric lines of the stars. If you are using a longarm machine, a “feather” or “floral” motif can provide a beautiful contrast to the sharp, straight edges of the star points, creating a balance between softness and structure.
Echo quilting is another fantastic technique for a Star Quilt – Pattern. This involves stitching a series of lines that follow the shape of the star, moving outward in concentric paths. It mimics the ripples in a pond and draws the eye directly toward the center of your work. This style is particularly effective for large, single-star designs where the quilting texture needs to be the star of the show (pun intended).
The binding is the “frame” of your Star Quilt – Pattern. While many choose a matching color, a “striped” binding cut on the bias can add a playful, candy-cane effect to the edges. A hand-sewn binding provides a soft, professional finish that is highly prized in quilt competitions, while a machine-sewn binding is durable and perfect for quilts that will be used and washed frequently in a busy household.
Labeling your Star Quilt – Pattern is the final, essential step. A quilt is a piece of history, and future generations will want to know who made it, where it was made, and when it was completed. You can use a permanent fabric marker or embroider your details onto a small scrap of fabric and sew it to the back corner. It is the final “signature” on your handcrafted masterpiece, marking the end of a beautiful creative journey.
1. Is the Star Quilt – Pattern difficult for beginners?
It depends on the variation! A “Sawtooth Star” or a “Friendship Star” is very beginner-friendly because they use basic squares and triangles. Avoid “Lone Stars” or “Feathered Stars” until you are comfortable with bias edges and precision piecing.
2. How do I stop my star points from getting cut off?
The secret is the “scant quarter-inch” seam. Also, when sewing your blocks together, make sure your needle goes exactly through the intersection where the two triangles meet. If you sew even a tiny bit “above” that point, the tip will be lost.
3. What are the best colors for a Star Quilt – Pattern?
High contrast is king! Navy and white, red and cream, or black and yellow are classic combos. If you want a modern look, try using a gradient of one color against a very dark or very light background.
4. How much fabric do I need for a Star Quilt – Pattern?
This varies wildly by size. A standard throw-sized quilt usually requires about 6 to 8 yards of fabric total. Always check your specific pattern instructions before buying, and add an extra half-yard for “insurance” against cutting mistakes.
5. Can I use “Fat Quarters” for this pattern?
Yes! Most Star Quilt – Patterns are very fat-quarter friendly. Because stars are made of many small pieces, fat quarters provide a great variety of prints without requiring you to buy full yards of every color.
6. Why is my star block not perfectly square?
This usually happens due to inaccurate cutting or “fabric stretch.” Using starch before you cut and sewing with a consistent seam allowance will help. If it’s only slightly off, you can “square it up” with a large ruler before joining it to other blocks.
The Star Quilt – Pattern is more than just a configuration of fabric; it is a timeless celebration of symmetry, light, and craftsmanship. In this guide, we have explored how the architectural structure of the star provides a foundation for endless creativity, from the selection of high-contrast fabrics to the technical mastery required to keep those star points sharp and visible.
Whether you are building a traditional heritage piece or a modern abstract work of art, the principles of precision and color value remain your most important tools.


