
American-style placemat with a fruit theme - Pattern

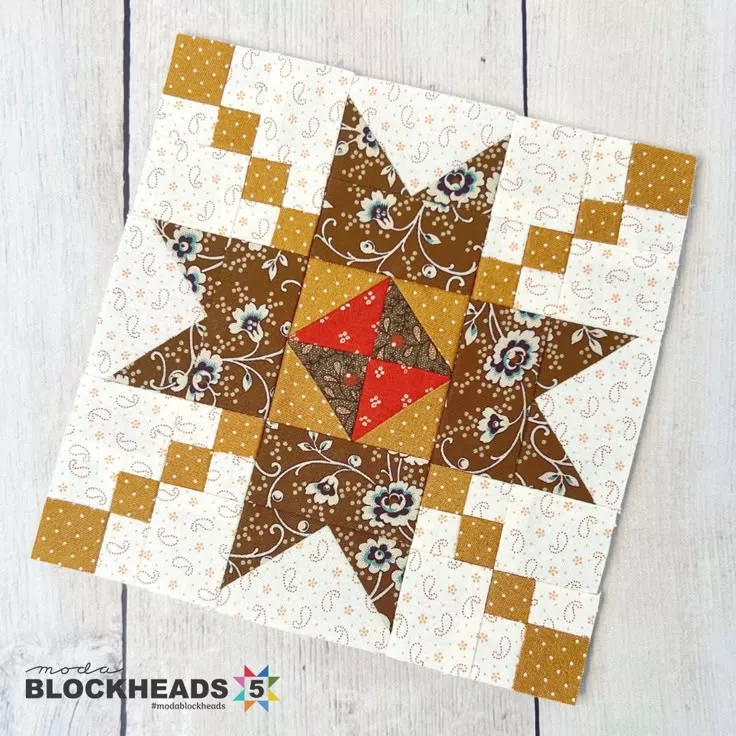
The Strata Star Quilt – Pattern is a breathtaking example of how traditional quilting geometry can be elevated through modern color-play and strategic fabric layering. For many quilters, the Strata Star Quilt – Pattern represents a milestone project that bridges the gap between intermediate skill levels and advanced artistic expression, offering a final product that looks far more complex than it is to assemble. By utilizing a technique that builds “strata” or layers of color, this design creates a shimmering, radiant effect that draws the eye toward the center of the star, making it a spectacular focal point for any bedroom or living space.
Embarking on a journey to create the Strata Star Quilt – Pattern requires an appreciation for precision cutting and a keen eye for value contrast. Unlike a standard star block, the Strata Star Quilt – Pattern relies on strip-pieced units that are then cut at specific angles to create the diamond shapes that form the star’s rays. This method, often referred to as “strip piecing,” allows for a faster assembly process while maintaining the intricate look of a multi-piece design, ensuring that even a large-scale quilt can be completed with consistent results across every block.
In this comprehensive guide, we will delve into the technical nuances of the Strata Star Quilt – Pattern, exploring everything from fabric selection to the final assembly of the radiant points. Whether you are attracted to the Strata Star Quilt – Pattern for its bold geometric lines or its ability to showcase a wide spectrum of fabric prints, understanding the underlying structure is key to a stress-free sewing experience. By focusing on the intersection of color and mathematics, you will be able to master this star quilt template and produce a handmade heirloom that carries a sense of movement and celestial wonder.

The core of the Strata Star Quilt – Pattern is built upon the concept of graduated color “strata.” To begin your project, you must select a range of fabrics that move from light to dark or through a specific color spectrum. This graduation is what gives the Strata Star Quilt – Pattern its signature “glow,” as the layers of fabric mimic the way light reflects off a gemstone. Choosing high-quality quilting cottons with a high thread count is essential here, as the project involves many bias edges that need to remain stable during the sewing and pressing phases.
The Strata Star Quilt – Pattern primarily uses diamond-shaped units, which are often constructed from long strips of fabric sewn together horizontally. These “strip sets” are the foundation of the design. When you cut across these sets at a 45-degree or 60-degree angle, you create a multicolored diamond that looks as though it was painstakingly pieced from tiny individual scraps. This strip-piecing efficiency is one of the main reasons the Strata Star Quilt – Pattern is so beloved by modern quilters who want a high-impact visual without thousands of tiny individual seams.
Precision is the most vital component when preparing your strip sets for the Strata Star Quilt – Pattern. Even a slight deviation in your 1/4 inch seam allowance can cause the stripes in your diamonds to misalign once the star points are joined. It is highly recommended to use a walking foot or a dual-feed system on your sewing machine to ensure that all layers of the strip set move at the same speed, preventing the “bowing” effect that can sometimes occur when sewing long, narrow strips of fabric together.
Once your strip sets are sewn, the Strata Star Quilt – Pattern requires careful cutting using a specialized quilting ruler with clear angle markings. For most versions of the star, you will be cutting “parallelograms” that eventually form the diamond points. To keep your work organized, it is helpful to label each cut piece by its position in the star. Using fabric-safe marking pens or numbered clips can help you keep track of which diamonds belong to the inner star and which belong to the outer rays of the Strata Star Quilt – Pattern.
Pressing is the “secret ingredient” that makes a Strata Star Quilt – Pattern lie flat and look professional. Because of the many intersections where the points meet, bulk can become an issue. Most experts suggest pressing seams open in this specific pattern to distribute the weight of the fabric evenly. Using a tailor’s clapper after steam-pressing can help flatten those bulky seams, ensuring that your quilt top remains smooth and doesn’t “bubble” when you eventually send it to the longarm quilter.
Lastly, the background fabric for your Strata Star Quilt – Pattern acts as the stage for your celestial performance. Most designers opt for a solid neutral, such as deep navy, crisp white, or charcoal gray, to let the colorful strata take center stage. This negative space is just as important as the star itself, as it provides the contrast needed for the star’s points to appear sharp and distinct. Selecting a background with a subtle tone-on-tone print can also add texture without distracting from the intricate geometry of the Strata Star Quilt – Pattern.
Value is the most important element of color theory when working with the Strata Star Quilt – Pattern. “Value” refers to how light or dark a color is, regardless of its hue. For the Strata Star Quilt – Pattern to have a 3D effect, you need a clear transition from your “highlight” fabrics (the brightest) to your “shadow” fabrics (the darkest). Using a grayscale filter on your smartphone to take a photo of your fabric choices is a brilliant trick; if the fabrics look distinct in black and white, they will work perfectly in your Strata Star Quilt – Pattern.
The “Star Points” in the Strata Star Quilt – Pattern are typically arranged so that the lightest colors are in the center, creating a “burst” effect. Alternatively, you can reverse this so the light is on the outer tips, making the star appear to reach outward. This flexibility in the Strata Star Quilt – Pattern allows you to experiment with different moods—from an “exploding” sunburst to a “deep space” nebula. The key is to ensure that each “layer” of the strata has enough contrast with its neighbor to remain visible.
Blending prints and solids can add a sophisticated layer of texture to your Strata Star Quilt – Pattern. While solids provide a clean, modern look, using small-scale ditsy prints or “batiks” can give the star an organic, shifting appearance. Batiks are particularly popular for the Strata Star Quilt – Pattern because they are high-density fabrics that don’t fray easily, which is a major advantage when dealing with the multiple bias-cut diamonds required for this specific design.
If you are struggling to choose a palette, consider using a pre-cut jelly roll or a “balipapa” for your Strata Star Quilt – Pattern. These pre-cut 2.5-inch strips are already color-coordinated by professional designers, taking the guesswork out of the selection process. However, ensure that the jelly roll has a wide enough range of values; if all the strips are medium-toned, the Strata Star Quilt – Pattern might look flat or “muddy” rather than vibrant and glowing.
The “Inner Star” and the “Outer Star” can also be treated as two separate color journeys within the same Strata Star Quilt – Pattern. For example, you could use warm oranges and yellows for the inner points and cool blues and purples for the outer points. This complementary color scheme creates a high-energy quilt that is visually stimulating. The Strata Star Quilt – Pattern is unique in that it rewards brave color choices, so don’t be afraid to step outside of your comfort zone.
Finally, always do a “test block” or a “dry run” before cutting all your fabric for the Strata Star Quilt – Pattern. Lay your strips out on a design wall or a flat floor to see how they interact. Sometimes a fabric that looks great in the bolt looks too busy when sewn into a multi-layered strata. Seeing the colors in their final orientation—at an angle—will give you the confidence to proceed with the full Strata Star Quilt – Pattern assembly without any second-guessing.
The most challenging part of the Strata Star Quilt – Pattern is joining the diamond units without “chopping off” the points. To achieve those razor-sharp angles, you must be meticulous with your pinning technique. Align the intersections of the strata by pushing a fine silk pin directly through the seam of the top diamond and the seam of the bottom diamond. This “matching of seams” ensures that the lines of color flow continuously across the Strata Star Quilt – Pattern without any jarring breaks.
Using a scant 1/4 inch seam is a professional secret for the Strata Star Quilt – Pattern. A “scant” seam is just one or two threads narrower than a true quarter-inch. This tiny bit of extra room accounts for the “turn of the cloth” when you press the seam open. Without this adjustment, your finished star blocks might end up a fraction of an inch too small, which makes it difficult to join them to the background squares and triangles of the Strata Star Quilt – Pattern.
“Y-seams” are often a part of traditional star construction, but many modern Strata Star Quilt – Pattern designs have been modified to avoid them. If your pattern does use Y-seams, the key is to stop your stitching exactly 1/4 inch from the edge of the fabric and backstitch. This leaves the seam “floating” so you can pivot the next piece into place. While intimidating to beginners, mastering the Y-seam technique opens up a world of complex geometric quilting patterns that go far beyond basic squares.
To prevent the center of the star from becoming a “lump” of fabric, you can “swirl” the seams at the very center of the Strata Star Quilt – Pattern. This involves unpicking a few stitches in the seam allowance and pressing the seams in a circular fashion. This center-point flattening technique allows the middle of the quilt to lie perfectly flat, which is essential for successful machine quilting later on. A flat center is the sign of a masterfully constructed Strata Star Quilt – Pattern.
Starch is your best friend when working with the Strata Star Quilt – Pattern. Because the diamonds are cut on the bias, the fabric can easily stretch out of shape if handled too roughly. Applying a heavy starch spray to your fabric before cutting provides the fibers with a “memory,” making them act more like paper than cloth. This fabric stabilization is a game-changer for maintaining the precision required for the Strata Star Quilt – Pattern, especially if you are working on a large-scale project.
As you finish each ray of the Strata Star Quilt – Pattern, check it against your ruler to make sure it is still “square” or at the correct angle. It is much easier to fix a slight misalignment in a single ray than it is to fix the entire star at the end. Consistent quality control checks throughout the construction process will ensure that when you finally add your setting triangles, the Strata Star Quilt – Pattern comes together perfectly without any puckering or “wavy” edges.
The border of a Strata Star Quilt – Pattern should ideally complement the movement of the star. A simple, solid border allows the complex strata to be the focus, while a “pieced border” using leftover scraps from the strip sets can create a “framed” look. Many quilters choose to add a thin inner border (a “stop border”) in a dark color to define the edges of the star before adding a wider, decorative outer border. This border layering adds a level of sophistication to the finished Strata Star Quilt – Pattern.
When it comes to the actual quilting of the Strata Star Quilt – Pattern, the “quilt-as-desired” instruction can be daunting. For a modern look, straight-line quilting that echoes the angles of the star is very effective. It reinforces the geometric nature of the design and adds a sense of “speed” and directionality. This linear quilting style is also very beginner-friendly if you are quilting on a domestic sewing machine using a walking foot.
If you prefer a more decorative approach, “free-motion quilting” (FMQ) can add a beautiful contrast to the sharp lines of the Strata Star Quilt – Pattern. Swirls, feathers, or pebbles in the background negative space can make the star appear to be “floating” on a cloud of texture. This texture-contrast quilting is a hallmark of award-winning show quilts and can turn a simple Strata Star Quilt – Pattern into a museum-quality piece of art.
Thread choice for the quilting phase is a significant decision. A monofilament thread can be used to “stitch in the ditch” for invisible support, while a variegated thread that matches the colors of your strata can add an extra layer of visual interest. For the Strata Star Quilt – Pattern, many people choose a high-sheen trilobal polyester thread to enhance the glowing effect of the fabric layers, making the star truly shimmer under the lights.
Don’t forget the importance of the quilt backing. Since the Strata Star Quilt – Pattern is often a labor of love, choosing a high-quality “wide-back” fabric or a soft “minky” can make the quilt even more functional and cozy. If you have leftover diamonds or strip sets, you can incorporate them into the backing to create a “reversible” quilt. This pieced-back technique is a great way to use up every last scrap of your precious Strata Star Quilt – Pattern materials.
Finally, the binding is the “frame” for your masterpiece. A diagonal striped binding (bias binding) looks incredible on a Strata Star Quilt – Pattern because the stripes echo the movement of the star’s rays. Whether you choose a traditional double-fold binding or a modern “faced binding” for a seamless edge, the goal is to provide a durable finish that protects the edges of your Strata Star Quilt – Pattern for generations of use and enjoyment.
Is the Strata Star Quilt – Pattern suitable for beginners?
It is generally considered an intermediate-level pattern. While the strip-piecing technique is easy, the precision required for matching the diamond points and handling bias edges can be challenging for a brand-new quilter. However, a determined beginner with a good quilting ruler and patience can certainly succeed!
What is the best fabric for the strata effect?
High-contrast batiks or solids work best. You want fabrics that have a clear “value” difference so that the layers of the strata don’t blend together. Avoid large, busy floral prints for the star itself, as they can break up the visual lines of the Strata Star Quilt – Pattern.
How much fabric do I need for a throw-sized star?
Typically, you will need about 2 to 3 yards of background fabric and approximately 10 to 12 different fabrics (about 1/4 yard each) for the strata. Always check the specific quilt pattern requirements for the size you intend to make, as star quilts can be “fabric-hungry” due to the cutting angles.
Can I make this quilt without a specialty ruler?
Yes, but it is much harder. A 60-degree or 45-degree quilting ruler makes the process of cutting the parallelograms significantly more accurate. If you don’t have one, you can use the angle lines on your cutting mat, but a ruler is a much more reliable tool for a Strata Star Quilt – Pattern.
How do I prevent the center from being too thick to sew?
The best way is to press your seams open and “swirl” the center junction. If it’s still too thick, you can gently tap the center point with a rubber mallet to compress the fibers before sewing the final seams. This is a common trick used for heavy-duty quilting projects.
Why is my star “puckering” in the middle?
Puckering usually happens if the setting triangles or background squares were stretched during the sewing process. Because the star is made of bias edges, it’s very easy to “ease” too much fabric into the seams. Using fabric starch and a lot of pins is the best way to keep the Strata Star Quilt – Pattern flat and square.
The Strata Star Quilt – Pattern is a magnificent exploration of color, value, and geometric precision. In this article, we’ve covered the essential foundations, from the importance of selecting a graduated range of quilting cottons to the technical efficiency of the strip-piecing method.
We explored how to maintain sharp points through scant 1/4 inch seams and the crucial role of “swirling” center seams to ensure a flat, professional finish. We also discussed the artistic side of the Strata Star Quilt – Pattern, including how to use negative space and linear quilting to enhance the radiant effect of the star. By combining these technical skills with your own unique color vision, you can create a handmade star quilt that is not only a functional blanket but a stunning work of celestial art.


