
Horizontal Row Quilt - Pattern

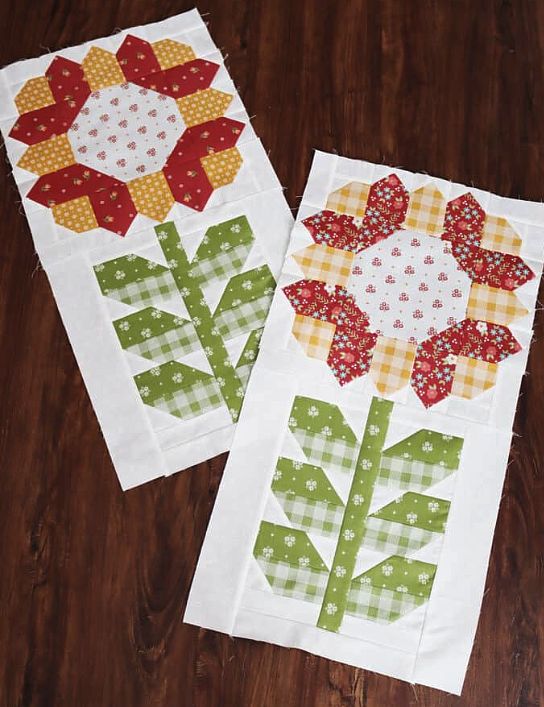
Creating beautiful and vibrant quilt blocks has long been a beloved pastime for crafters, and nothing quite captures the charm of nature like the Sunflower Blocks – Pattern. This cheerful motif brings the warmth and color of summer into your quilting projects, making it perfect for both beginners and experienced quilters. Whether you’re designing a full quilt or adding a decorative touch to a pillow or table runner, sunflower blocks are always a stunning choice.
The Sunflower Blocks – Pattern is a versatile quilting design that combines both traditional techniques and modern aesthetics. With their radiant petals and sunny centers, these blocks bring a sense of joy and personality to any handmade creation. Best of all, they can be made using fabric scraps, fat quarters, or your favorite prints—offering you limitless possibilities for customization.
In this tutorial, you’ll learn how to create your own sunflower blocks from start to finish. We’ll cover what materials you’ll need, walk through the construction steps, offer customization ideas, and show you how to incorporate your blocks into larger projects. Whether you’re quilting for yourself or crafting a gift, mastering the Sunflower Blocks – Pattern will add a delightful new skill to your sewing repertoire.
To begin your journey with the Sunflower Blocks – Pattern, you’ll need a few essential materials. Fortunately, these blocks don’t require expensive supplies, and many items can be found in your existing sewing stash.
Start by choosing fabrics for your petals, center, and background. Yellows, golds, and oranges work beautifully for petals, while rich browns or dark greys make great centers. For the background, opt for soft blues, creams, or greens to make your sunflower pop.
You’ll need a rotary cutter, self-healing cutting mat, and quilting ruler to ensure accurate fabric cuts. Accuracy is key when working with quilt blocks to make sure everything aligns properly.
A sewing machine with a quarter-inch foot will help maintain consistent seam allowances. However, if you prefer hand-sewing, that’s entirely possible too—it just requires a bit more time and patience.
You’ll also need high-quality cotton thread, a steam iron, and pins or fabric clips. Pressing your seams as you go is crucial for a neat, flat finish.
Finally, it’s helpful to use a printed or digital copy of your chosen Sunflower Blocks – Pattern. Some patterns are simple square and triangle assemblies, while others may use curved piecing or appliqué, depending on your skill level.
Once your materials are ready, it’s time to dive into the heart of the Sunflower Blocks – Pattern. The process may look complex at first, but it’s all about breaking it down into manageable steps.
Begin by cutting your fabric pieces according to your pattern. Most sunflower blocks use a combination of half-square triangles (HSTs), flying geese units, or petal shapes. Accurate cutting makes assembly much smoother.
Sew your petals first. These may be triangles or elongated shapes, depending on your chosen Sunflower Blocks – Pattern. Arrange them in a circular or radiating layout around the sunflower center, ensuring symmetry.
Next, assemble the center of the sunflower. This is typically a circle or square and can be appliquéd or pieced into the center of your block. Using fusible web can help secure appliqué shapes before stitching them down.
Join the petal units to the center, checking alignment as you go. Use pins generously and press your seams carefully to reduce bulk and distortion.
Now add the background pieces. These frame your sunflower and give it that block shape we’re aiming for. This might include squares or rectangles in the corners or sides, depending on your block size.
Finally, square up your block to ensure clean edges and accurate dimensions. A squared block will be much easier to join with others if you’re creating a full quilt or larger project.
The great thing about the Sunflower Blocks – Pattern is that it’s incredibly customizable. From fabric choices to design alterations, there are many ways to make each block your own.
Start with color variations. While sunflowers are traditionally yellow, feel free to play with reds, purples, or even multicolor petals. This creative twist can add vibrancy and uniqueness to your quilt.
Use different textures or fabric types. Try mixing cotton with linen or batik prints to give your sunflowers depth and interest. Just be sure the fabrics are of similar weight for easier sewing.
Change the block size. You can scale the Sunflower Blocks – Pattern up for a statement pillow or down for a mini quilt. Just remember to adjust the measurements of each piece accordingly.
Add embroidered details to enhance your blocks. A few stitched lines on the petals or a spiral design in the center can give the sunflower a realistic touch and a handmade feel.
Incorporate sashing or borders between your blocks to add dimension. A green border can mimic leaves or vines and give your quilt a natural flow.
Don’t forget to sign your work. A small stitched name or date in the corner adds a personal touch, especially if you’re gifting or displaying your finished quilt.
Once you’ve completed your Sunflower Blocks – Pattern, you might wonder what to do with them. Thankfully, the possibilities are endless, from practical home décor to heartfelt gifts.
One popular option is to create a full sunflower quilt. Combine multiple blocks with alternating colors or identical designs for a cohesive and cheerful bedspread or throw.
Make a sunflower wall hanging. Use a single or a few blocks and frame them with borders to create a beautiful seasonal decoration for your home or sewing room.
Create a set of sunflower-themed pillows. One block per pillow makes a stunning addition to any couch or chair, especially during spring and summer.
Use your sunflower blocks for table runners or placemats. These smaller projects are quick to finish and perfect for practicing your piecing and quilting skills.
If you’re into bag-making, consider incorporating a sunflower block into the front panel of a tote bag. It’s a creative way to show off your skills and carry sunshine wherever you go.
Lastly, consider making a baby quilt with soft pastel sunflower blocks. These gentle colors and cheerful design make for a sweet and soothing baby gift.
Q1: Is the Sunflower Blocks – Pattern suitable for beginners?
Yes, many sunflower block patterns are beginner-friendly, especially those using simple square and triangle piecing methods. More advanced versions may involve curved seams or appliqué.
Q2: What is the standard size of a sunflower quilt block?
Sunflower blocks typically range from 10 to 16 inches square, but you can resize them to fit your project. Just remember to adjust your cutting measurements accordingly.
Q3: Can I use fabric scraps to make sunflower blocks?
Absolutely! The Sunflower Blocks – Pattern is perfect for scrap quilting. Petals and centers can be made from leftover pieces, making this both economical and eco-friendly.
Q4: How do I get the petals to look even and symmetrical?
Precision in cutting and consistent seam allowances are key. Using a template or rotary ruler can help ensure each petal is the same size and shape.
Q5: Should I quilt before or after assembling multiple blocks?
That depends on your method. If you’re doing traditional quilting, assemble all your blocks first. For quilt-as-you-go techniques, you can quilt each block individually before joining them.
Q6: Can I sell items made from a sunflower block pattern?
Yes, generally, you can sell handmade items using a pattern unless the designer specifies otherwise. Always credit the pattern source when possible and follow any licensing terms.
The Sunflower Blocks – Pattern is a joyful and versatile quilting project that allows you to bring a touch of nature into your creative work. You’ve learned how to gather your materials, piece together the sunflower design, customize your blocks, and incorporate them into beautiful projects. Whether you’re making a quilt, pillow, wall hanging, or gift, these sunflower blocks offer unlimited possibilities.
If this tutorial helped or inspired you, we’d love to hear from you! Please leave your honest opinion in the comments, and feel free to share any suggestions or questions. Happy quilting, and may your next project bloom with creativity and color!


